
Amazon Web Services (aws)
This study guide is a collection of my notes in preparation for the AWS Certified Developer – Associate certification.
AWS Fundamentals (IAM + EC2)
AWS Regions
- AWS has Regions (cluster of data centers) all around the world
- Example region names:
us-east-1,us-east-2,eu-west-3, etc… - Most AWS services are region-scoped (e.g., EC2). In other words, if, for example, you use a service in region
us-east-1(N. Virginia) your data will not be replicated or synchronized to other regions (e.g.,us-east-2, etc..), so you would have to re-create your infrastructure - Some AWS services are global services. This means they are not linked to any particular region (e.g., Identity and Access Management or IAM)
AWS Availability Zones (AZs)
- Each region has many availability zones (usually
3per region, min is2, max is6) - For example, AWS Region
ap-southeast-2(i.e., Sydney region) has 3 availability zones:ap-southeast-2a,ap-southeast-2b, andap-southeast-2c - Each AZ consists of one or more discrete data centers with redundant power, networking, and connectivity
- AZs are geographically separated from each other so that they are isolated from disasters
- AZs are connected to each other with high bandwidth, ultra-low latency networking
Note: regions end with a number and AZs end with a letter
Identity and Access Management (IAM) Introduction
API calls are the heart of the AWS Cloud, as every interaction with AWS is an API call to some service.
Because security is a top priority for all applications, making calls to AWS requires API keys. We can create our own API keys by using AWS Identity and Access Management (IAM).
- IAM enables creation and management of the following AWS security principles:
- Users
- Groups
- Roles
- Root account should only be used once (when account is created for the first time). Otherwise, it should never be used and shared since it has access to everything
- Users must be created with proper permissions
- IAM is the center of AWS
- Policies are written in JSON
At a high level, IAM has:
- Users: usually a person (e.g., a developer) that needs access to certain AWS services. This person will get an account in IAM (which is not the root account)
- Groups: contains users that are grouped together. For example, groups can be established by function (e.g., admin, devops, etc..) and teams (engineering, design, etc..). This allows permissions to be applied to groups and for users to inherit these permissions when they are added to a group
- Roles: for internal usage within the AWS resources and services. Roles is what is given to machines to define access
- Policies: JSON documents which define what Users, Groups, and Roles can and cannot do
Important distinction: Users is for physical people and Roles are for machines
- IAM has a global view. In other words, when you create a User, Group, or Role in your AWS account it will be accross all regions
- Permissions are governed by Policies (JSON)
- MFA (Multi Factor Authentication) can be setup
- IAM has predefined “managed policies” (these are common policies that Amazon has already put together so we don’t have to re-write them)
- It’s best to give users the minimal amount of permissions they need to perform their job (least privilege principles)
- Big enterprises usually integrate their own repository of users (e.g., Microsoft Active Directory) with IAM. Doing this allows users to login to AWS using their company credentials
- Identity Federation uses the SAML standard (e.g., Microsoft Active Directory is one of the big users of the SAML standard)
IAM takeaway:
- One IAM User per physical person
- One IAM Role per application
- IAM credentials should never be shared
- Never write IAM credentials in code
- Never use the root account except for initial setup
- Security is important! AWS can cost a lot of money if you or someone else misuses it
Amazon Elastic Compute Cloud (EC2) Introduction
- EC2 is one of the most popular AWS offerings
- Using EC2 users can:
- Rent virtual machines (EC2)
- Store data on virtual drives (EBS)
- Distribute load across machines (ELB)
- Scaling the services using an auto-scaling group (ASG)
Creating an EC2 instance
Step 1: Select an instance type
The EC2 Instance Type determines the hardware of the host computer used for your instance. Each instance type offers different compute and memory capabilities
Step 2: Select an Amazon Machine Image (AMI) for your instance
The AMI is a template that contains a software configuration (for example, an operating system, an application server, and applications). From an AMI, you launch an instance, which is a copy of the AMI running as a virtual server in the cloud
Step 3: Add Storage
The root device for your instance contains the image used to boot the instance. The root device is either an Amazon Elastic Block Store (Amazon EBS) volume or an instance store volume.
Your instance may include local storage volumes, known as instance store volumes, which you can configure at launch time with block device mapping. After these volumes have been added to and mapped on your instance, they are available for you to mount and use. If your instance fails, or if your instance is stopped or terminated, the data on these volumes is lost; therefore, these volumes are best used for temporary (ephemeral) data. To keep important data safe, you should use a replication strategy across multiple instances, or store your persistent data in Amazon S3 or Amazon EBS volumes.
Step 4: Add Tags (Optional)
Tags can be used to describe or group instances
Step 5: Configure Security Group
Use Security Groups to restrict access by only allowing trusted hosts or networks to access ports on your instance. For example, you can restrict SSH access by restricting incoming traffic on port 22.
To access your EC2 instance via SSH, you will need a key pair. The key is generated once during instance creation and cannot be recovered.
Before SSHing into your instance you will need to set appropriate permissions on the key using:
chmod 400 EC2Tutorial.pem
Where “EC2Tutorial.pem” would be replaced by the name of your key file.
As a side note, chmod 400 sets permissions so that, (U)ser / owner can read, can’t write and can’t execute. (G)roup can’t read, can’t write and can’t execute. (O)thers can’t read, can’t write and can’t execute (reference).
If you skip this step you won’t be able to SSH into your instance and will get the error:
1
2
3
4
5
6
7
8
  @@@@@@@@@@@@@@@@@@@@@@@@@@@@@@@@@@@@@@@@@@@@@@@@@@@@@@@@@@@
  @         WARNING: UNPROTECTED PRIVATE KEY FILE!          @
  @@@@@@@@@@@@@@@@@@@@@@@@@@@@@@@@@@@@@@@@@@@@@@@@@@@@@@@@@@@
  Permissions 0644 for 'EC2tutorial.pem' are too open.
  It is required that your private key files are NOT accessible by others.
  This private key will be ignored.
  Load key "EC2tutorial.pem": bad permissions
  ec2-user@54.172.238.16: Permission denied (publickey,gssapi-keyex,gssapi-with-mic).
And, finally, to SSH: ssh -i EC2tutorial.pem <hostname>@<your-instance-public-ip-address>
For example: ssh -i EC2tutorial.pem ec2-user@54.132.218.27
EC2 Security Best Practices
- Use AWS Identity and Access Management (IAM) to control access to your AWS resources, including your instances. You can create IAM users and groups under your AWS account, assign security credentials to each, and control the access that each has to resources and services in AWS
- Restrict access by only allowing trusted hosts or networks to access ports on your instance. For example, you can restrict SSH access by restricting incoming traffic on port 22. For more information, see Amazon EC2 security groups for Linux instances.
- Review the rules in your security groups regularly, and ensure that you apply the principle of least privilege—only open up permissions that you require. You can also create different security groups to deal with instances that have different security requirements. Consider creating a bastion security group that allows external logins, and keep the remainder of your instances in a group that does not allow external logins.
- Disable password-based logins for instances launched from your AMI. Passwords can be found or cracked, and are a security risk. For more information, see Disable password-based remote logins for root. For more information about sharing AMIs safely, see Shared AMIs.
Introduction to Security Groups
Security Groups are fundamental to network security in AWS. In essencse, they act as a “firewall” and, thus, control what traffic is allowed in or out of our EC2 machines. They regulate:
- Access to ports
- Authorized IP ranges (IPv4 and IPv6)
- Control on ingress network traffic (from other to instance)
- Control of egress network traffic (from instance to other)

Security Groups Good to Know:
- Can be attached to multiple instances
- Locked down to a region / VPC combination (so if you switch to another region or create another VPC you have to re-create the security groups)
- Lives outside the EC2 instance, it is not an appliction running on your instance, so, if traffic is blocked, then EC2 instance won’t see it
- It is good to maintain one security group for SSH access
- If application is not accessible (time out), then it is a security group issue
- If application gives a “connection refused” error, then it’s an application error or it hasn’t been launched
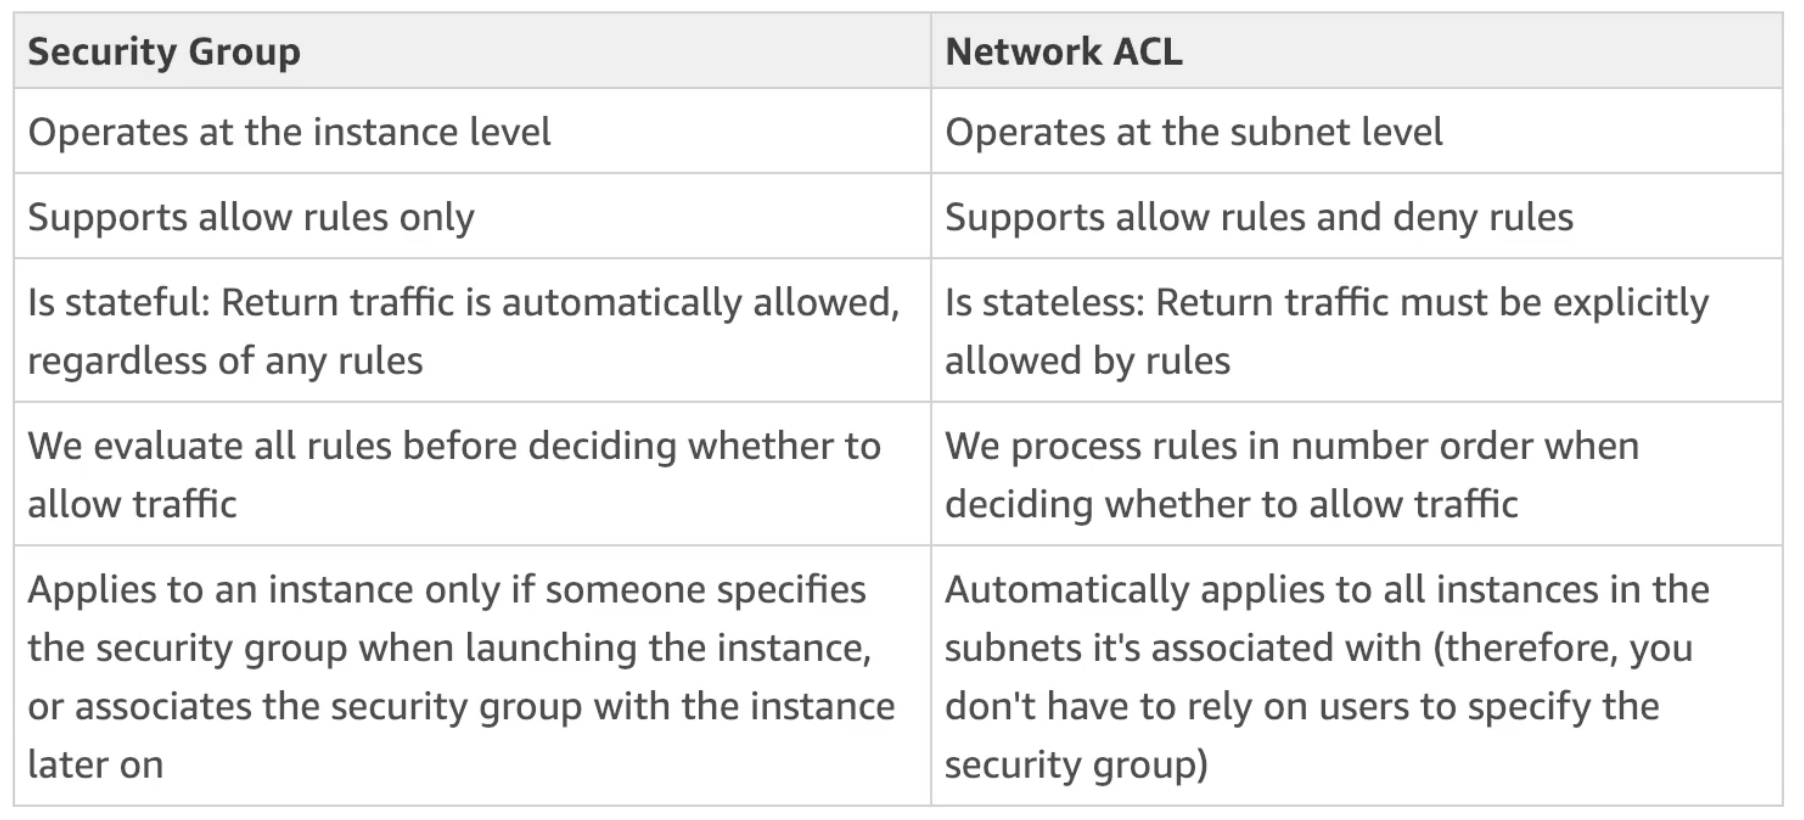
- Operate at instance level
- Allow or deny traffic that a NACL allows in
- Are implicit deny – you can only add “allow” rules
- By default, all inbound traffic is denied, and all outbound traffic is allowed
- Are stateful – response traffic is automatically allowed
- For example, if inbound allows TCP port
80(HTTP) but denies all outbound traffic and we get a request from the outside to port80, a response will still be sent (even though Security Group says all outbound traffic is denied). This is because, by default, all response traffic is automatically allowed. However, we would not be able to initiate a request to the outside world from within the instance since per the Security Group all outbound traffic is denied (reference)
- For example, if inbound allows TCP port

We can also reference other security groups within a security group to define allowed inbound and outbound network traffic.
For example, in the figure below EC2 instance on left has Security Group 1 attached for defining inbound network. This group allows inbound network from group 1 and 2 but not 3. This makes management easier as we no longer have to think about IPs:

Private vs Public IP (IPv4)
- Networking has two sorts of IPs: IPv4 and IPv6
- IPv6 is newer and introduces a greater IP range
- Today, IPv4 is still most common
- IPv4 allows for 3.7 billion different addresses in the public space
- IPv4 format:
[0-255].[0-255].[0-255].[0-255] - Public IP:
- The machine can be uniquely identified on the internet (two machines cannot have the same public IP)
- Private IP:
- Using the private IP, the machine can only be identified on the private network that its on
- The IP of the machine must be unique across the private network that its on
- Machines connect to the WWW using NAT + internet gateway (proxy)
- Only a specified range of IPs can be used as private IPs
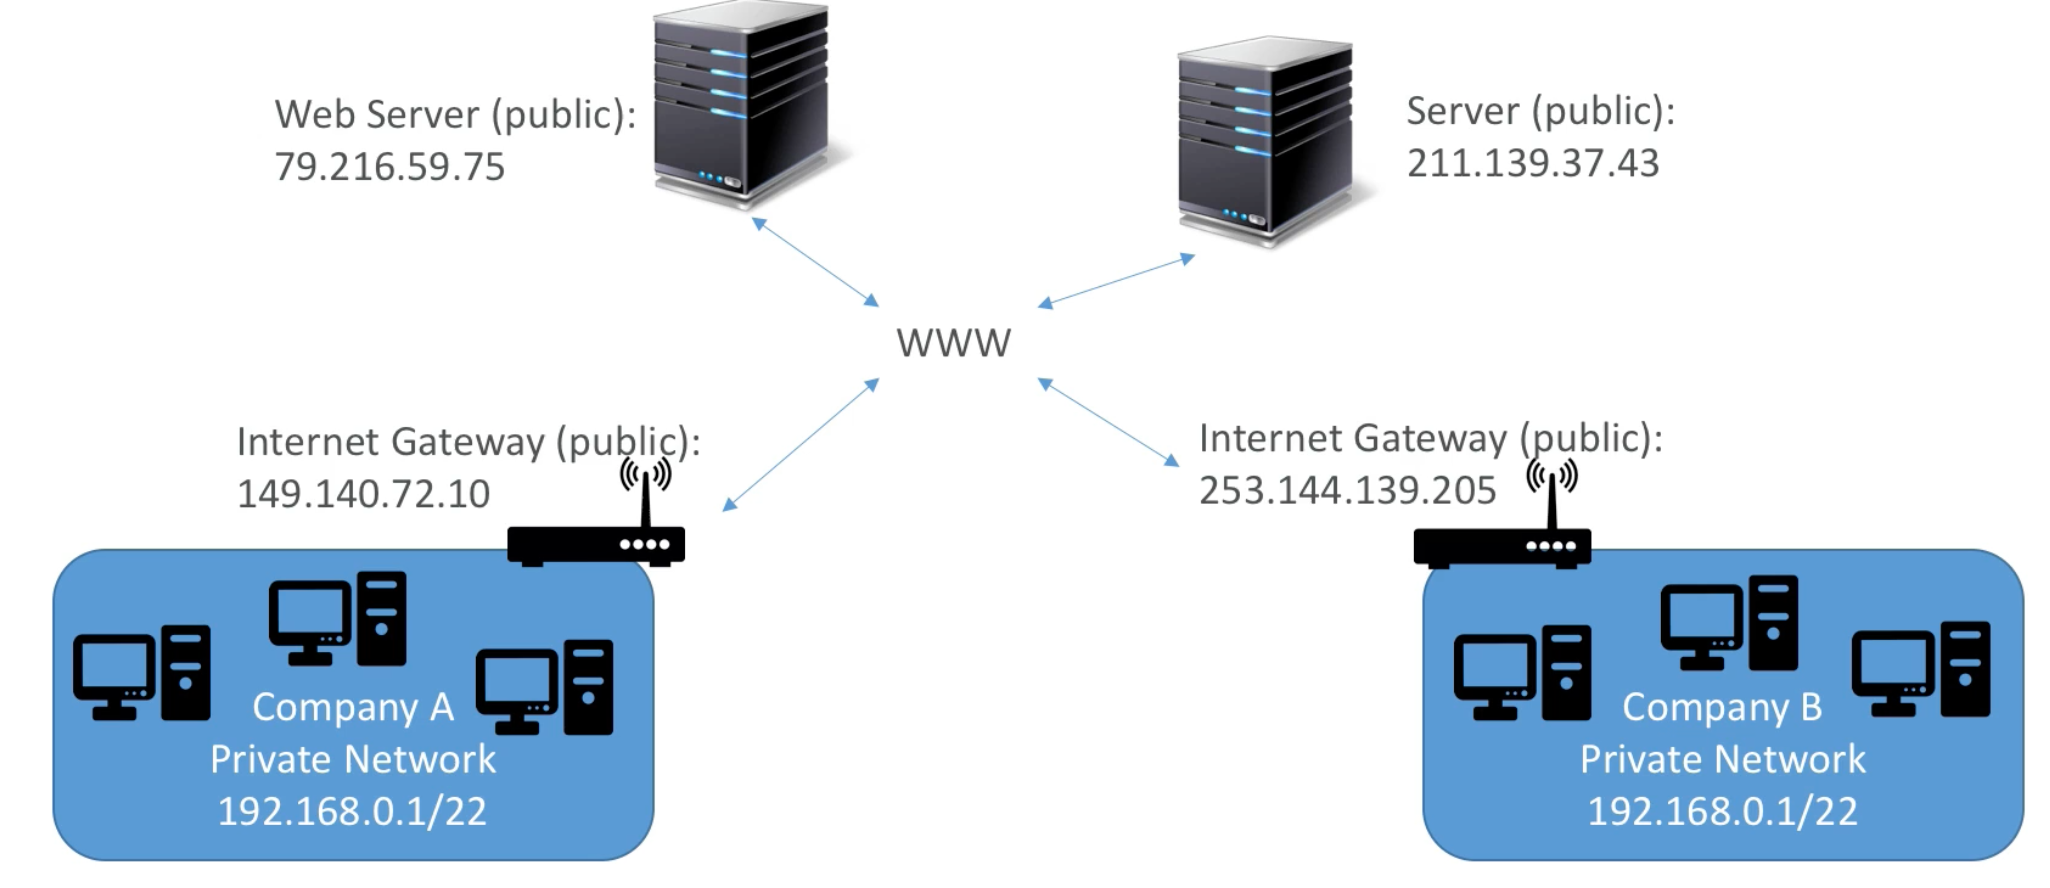
Things to note:
- When you stop and then start an EC2 instance public IP will change and private IP will remain as is
- By default, an EC2 instance comes with a private IP for the internal AWS network and a public IP for the WWW
- When SSHing into our EC2 machines, we can’t use the private IP because we are not in the same network
AWS Elastic IP
- If you need to have a fixed public IP for your instance, you need an Elastic IP
- An Elastic IP is a public IPv4 IP you own as long as you don’t delete it
- You only pay for an Elastic IP when it is not associated with an EC2 instance
- You can only have
5Elastic IP in your account (you can ask AWS to increase that) - Overall, try to avoid using Elastic IPs – they often reflect poor architectural decisions. Instead it is recommended to:
- Use a random public IP and register a DNS name to, or
- Use a load balancer and don’t use a public IP
- To use the Elastic IP with your EC2 instance, you have to create an association between the instance and the Elastic IP
Install Apache on EC2
In this example we will install an Apache HTTP Server (httpd) on an EC2 instance to host a basic web application.
The Apache HTTP Server, colloquially called Apache, is a free and open-source cross-platform web server software.
httpd is the Apache HyperText Transfer Protocol (HTTP) server program. It is designed to be run as a standalone daemon process. When used like this it will create a pool of child processes or threads to handle requests.
We will also use The Yellowdog Updater, Modified (a free and open-source command-line package-management utility for computers running the Linux operating system using the RPM Package Manager), also know as yum, to update all instance packages (OS: Amazon Linux 2).
Steps:
- Create an EC2 instace (select Amazon Linux 2 AMI)
- Configure instance Security Group to allow inbound SSH (TCP port
22) and HTTP (TCP port80) traffic - Create a new SSH key or use an existing one (Note: this is required to be able to get terminal access to instance)
- SSH into instance using `ssh -i
.pem ec2-user@ - Run
sudo susudois a program for Unix-like computer operating systems that allows users to run programs with the security privileges of another usersuis used to switch to another user (s witch u ser)sudo sucommand switches to the super user – or root user – when you execute it with no additional options
- Run
yum update -yto update all system packages - Run
yum install -y httpd.x86_64to installhttpd - Run
systemctl start httpd.serviceto start thehttpdservice (listening on port80) - Run
systemctl enable httpd.serviceto make sure service is enabled across reboots - Run
curl localhost:80to see the webpage that will be served - To access website via browser, visit the EC2 instance using its public IP
- Note: if you restart the EC2 instance, the public IP will change (unless you associate an Elastic IP with the instance – in which case the public IP will not change)
- Run
echo "<h1>Hello World from Nuuk! (Internal DNS: <span style="color:red">$(hostname -f))</span></h1>" > /var/www/html/index.htmlto change from defaulthttpdpage
What is systemctl?
systemctlis a controlling interface and inspection tool for the widely-adopted init system and service managersystemdsystemdis a suite of basic building blocks for a Linux system. It provides a system and service manager that runs asPID 1and starts the rest of the system
systemctl references:
- https://www.digitalocean.com/community/tutorials/how-to-use-systemctl-to-manage-systemd-services-and-units
- https://www.linode.com/docs/guides/introduction-to-systemctl/
- https://wiki.archlinux.org/index.php/systemd
EC2 User Data
- It is possible to bootstrap our EC2 instance using a User Data script
- Bootstraping means launching commands when a machine starts
- The script is only run once at instance start
- EC2 user data is often used to automate boot tasks such as:
- Installing updates
- Installing software
- Downloading common files from the internet
- The EC2 User Data Script runs with the root user
User Data script to automate Apache httpd installation from the example above:
1
2
3
4
5
6
  #!/bin/bash
  yum update -y
  yum install -y httpd.x86_64
  systemctl start httpd.service
  systemctl enable httpd.service
  echo "<h1>Hello World from Nuuk! (Internal DNS: <span style="color:red">$(hostname -f)</span>)</h1>" > /var/www/html/index.html
A note on why you need #!/bin/bash:
- It’s a convention so the *nix shell knows what kind of interpreter to run.
- The shebang
#!, when it is the first two bytes of an executable (xmode) file, is interpreted by theexecve(2)system call (which executes programs). As such,#!must be followed by a file path of an interpreter executable. Thus: we have#!/bin/bash
EC2 Instance Launch Types
- On Demand Instances: short workload, predictable pricing
- Reserved: (MINIMUM one year)
- Reserved Instances: long workloads
- Convertible Reserved Instances: long workloads with flexible instances
- Scheduled Reserved Instances: example – every Thursday between
3PM and6PM
- Spot Instances: short workloads, much cheaper price, but can loose instance if spot price goes above your max bid (thus, less reliable)
- Dedicated Instances: Your instance runs on some dedicated hardware, but it is not lockdown to you. If you stop/start instance, you can get some other hardware somewhere else. Basically, the hardware is “yours” (you are not sharing it with others) for the time your instance is running. You stop/start it, you may get different physical machine later on (maybe older, maybe newer, maybe its specs will be a bit different), and so on. So your instance is moved around on different physical servers - whichever is not occupied by others at the time
- Dedicated Hosts: unlike dedicated instances, with dedicated host, the physical server is basically yours. It does not change, it’s always the same physical machine for as long as you are paying
EC2 On Demand
- Pay for what you use (billing per second – after the first minute)
- Has the highest cost, but no upfront payment
- No long term commitment
- Recommended for short-term and un-interrupted workloads where you can’t predict how the application will behave
EC2 Reserved Instances
- Up to 75% discount compared to On Demand
- Pay up front for what you use with long term commitment
- Reservation period can be
1or3years - Reserve a specific instance type
- Recommended for steady state usage applications (e.g., database)
- Convertible Reserved Instance:
- Convertible RIs can be exchanged for different Convertible RIs of equal or greater value
- Can change the EC2 instance type
- Up to 54% discount
- Scheduled Reserved Instances:
- Launch within the time window you reserve
- Use when you require a fraction of day / week / month
- When you purchase a Reserved Instance, you determine the scope of the Reserved Instance. The scope is either regional or zonal
- Regional: When you purchase a Reserved Instance for a Region, it’s referred to as a regional Reserved Instance
- Zonal: When you purchase a Reserved Instance for a specific Availability Zone, it’s referred to as a zonal Reserved Instance
- Reference
EC2 Spot Instance
- Can get a discount of up to 90% compared to On Demand
- You may loose instance at any point if your max price is less than the current spot price (bidding approach)
- The MOST cost efficient instances in AWS
- Useful for workloads that are resilient to failure:
- Batch jobs
- Data analysis
- Image processing
- Not good for mission critical jobs or databases
- Great combinatin: reserved instances for baseline needs + On Demand & Spot instances to handle peak times
EC2 Dedicated Instances
- Instances running on hardware that is dedicated to you
- May share hardware with other instances in same account
- No control over instance placement (can move hardware after Stop / Start)
EC2 Dedicated Hosts
- Physical dedicated EC2 server for your use
- Full control of EC2 instance placement
- Visibility into the underlying sockets / physical cores of the hardware
- Allocated to your account for a
3year period reservation - More expensive
- Useful for software that have complicated licensing model

EC2 Elastic Network Interfaces
- Logical component in a VPC that represents a virtual network card
- The ENI can have the following attributes:
- Primary private IPv4, one or more secondary IPv4
- One Elastic IP (IPv4) per private IPv4
- One public IPv4
- One or more security groups
- A MAC address
- You can create ENI independendtly and attach them on the fly on EC2 for failover
- Bound to a specific availability zone (AZ)

EC2 Good to Know and Checklist
Pricing
- EC2 instance price (per hour) varies based on these parameters:
- Region
- Instance type
- On Demand vs Spot vs Reserved vs Dedicated Host
- Linux vs Windows vs Private OS
- You are billed by the second, with a minimum of
60seconds - You also pay for other factors such as storage, data transfer, fixed IP public addresses, load balancing
Amazon Machine Image (AMI)
- AWS comes with base images that you can use to create your EC2 instance
- Ubuntu
- RedHat
- Windows
- These images can be customized at runtime using EC2 User Data
- Alternatively, we can create our own AMI that is ready to go without needing to run User Data script on start
- Building your own AMI has some advantages:
- Pre-install packages
- Faster boot time (no need for long EC2 User Data at boot time)
- Machine comes configured with monitoring / enterprise software
- Control of maintenance and updates of AMI over time
- Note: AMIs are built for a specific AWS region
EC2 Instance Characteristics Overview
- Instances have
5distinct characteristics:- RAM (type, amount, generation)
- CPU (type, make, frequency, generation, number of cores)
- I/O (disk performance, EBS optimizations)
- Network (network bandwidth, network latency)
- Graphical Processing Unit (GPU)
- R/C/P/G/H/X/I/F/Z/CR are specialized in RAM, CPU, I/O, Network, GPU
- M instance types are balanced
- T2/T3 instances are “burstable”
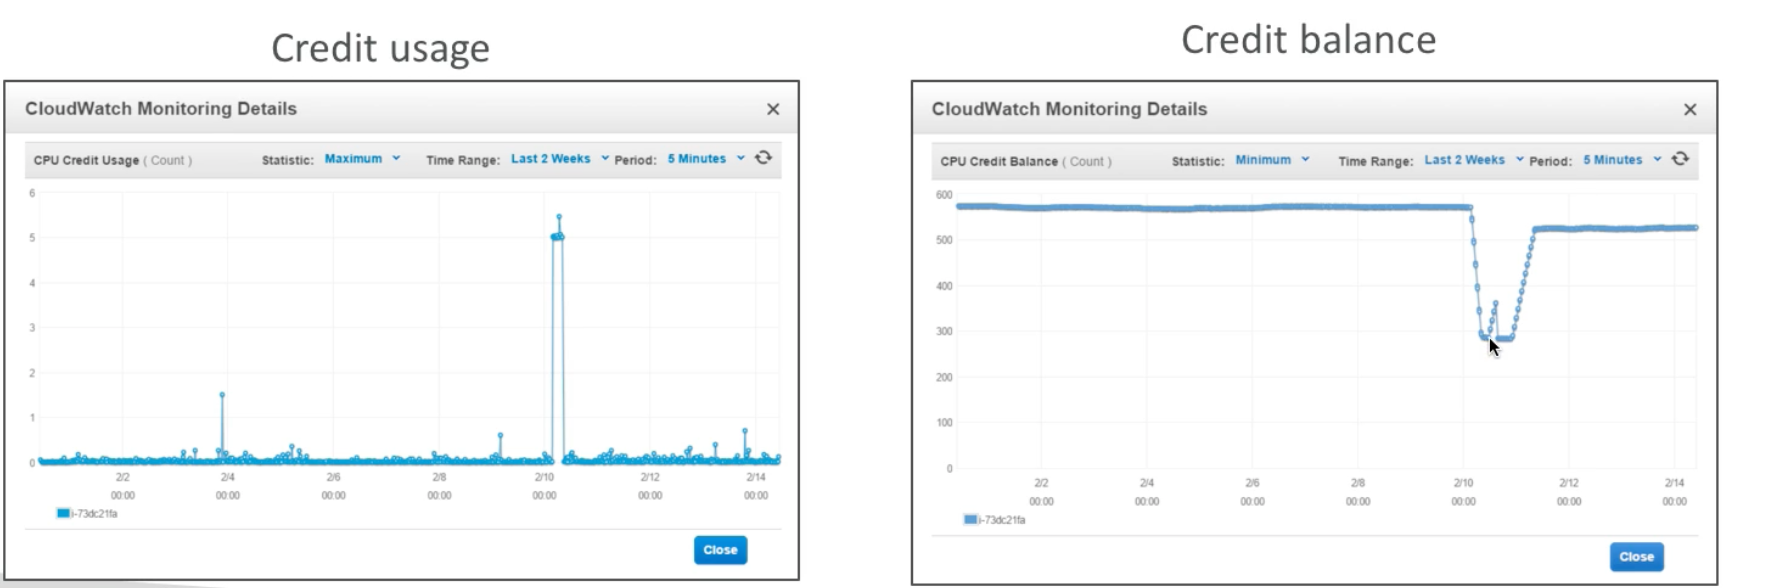
Burstable Instances (T2)
- Burst means that overall, the instance has OK CPU performance
- When the machine needs to process something unexpected (a spike in load for example), it can burst, and CPU can be VERY good
- If the machine bursts it utilizes “burst credit”
- If all the credits are gone, the CPU becomes BAD
- If machine stops bursting, credits are accumulated over time
- Burstable instances can be amazing to handle unexpected traffic, but if your instance consistently runs on low credit, you need to move to a different kind of non-burstable instance
- Note: it is possible to have an “unlimited burst credit balance” – you pay extra money (can get very expensive), but you don’t loose in performance
AWS Elastic Load Balancer (ELB) + Auto Scaling Group (ASG)
Scalability & High Availability
- Scalability means that an application / system can handle greater loads by adapting
- There are two types of scaling:
- Vertical, and
- Horizontal (a.k.a., elasticity)
Vertical Scalability
- Vertical Scalability means increasing the hardware capabilities of the instance (scale up / scale down)
- From:
t2.nano- 0.5G of RAM, 1 vCPU - To:
u-12tb1.metal- 12.3TB RAM, 448 vCPU
- From:
- For example, if your application is currently running on a
t2.microinstance type, then scaling vertically could mean changing it to at2.largeinstead - Vertical scaling is common for non distributed systems like databases
- RDS, ElasticCache are services that can scale vertically
- There is a hardware limit to how much you can scale vertically
Horizontal Scaling
- Horizontal scaling means increasing the number of instances (scale out / scale in)
- Auto Scaling Group (ASG)
- Load Balancer
- Horizontal scaling implies distributed systems (e.g., Kafka, BitTorrent)
High Availability
- High Availability goes hand in hand with horizontal scaling
- Auto Scaling Group multi AZ
- Load Balancer multi AZ
- High Availability is used to guarantee fault tolerance – the property that enables a system to continue operating properly in the event of the failure of some of its components
- To make our application highly available, we could run it in two Availability Zones. In this case, if one data center is compromized (e.g., natural disaster), then our application will continue to function as usual out of the second Availability Zone (data center)
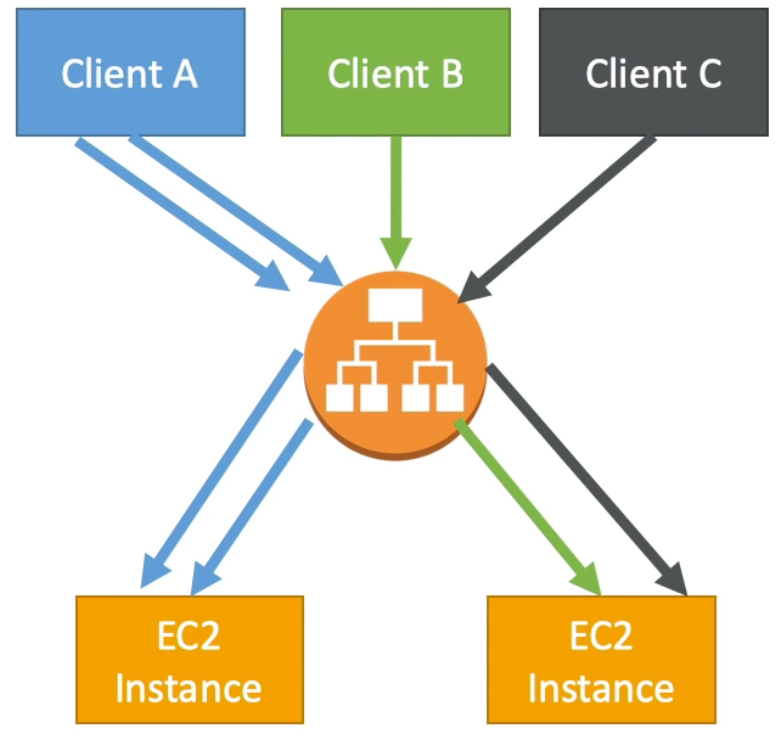
Load Balancing
Load balancers are servers that forward traffic to multiple downstream servers. The idea is to spread the work.
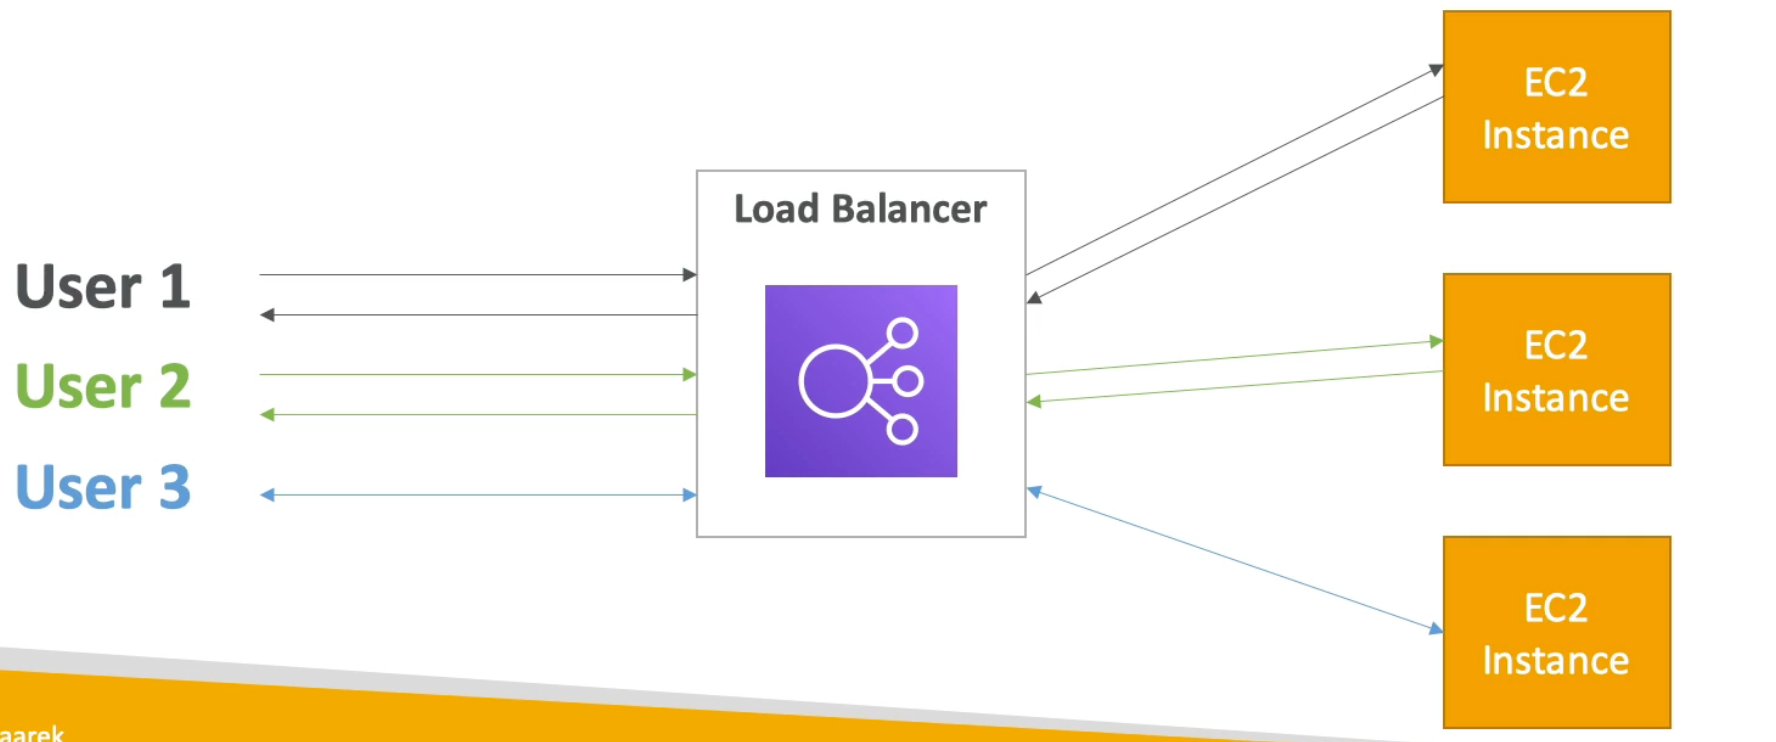
Why use a Load Balancer?
- Spread load across multiple downstream instances
- Expose a single point of access (DNS) to your application
- Seamlessly handle failures of downstream instances
- Do regular health checks to your instances
- Provide SSL termination (HTTPS) for your websites
- Enforce stickiness with cookies
- High availability across zones
- Separate public traffic from private traffic
Why use an EC2 Load Balancer?
- An ELB (EC2 Load Balancer) is a managed load balancer
- AWS guarantees that it will be working
- AWS takes care of upgrades, maintenance, high availability
- AWS provides only a few configuration knobs
- It costs less to setup your own load balancer, but it will cost more in maintenance and effort on your end
- It is integrated with many AWS offerings / services
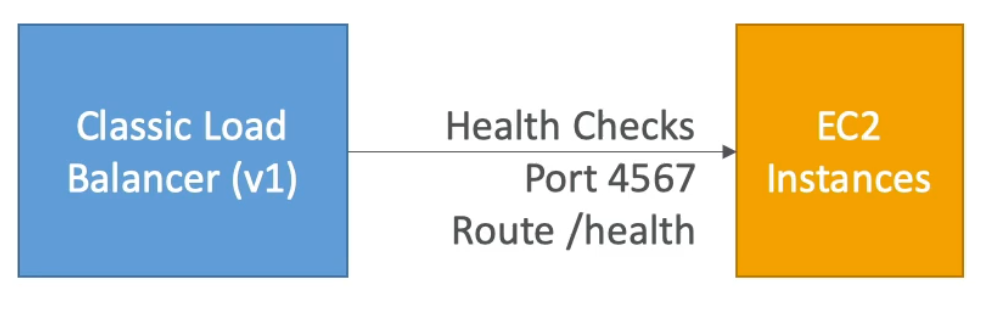
Health Checks
- Health Checks are crucial for Load Balancers
- They enable the load balancer to know if instances it forwards traffic to are available to reply to requests
- The health check is done on a port and a route (
/healthis common) - If the response is not
200 (OK), then the instance is marked “un-healthy”
Types of Load Balancers on AWS
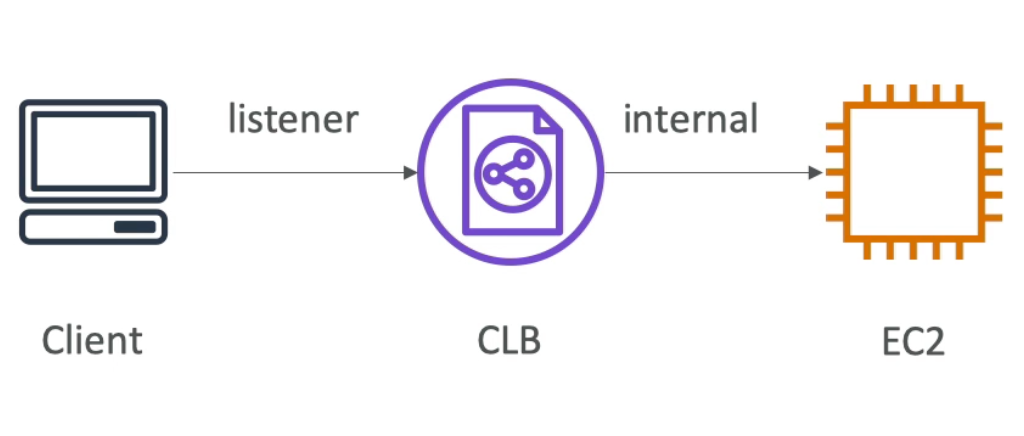
Classic Load Balancer (v1 – old generation, 2009)
- HTTP & HTTPS (OSI layer 7), TCP (OSI layer 4)
- Health checks are TCP or HTTP based
- Fixed hostname:
xxx.region.elb.amazonaws.com
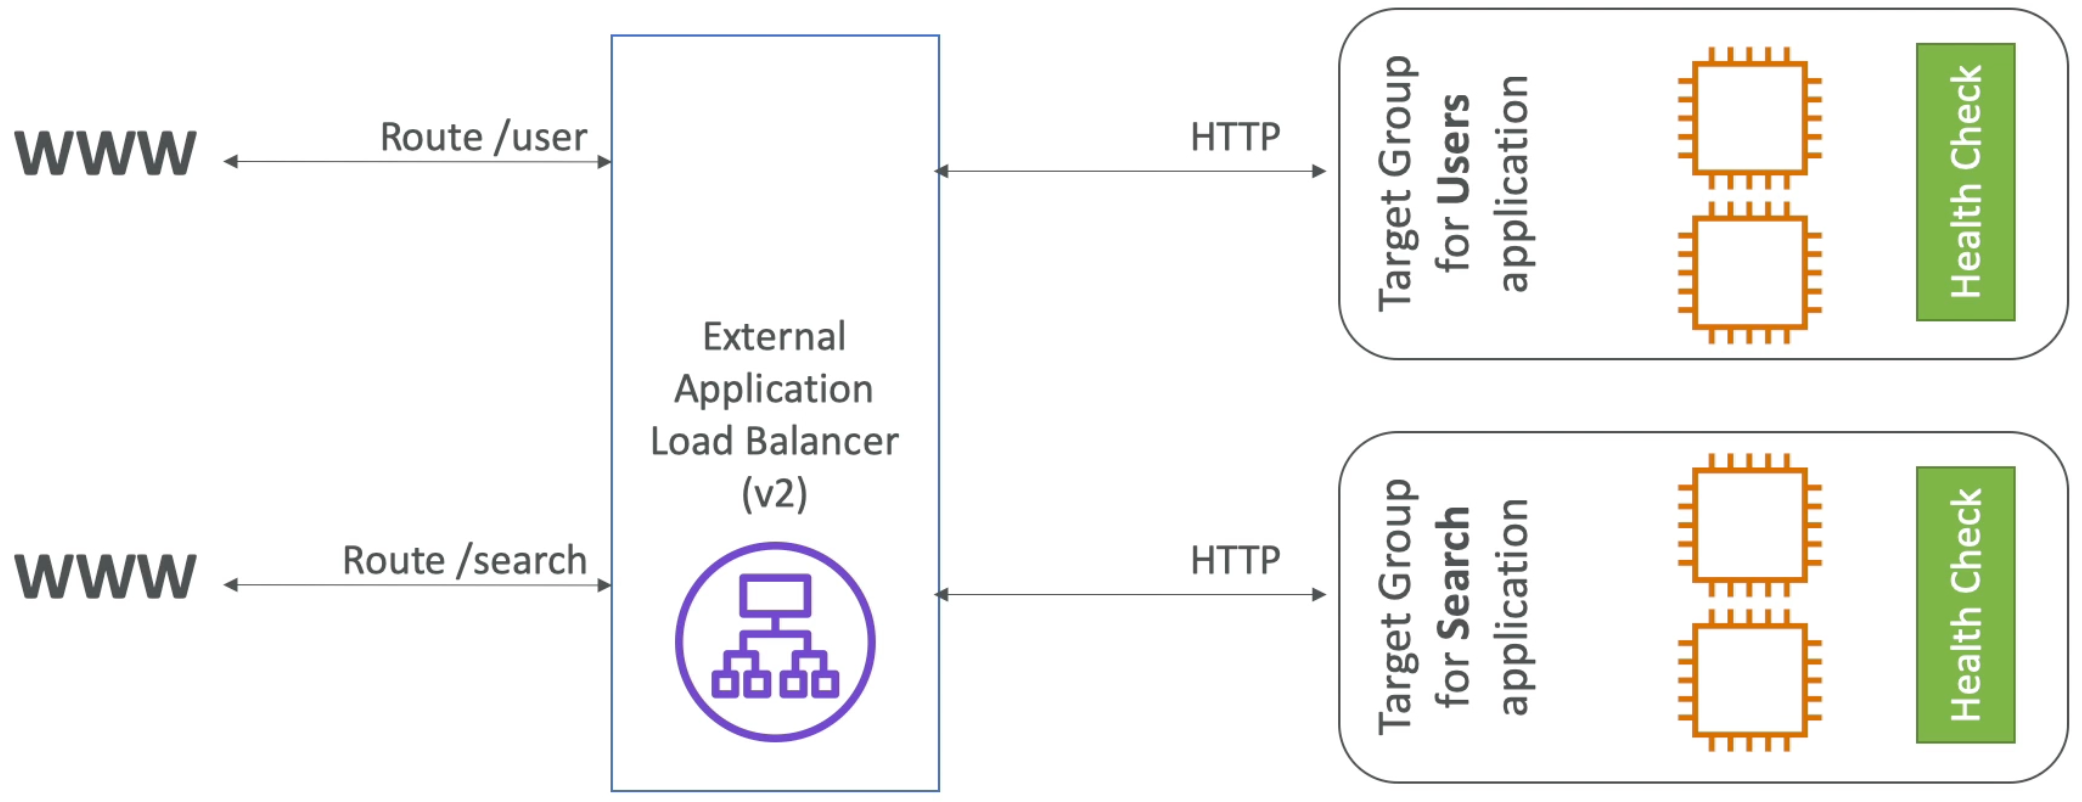
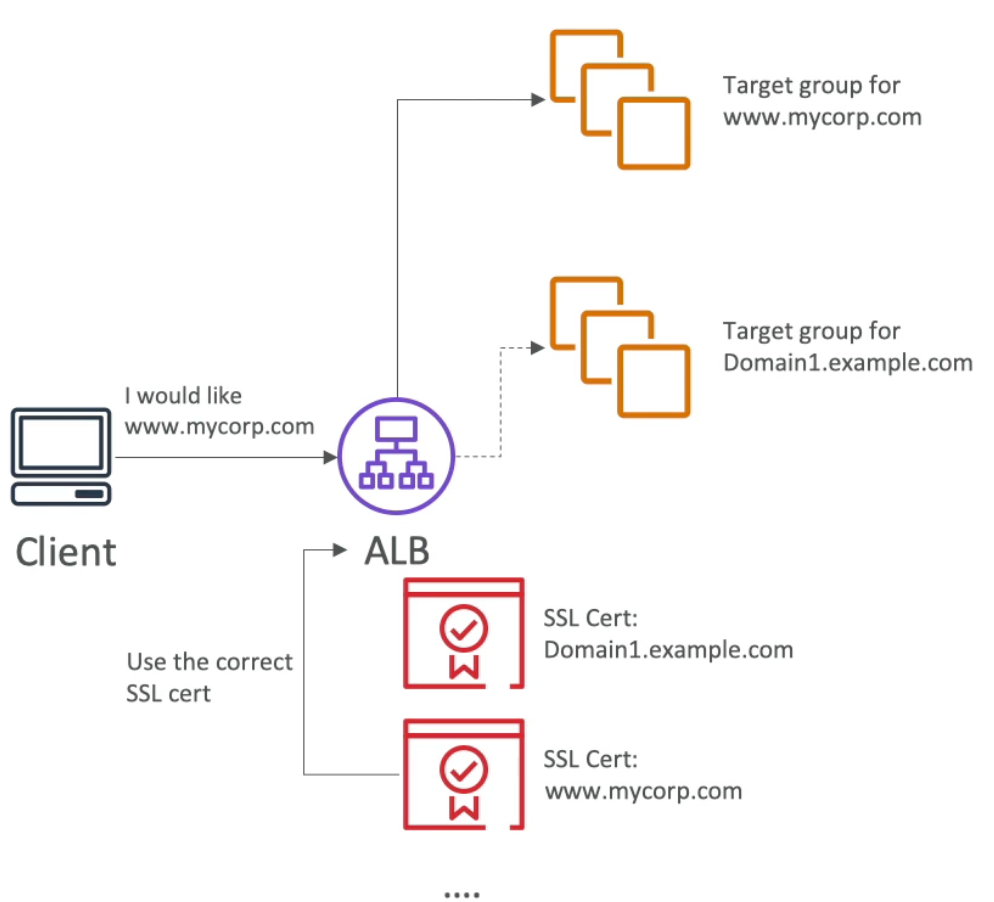
Application Load Balancer (v2 – new generation, 2016)
- HTTP & HTTPS (OSI layer 7), HTTP2, WebSocket
- Can load balance to multiple target groups
- A target group is a cluster of related instances (e.g., running some HTTP application)
- Target Groups can be:
- EC2 instances (can be managed by an Auto Scaling Group)
- ECS tasks (managed by ECS itself)
- Lambda functions – HTTP request is translated into a JSON event
- IP addresses (must be private IPs)
- Note: ALB can route to multiple target groups and health checks are at the target group level
- As a result of target groups, ALB can load balance to multiple applications running behind the same load balancer
- For example, we can create a listener rule such that all requests with path
/pricing/*go to target group running the pricing microservice - Similarly, we can have a rule to forward requests with
/forecasting/*in path to the target group running the forecasting EC2 instances
- For example, we can create a listener rule such that all requests with path
- ALB can also load balance to multiple applications running on the same machine (e.g., Docker containers on EC2)
- As such, ALB is a great fit for microservices and container based applications (e.g., Docker & Amazon ECS)
- In general, ALB supports traffic forwarding, redirection (e.g. from HTTP to HTTPS), and fixed responses based on conditions from a request’s:
- Path,
- Host header
- HTTP header
- HTTP request method
- Query string
- Source IP
- Hostname
- ALB, has a port mapping feature that enables redirection to a dynamic port in ECS
- Good to know:
- ALB has a fixed hostname (e.g.,
xxx.region.elb.amazonaws.com) - The application servers do not see the IP of the client directly (instead Classic Load Balancers and Application Load Balancers use the private IP addresses associated with their elastic network interfaces as the source IP address for requests forwarded to your web servers)
- The true IP of the client is inserted in the header
X-Forwarded-For - We can also get the client port and protocol in the headers
X-Forwarded-PortandX-Forwarded-Protorespectively
- ALB has a fixed hostname (e.g.,
ALB also supports SSL termination:

Network Load Balancer (v2 – new generation, 2017)
- TCP, TLS (secure TCP), UDP (all OSI layer 4)
- Network load balancers (OSI layer 4) allow to:
- Forward TCP & UDP traffic to your instances
- Handle millions of requests per second
- Less latency ~100 ms (vs ~400 ms fo ALB)
- NLB has one static IP per AZ and supports assigning Elastic IP
- NLBs are used for extreme performance (TCP or UDP traffic)
- You can set up internal (private) or external (public) ELBs
Load Balancer Security Group with Application Security Group that allows traffic only from Load Balancer

Load Balancer Good to Know
- Load Balancers can scale but not instantaneously – contact AWS for a “warm-up”
- Troubleshooting:
- A
4xxerror code indicates that the error was caused by the user (e.g., bad request) - A
5xxerror tells the user that they did everything correctly and it’s the server itself who caused the problem - Load Balancer Error
503means that LB is at capacity or no registered targets - If the LB can’t connect to your application, check your security groups!
- A
- Monitoring:
- ELB access logs will log all access requests (so you can debug per request)
- CloudWatch Metrics will give you aggregate statistics (e.g., connection counts)
ELB - Stickiness
- It is possible to implement stickiness so that the same client is always redirected to the same instance behind a load balancer
- This is possible for Classic Load Balancers (CLB) and Application Load Balancers (ALB) – both of which operate at OSI layer 7
- Stickiness is implemented via a session tracking cookie which has an expiration date that you control
- Note that enabling stickiness may bring an imbalance to the load over the backend EC2 instances
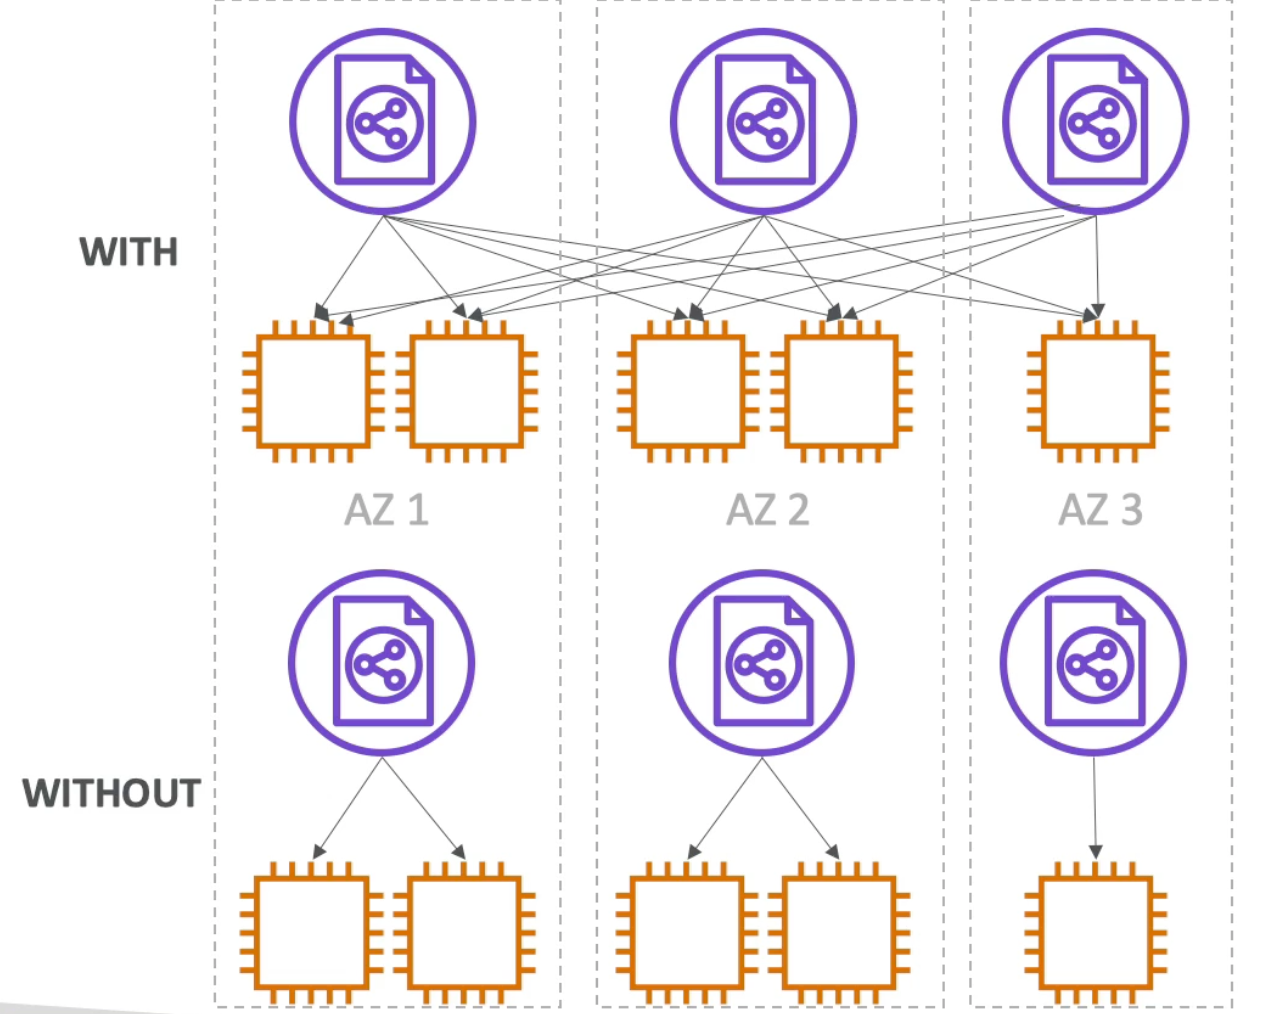
ELB - Cross Zone Load Balancing
- With Cross Zone Load Balancing each load balancer instance distributes load evenly across all registered instances in all Availability Zones (AZs)
- Without Cross Zone Load Balancing, each load balancer would only distribute requests across registered instances in its AZ only
- Classic Load Balancer
- Disabled by default
- No charges for inter AZ data if enabled
- Application Load Balancer
- Always on (can’t be disabled)
- No charges for inter AZ data
- Network Load Balancer
- Disabled by default
- You pay for inter AZ data if enabled
ELB - SSL Certificates
- An SSL Certificate allows traffic between your clients and your load balancer to be encrypted in transit (i.e., in-flight encryption)
- SSL refers to Secure Socket Layer – used to encrypt connections
- TLS refers to Transport Layer Security which is a newer version
- Nowadays, TLS certificates are mainly used, but people still say SSL
- Public SSL certificates are issued by Certificate Authorities (e.g., Comodo, Symantec, GoDaddy, Digicert, etc..)
- SSL certificates have an expiration date that you set and must be renewed

- The load balancer uses a X.509 certificate (SSL/TLS server certificate)
- You can manage certificates using ACM (AWS Certificate Manager)
- Alternatively, you can upload your own certificates
- Load Balancer HTTPS listener:
- You must specify a default certificate
- You can add an optional list of certs to support multiple domains
- Clients can use SNI (Server Name Identification) to specify the hostname they reach
- Ability to specify a security policy to support older versions of SSL / TLS for legacy clients
SSL - Server Name Indication
- SNI solves the problem of loading multiple SSL certificates onto one web server (to serve multiple websites)
- It’s a newer protocol and requires the client to indicate the hostname of the target server in the initial SSL handshake
- The server will then find the correct certificate or return the default one
- Only works for ALB & NLB (newer generation load balancers), CloudFront – does not work for CLB
- Classic Load Balancer (v1)
- Supports only one SSL certificate
- Must use multiple CLB for multiple hostnames with multiple SSL certificates
- Application Load Balancer (v2)
- Supports multiple listeners with multiple SSL certificates
- Uses Server Name Indication (SNI) to make it work
- Network Load Balancer (v2)
- Supports multiple listeners with multiple SSL certificates
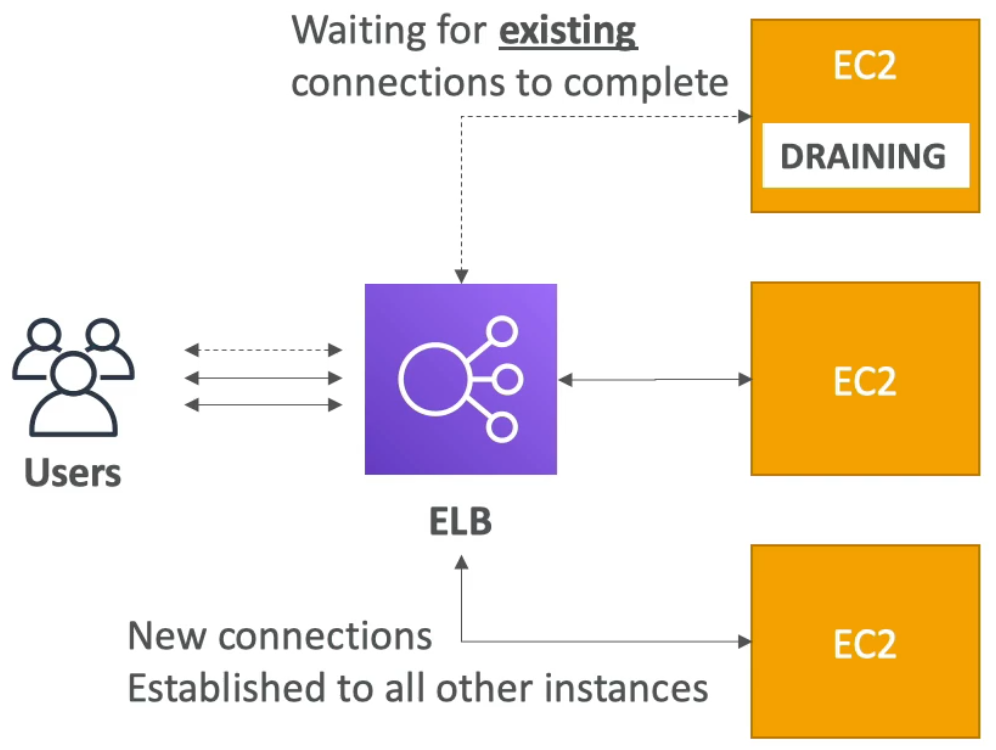
ELB - Connection Draining
- If you are using a Classic Load Balancer (CLB), then it is called Connection Draining
- If you are using a target group (i.e., Application Load Balancer (ALB) or Network Load Balancer (NLB)), then it is called Deregistration Delay
- In either case, both are referring to the amount of time given to in-flight requests to complete before the instance is in “de-registration mode” (i.e., being stoped or terminated)
- Thus, when an instance goes into de-registration mode, the ELB stops forwarding requests to the instance and the de-registration delay goes into effect
- The de-registration delay can be between
1and3600seconds. The default is300seconds - Can be disabled (set value to
0). If you do this, when an EC2 instance goes into de-registration mode all in-flight requests to that instance will be dropped - Set to a low value if your requests are short, else set to something a bit higher so you give a chance to requests that are in-flight to be completed
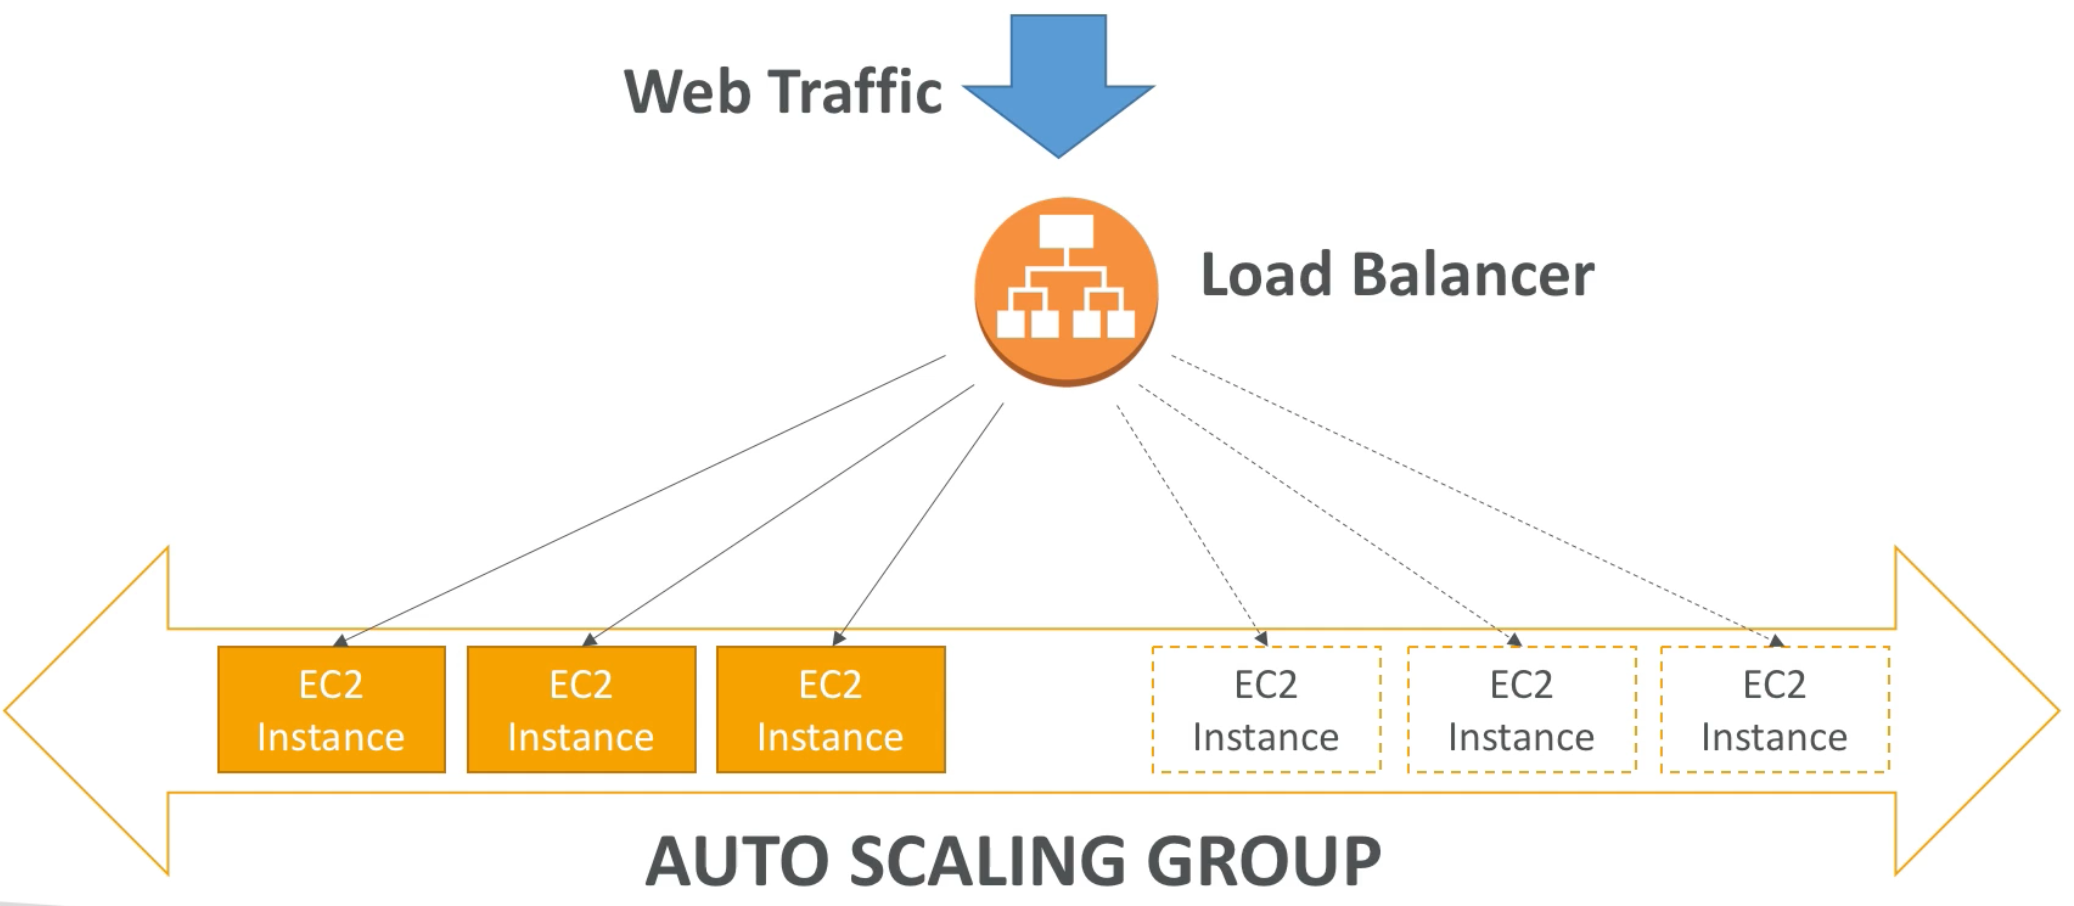
Auto Scaling Group (ASG)
- An Auto Scaling group contains a collection of Amazon EC2 instances that are treated as a logical grouping for the purposes of automatic scaling and management. An Auto Scaling group also enables you to use Amazon EC2 Auto Scaling features such as health check replacements and scaling policies. Both maintaining the number of instances in an Auto Scaling group and automatic scaling are the core functionality of the Amazon EC2 Auto Scaling service
- The size of an Auto Scaling group depends on the number of instances that you set as the desired capacity. You can adjust its size to meet demand, either manually or by using automatic scaling
- An Auto Scaling group starts by launching enough instances to meet its desired capacity. It maintains this number of instances by performing periodic health checks on the instances in the group. The Auto Scaling group continues to maintain a fixed number of instances even if an instance becomes unhealthy. If an instance becomes unhealthy, the group terminates the unhealthy instance and launches another instance to replace it
- You can use scaling policies to increase or decrease the number of instances in your group dynamically to meet changing conditions. When the scaling policy is in effect, the Auto Scaling group adjusts the desired capacity of the group, between the minimum and maximum capacity values that you specify, and launches or terminates the instances as needed. You can also scale on a schedule
- On health checks:
- EC2 Auto Scaling automatically replaces instances that fail health checks. If you enabled load balancing, you can enable ELB health checks in addition to the EC2 health checks that are always enabled
- The default EC2 health checks provided by Amazon only check for hardware and software issues that may impair an instance
- ELB health checks are more customized and can be set up to verify a TCP port on an instance is accepting connections OR a specified web page returns some success code – thus ELB health checks are a little bit smarter and verify that actual app works instead of verifying that just an instance works
- There is a third health check type: custom health check. If your application can’t be checked by simple HTTP request and requires advanced test logic, you can implement a custom check in your code and set instance health though an API (reference)
- ELB health checks used in conjunction with an ASG allows ELB health check to report application health on the instances to ASG and ASG will then rotate failing instances (ELB health checks can be pointed at a specific URL similar to Route 53 health checks)
- ASG Health Check Grace Period: Amazon EC2 Auto Scaling doesn’t terminate an instance that came into service based on EC2 status checks and ELB health checks until the health check grace period expires (reference)
- Thus, ASGs allow us to:
- Scale out (add EC2 instances) to match an increase in load
- Scale in (remove EC2 instances) to match a decrease in load
- Ensure we have a minimum and maximum number of machines running
- Automatically register new instances to a load balancer

Auto Scaling Group with Load Balancer
ASGs Have The Following Attributes
- A launch configuration
- AMI + Instance Type
- EC2 User Data
- EBS Volumes
- Security Groups
- SSH Key Pair
- Minimum Size / Maximum Size / Initial Capacity
- Network + Subnets Information
- Load Balancer Information
- Scaling Policies
Auto Scaling Alarms
- ASG scaling policies are driven by CloudWatch alarms
- An Alarm monitors a metric. For example:
- Average CPU
- Number of requests on the ELB per instance
- Average Network In
- Average Network Out
- Metrics are computed for the overall ASG instances
- Based on the alarm:
- We can create scale-out policies (increase the number of instances)
- We can create scale-in policies (decrease the number of instances)
- We can also auto scale based on a custom metric:
- Send custom metric from application on EC2 to CloudWatch (using
PutMetricAPI) - Create CloudWatch alarm to react to low / high values
- Use the CloudWatch alarm as the scaling policy for ASG
- Send custom metric from application on EC2 to CloudWatch (using

ASG Additional Information
- Scaling policies can be based on predefined metrics (e.g., CPU, Network, etc..) and even on custom metrics or based on a schedule (if you know the user patterns)
- To update an ASG, you must provide a new launch configuration / launch template
- IAM roles attached to an ASG will get assigned to EC2 instances
- ASGs are free – you pay for the underlying resources being used
- Having instances under an ASG means that if they get terminated for whatever reason, the ASG will automatically create new ones as a replacement
- ASG can terminate instances marked as unhealthy by an LB and replace them
Auto Scaling Groups – Scaling Policies
- Target Tracking Scaling
- With target tracking scaling policies, you select a scaling metric and set a target value. Amazon EC2 Auto Scaling creates and manages the CloudWatch alarms that trigger the scaling policy and calculates the scaling adjustment based on the metric and the target value
- Example: I want the average ASG CPU to stay at around 40%
- Simple / Step Scaling
- With step scaling and simple scaling, you choose scaling metrics and threshold values for the CloudWatch alarms that trigger the scaling process. You also define how your Auto Scaling group should be scaled when a threshold is in breach for a specified number of evaluation periods
- Scheduled Actions
- Scheduled scaling allows you to set your own scaling schedule
- For example, let’s say that every week the traffic to your web application starts to increase on Wednesday, remains high on Thursday, and starts to decrease on Friday. You can plan your scaling actions based on the predictable traffic patterns of your web application. Scaling actions are performed automatically as a function of time and date
Simple Scaling Example
- You pick ANY Cloud Watch metric
- For this examples I am choosing CPU utilization
- You specify, a SINGLE THRESHOLD beyond which you want to scale and specify your response
- Example: how many EC2 instances do you want to add or take away when the CPU utilization breaches the threshold
- The scaling policy then acts
- THRESHOLD: add
1instance when CPU utilization is between40%and50% - Note: This is the ONLY threshold
Step Scaling Example
- You specify MULTIPLE thresholds along with different responses
- Threshold
A: add 1 instance when CPU utilization is between40%and50% - Threshold
B: add 2 instances when CPU utilization is between50%and70% - Threshold
C: add 3 instances when CPU utilization is between70%and90% - And so on and so on
- Note: There are MULTIPLE thresholds
Target Tracking Example
- You don’t want to have to make so many decisions
- Makes the experience simple as compared to the previous 2 scaling options
- It’s automatic
- All you do is pick metric (CPU utilization in this example)
- Set the value and that’s it
- Auto scaling does the rest adding and removing the capacity in order to keep your metric (CPU utilization) as close as possible to the target value
- It’s SELF OPTIMIZING: meaning that it has an algorithm that learns how your metric changes over time and uses that information to make sure that over and under scaling are minimized
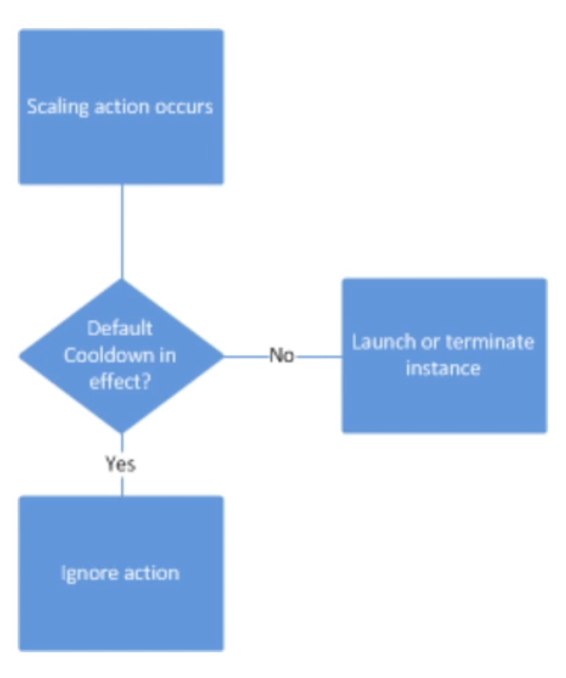
Auto Scaling Groups – Scaling Cooldowns
- The cooldown period helps to ensure that your Auto Scaling Group doesn’t launch or terminate additional instances before the previous scaling activity takes effect
- In addition to default cooldown for Auto Scaling Group, we can create cooldowns that apply to a specific simple scaling policy
- A scaling-specific cooldown period overrides the default cooldown period
- One common use for scaling-specific cooldowns is with a scale-in policy – a policy that terminate instances based on a specific criteria or metric. Because this policy terminates instances, Amazon EC2 Auto Scaling needs less time to determine whether to terminate additional instances
- If the default cooldown period of
300seconds is too long, you can reduce costs by applying a scaling-specific cooldown period of180seconds to the scale-in policy - If your application is scaling up and down multiple times each hour, modify the Auto Scaling Group cool-down timers and the CloudWatch Alarm Period that triggers the scale in
EC2 Storage – Elastic Block Storage (EBS) and Elastic File System (EFS)
What is an EBS volume?
- An EBS volume is a network drive you can attach to your instance
- It uses the network to communicate to the instance (which implies some latency)
- EBS volumes persist independently from the running life of an EC2 instance
- You can choose “DELETE ON TERMINATION” option to automatically delete an EBS volume when the associated instance is terminated
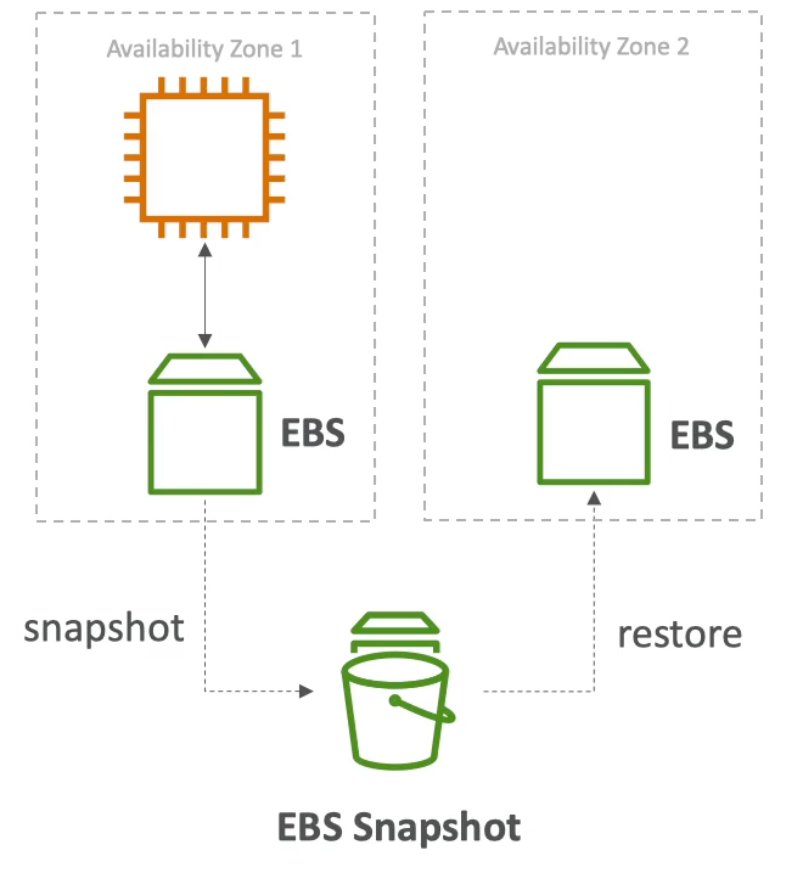
- It is locked to an Availability Zone (AZ)
- An EBS volume in
us-east-1acannot be attached to an instance inus-east-1b - To move a volume across AZs you first need to create a snapshot of it
- An EBS volume in
- Has provisioned capacity (size in GBs and IOPS - Input Output Per Second)
- You get billed for all the provisioned capacity
- You can increase the capacity of the drive over time
- Read here how to mount an Amazon EBS volume and make it available for use
- It is just of many storage options on AWS. Others include: Elastic File System (EFS), Simple Storage Service (S3), etc..
- By default, an EBS volume can only be attached to one instance
- There is a new “Multi-Attach” feature which allows to attach an EBS volume to multiple instances
- An instance can have multiple EBS volumes attached to it
Performance
AWS measures the volumes performance in two dimensions:
- Input Output per Second (IOPS): refers to the maximum number of input and output requests the volume can serve per second (see how unlike throughput this has nothing to do with the system block size)
- Throughput: refers to the maximum amount of data (i.e., bits) can be read or written per second. So, IOPS and the system block size play an important role in calculating this
Let’s consider as the sample the 3000 IOPS and SQL database engine, the block size in terms of db engine is called the page size and for SQL Server it’s equal to 8 KB. If you wish to calculate the actual throughput, if the IOPS defined, you will end up with the formula below:
throughput = [IOPS] * [block size] = 3000 * 8 = 24 000 KB/s = 24 MB/s

References:
- https://stackoverflow.com/questions/15759571/iops-versus-throughput#:~:text=IOPS%20measures%20the%20number%20of,read%20or%20written%20per%20second.&text=If%20you%20have%20small%20files,experience%20a%20lower%20actual%20performance
- https://ahmedahamid.com/which-is-better/
EBS Volume Types
- EBS volumes come in
4types:gp2/gp3(SSD): general purpose SSD volume that balances price and performance for a wide variety of workloadsio1/io2(SSD): highest performance SSD volume for mission critical low latency or high throughput workloadsst1(HDD): low cost HDD volume designed for frequently accessed, throughput intensive workloadssc1(HDD): lowest cost HDD volume designed for less frequently accessed workloads
- EBS volumes are characterized by: size, throughput, IOPS
- Only
gp2andio1can be used as boot volumes
SSD-backed volumes are optimized for IOPS, which are best for workloads involving frequent read/write operations
HDD-backed volumes are optimized for throughput (measured in MiB/s) for large streaming workloads. CANNOT INCLUDE BOOT VOLUMES
EBS General Purpose SSD Volume Type (gp3 and gp2)
- General purpose SSD volume that balances price and performance for a wide variety of workloads
- Recommended for most workloads (e.g., virtual desktops, low-latency interactive apps, development and test environments)
- Volume size ranges from
1GiB to16TiB gp3(newer):- Baseline of
3000IOPS and throughput of125MiB/s - Can increase IOPS to
16000and throughput up to1000MiB/s - Can scale IOPS (input/output operations per second) and throughput independently (i.e., without needing to provision additional block storage capacity)
- Baseline of
gp2:- Small
gp2volumes can burst IOPS to3000 - You don’t have direct control on the IOPS and throughput, they are linked and depend on the volume size
- To get higher performance you have to use a bigger volume size. Max IOPS is
16000 3IOPS per GB – which means that at5334GB we are at max IOPS
- Small
Remember: for gp2 volume types you don’t have direct control on the IOPS and throughput, they are linked and depend on the volume size. gp3 removed this limitation and you can increase the IOPS and/or throughput independently up to 16,000 IOPS and 1,000 MiB/s respectively.
EBS Provisioned IOPS (PIOPS) SSD Volume Types (io1 and io2)
- Highest performance SSD volume for mission critical low latency or high throughput workloads
- For critical business applications that need more than
16000IOPS - Great for database workloads (e.g., MongoDB, Cassandra, PostgreSQL, etc..)
io1/io2:- Size range:
4GiB -16TiB - PIOPS: MIN
100- MAX32000or64000if on Nitro instance - Can increase PIOPS independently from storage size
- Size range:
io2Block Express:- Size range:
4GiB -64TiB - Sub-millisecond latency
- Max PIOPS:
256000with an IOPS:GiB ration of1000to1
- Size range:
- Supports EBS Multi Attach option
EBS st1 (HDD) Volume Type
- Low cost HDD volume designed for frequently accessed, throughput intensive workloads
- Streaming workloads requiring consistent, fast throughput at low price
- Big data, data warehouses, log processing
- Apache Kafka
- Cannot be a boot volume
- Size range:
500GiB -16TiB - Max IOPS is
500 - Baseline
40MB/s per TiB throughput until a max of500MiB/s – can burst
EBS sc1 (HDD) Volume Type
- Lowest cost HDD volume designed for less frequently accessed data
- Throughput oriented storage for large volumes of data that is infrequently accessed
- Scenarios where the lowest storage cost is important
- Cannot be a boot volume
- Size range:
500GiB -16TiB - Max IOPS is
250 - Baseline
12MB/s per TiB throughput until a max of250MiB/s – can burst
EBS vs Instance Store
- Some instances do not come with Root EBS volumes, instead they come with “Instance Store” (i.e., ephemeral storage (short lived) because it goes away after instance is stopped or terminated)
- Instance store is physically attached to the machine whereas EBS is a network device
- Instance Store pros:
- Better IO performance (very high IOPS – since it is physically attached to the instance)
- Good for caching (since its closer to hardware executing our code)
- Instance Store cons:
- Data survives only reboots
- If instance is stopped or terminated the instance store is lost
- You cannot resize the instance store
- Performing backups is left to the user
EBS Multi-Attach
- Option to attach the same EBS to multiple EC2 instances in the same AZ
- Each instance would get full read and write permission to the volume
- Only works with
io1andio2family EBS volume types
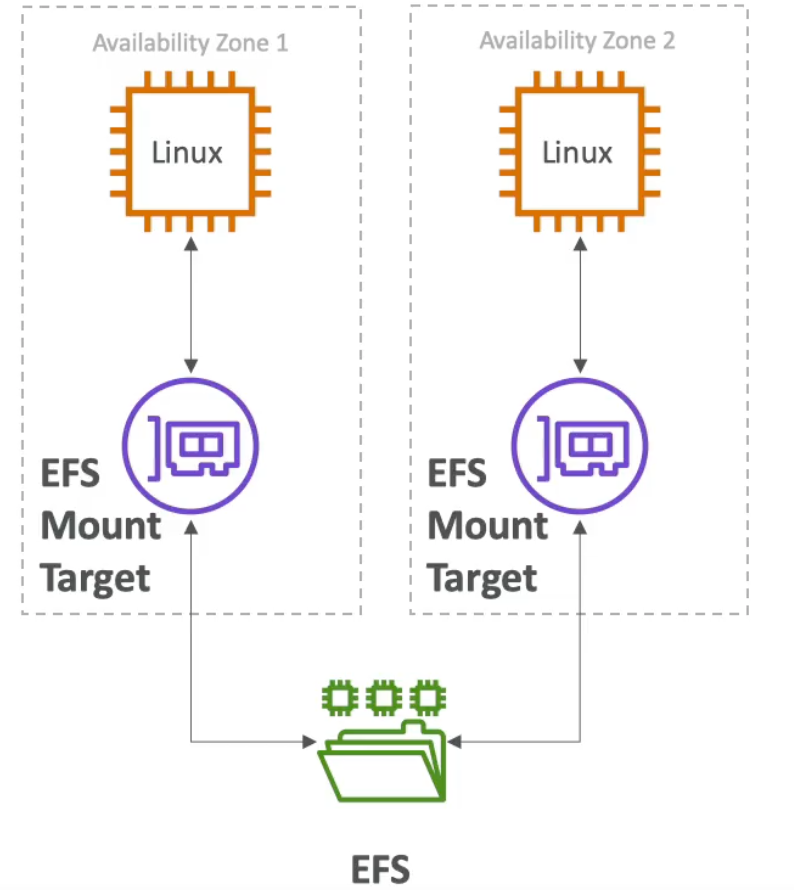
Elastic File System (EFS)
- Managed network file system (NFS) that can be mounted on many EC2 instances at once
- Unlike EBS volumes, EFS volumes can be mounted to EC2 instances across AZs (which means its expensive)
- Highly available, pay per use (which is different than EBS where you pay for amount of storage you reserve)
- Uses NFSv4.1 protocol
- Uses security group to control access to EFS
- Compatible with Linux based AMIs (not Windows)
- Can leverage encryption at rest using KMS
- POSIX file system that has standard file API
- File system scales automatically, pay per use, so no capacity planning
- EFS scale:
- Supports thousands of concurrent NFS clients with
10GB+ /s throughput - Can grow to Petabyte-scale network file system automatically (again: no capacity planning, pay per use)
- Supports thousands of concurrent NFS clients with
- To mount an EFS file system you will need to install the
amazon-efs-utils. Follow instruction here

EFS Performance Modes (set at EFS creation time):
General Purpose (default): low latency. In General Purpose performance mode, read and write operations consume a different number of file operations. Read data or metadata consumes one file operation. Write data or update metadata consumes five file operations. A file system can support up to 35000 file operations per second (use cases: web server, CMS)
Max I/O: higher latency. Max I/O performance mode doesn’t have a file system operations limit. Use the Max I/O performance mode if you have a very high requirement of file system operations per second.
Note: General Purpose performance mode has the lower latency of the two performance modes and is suitable if your workload is sensitive to latency. Max I/O performance mode offers a higher number of file system operations per second but has a slightly higher latency per each file system operation
EFS Throughput Modes (set at EFS creation time):
Bursting: throughput scales with file system size. Depending on the size of your data you get a certain number of burst credits, which allow you to get higher throughput for a limited time. For example, a 1-TiB file system runs continuously at a throughput of 50 MiB/second and is allowed to burst to 100 MiB/s for 12 hours each day.
Provisioned: throughput fixed at specified amount (range: 1 - 1024 MiB/s)
EFS Storage Tiers (file lifecycle management feature – move file if unused for N days):
- Standard storage tier: for frequently accessed
- Infrequent Access storage tier (EFS IA): after not used for
Ndays file is moved to infrequent storage class, this results is a lower price, but cost to retrive is higher
EBS vs EFS
- EFS is for a shared network file system to be mounted across many instances across AZs
- EBS is for a network file system that can be attached to only one instance and is locked at AZ level (meaning you can’t decide to detach it from an instance in
us-east-1aand attach it to another instance inus-east-1b) - Instance Store is to get the maximum amount of I/O (since it is storage that is physically attached to our instance) but it is something you loose once instance is terminated so it is an ephemeral drive
EBS
- Can be attached to only one instance at a time (unless “Multi-Attach” feature is enabled)
- Are locked at the Availability Zone (AZ) level (e.g.,
us-east-1a) gp2(SSD backed): I/O increases if the disk size increases,3IOPS per GB – which means that at5334GB we are at max IOPS, baseline of3000IOPS and throughput of125MiB/sgp3(SSD backed): can scale IOPS (input/output operations per second) and throughput independentlyio1/io2(SSD backed): provisioned IOPS, can increase I/O independently, for critical business applications that need more than16000IOPS, can be used as EC2 root volume- To migrate an EBS volume across AZs:
- Take a snapshot
- Restore the snapshot to another AZ
- EBS backups use I/O and you shouldn’t run them while your application is handling a lot of traffic since you will be affecting performance (since IOPS is limited)
- Only EBS or instance storage can be used as a root volume
- If we have EBS as root volume for EC2 instance, then (by default) the volume will get terminated if the EC2 instance is terminated. HOWEVER, this behaviour can be disabled
EFS
- Supports mounting thousands of instances across AZs
- Only supports for POSIX based instances (e.g., Linux)
- More expensive than EBS (because of the cross AZ communication required to have a shared file system across AZs)
- Can leverage EFS Infrequent Access storage class for files not accessed after
Ndays for a much cheaper storage cost
AWS Relational Databases (RDS), Aurora, ElastiCache
- RDS stands for Relational Database Service
- It is an AWS service that manages relational databases (i.e., databases that use SQL as a query language)
- Thus, it allows you to create databases in the cloud that are managed by AWS. For example:
- MySQL
- PostgreSQL
- MariaDB
- Oracle
- Microsoft SQL
- Aurora (AWS proprietary database)
Advantages of using RDS over deploying same database on EC2
- Automated provisioning, OS patching
- Continuous backups and ability to restore to a specific timestamp (Point in Time Restore)
- Monitoring dashboards
- Read replicas for improved read performance
- Multi AZ setup for disaster recovery (DR)
- Scaling capability (vertical and horizontal)
- Storage backed by EBS (
gp2orio1– both SSD) - Note: because this is a managed service you cannot SSH into the underlying instance
RDS Backups
- Backups are automatically enabled in RDS
- Automated backups:
- Daily full backup of the database (during the maintenance window)
- Database transaction logs are backed-up by RDS every five minutes, thus enabling the ability to restore to any point in time (from oldest backup to the one that was done five minutes ago)
- Default
7day backup retention period, but can be increased to35days
- DB Snapshots:
- Different from automated backups in that these are manually triggered by the user
- Retention of backup can be as long as you want
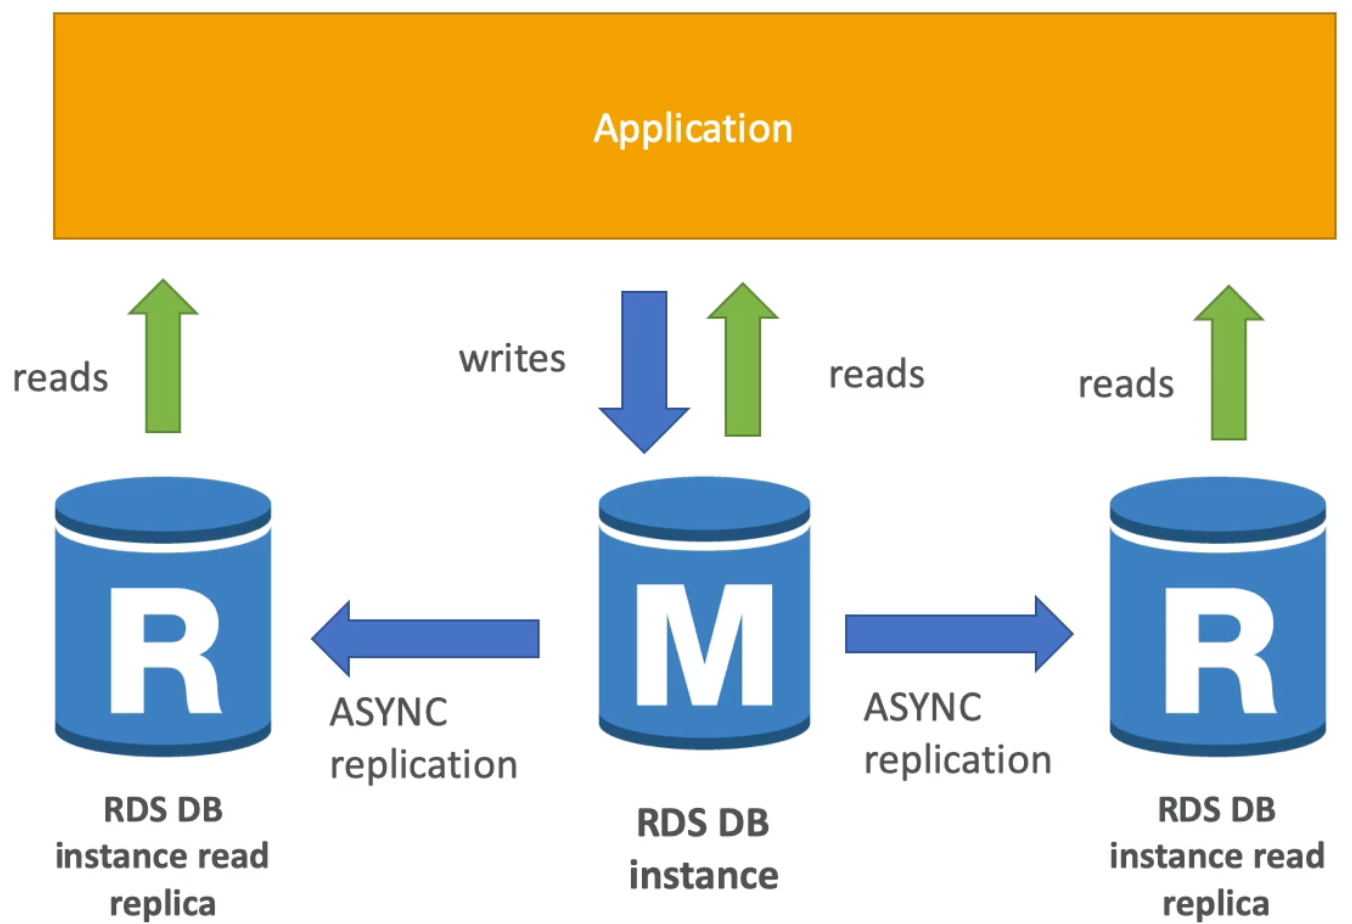
RDS Read Replicas for read scalability
- Read replicas are read only database replicas that can be used by applications to read data. This pattern allows us to reduce load on the main database instance which is read write enabled
- We can create up to
5read replicas which can be within AZ, across AZs, or across regions - The replication itself is asynchronous which means that the read replicas are eventually consistent. Eventually consistent means that they eventually reflect the data in the master database instance, but not necessarily right away
- Replicas can be promoted to become their own separate database
- Applications must update the connection string to leverage read replicas. In other words, we have separate endpoints for the read replicas and the main RDS DB instance
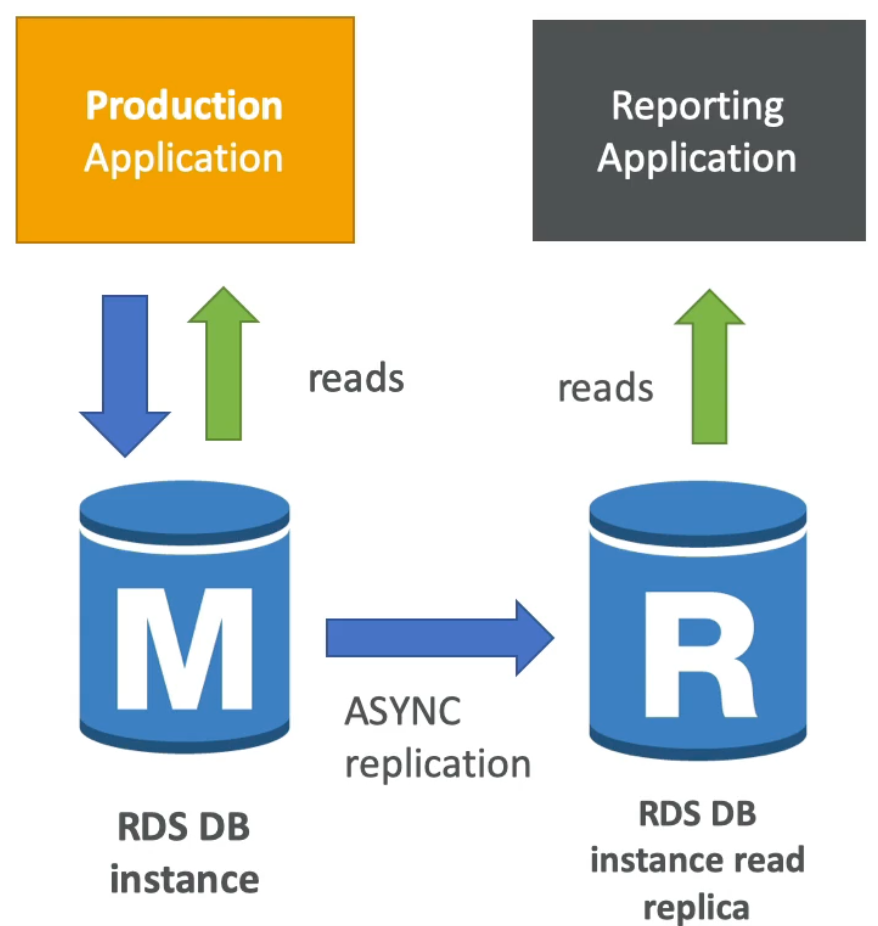
RDS Read Replicas Use Cases
- You have a production database that is taking normal load
- A separate team comes in and wants to use the data to run some reporting application
- In this scenario, we can create an RDS Read Replica of our main DB instance and tell the other team to use that instance for their reporting application instead
- As such, our production application and database is completely unaffected
- Note: read replicas are used for read operations only (so
SELECTkind of statements notINSERT, UPDATE, DELETE)
RDS Read Replicas
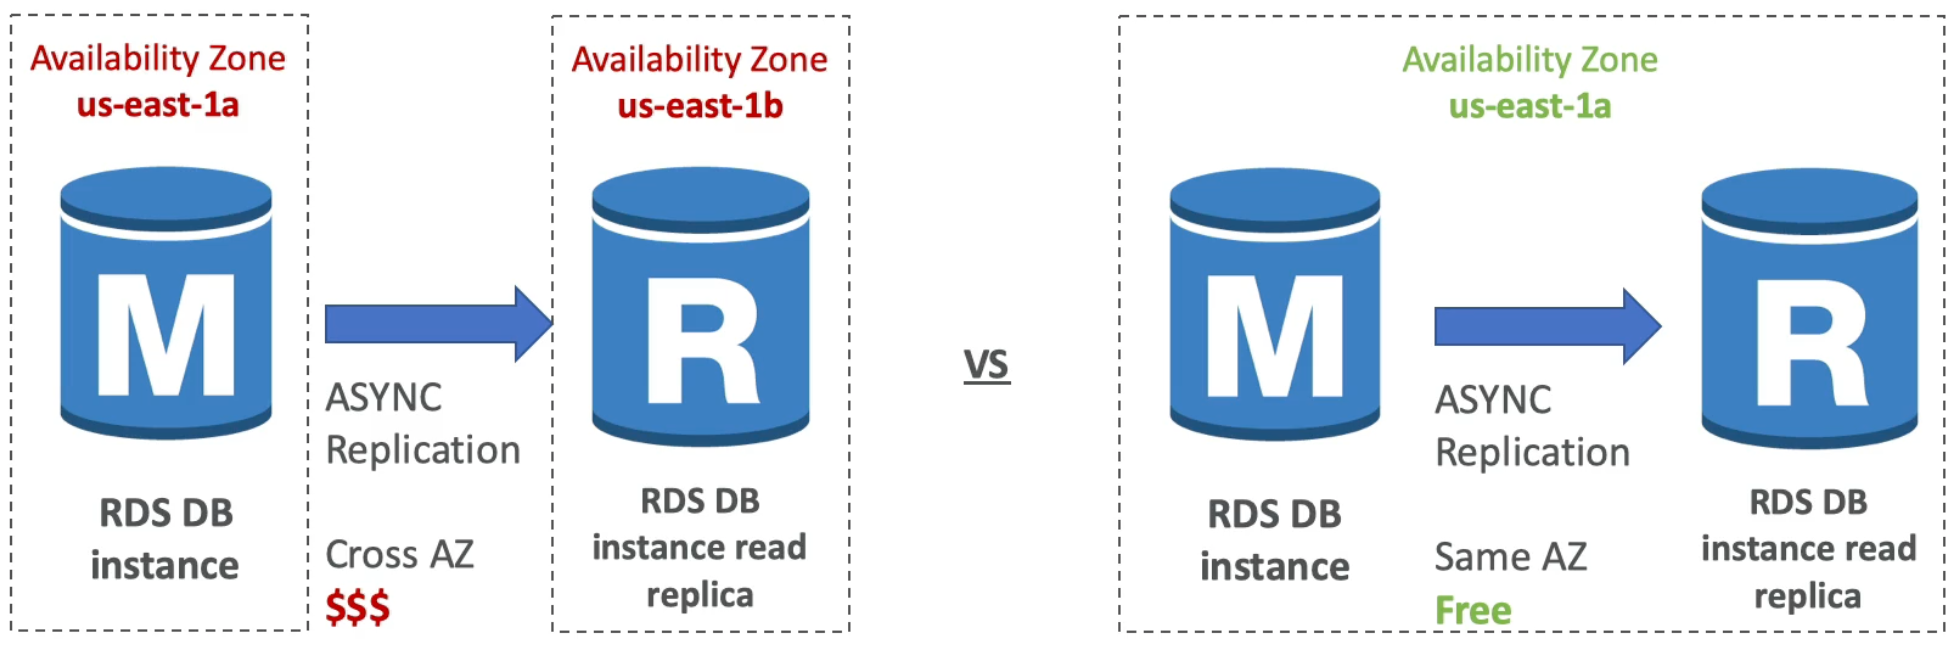
- In AWS there is a network cost when data goes from one AZ to another
- To reduce costs keep your Read Replicas in the same AZ
RDS Multi AZ (Disaster Recovery)
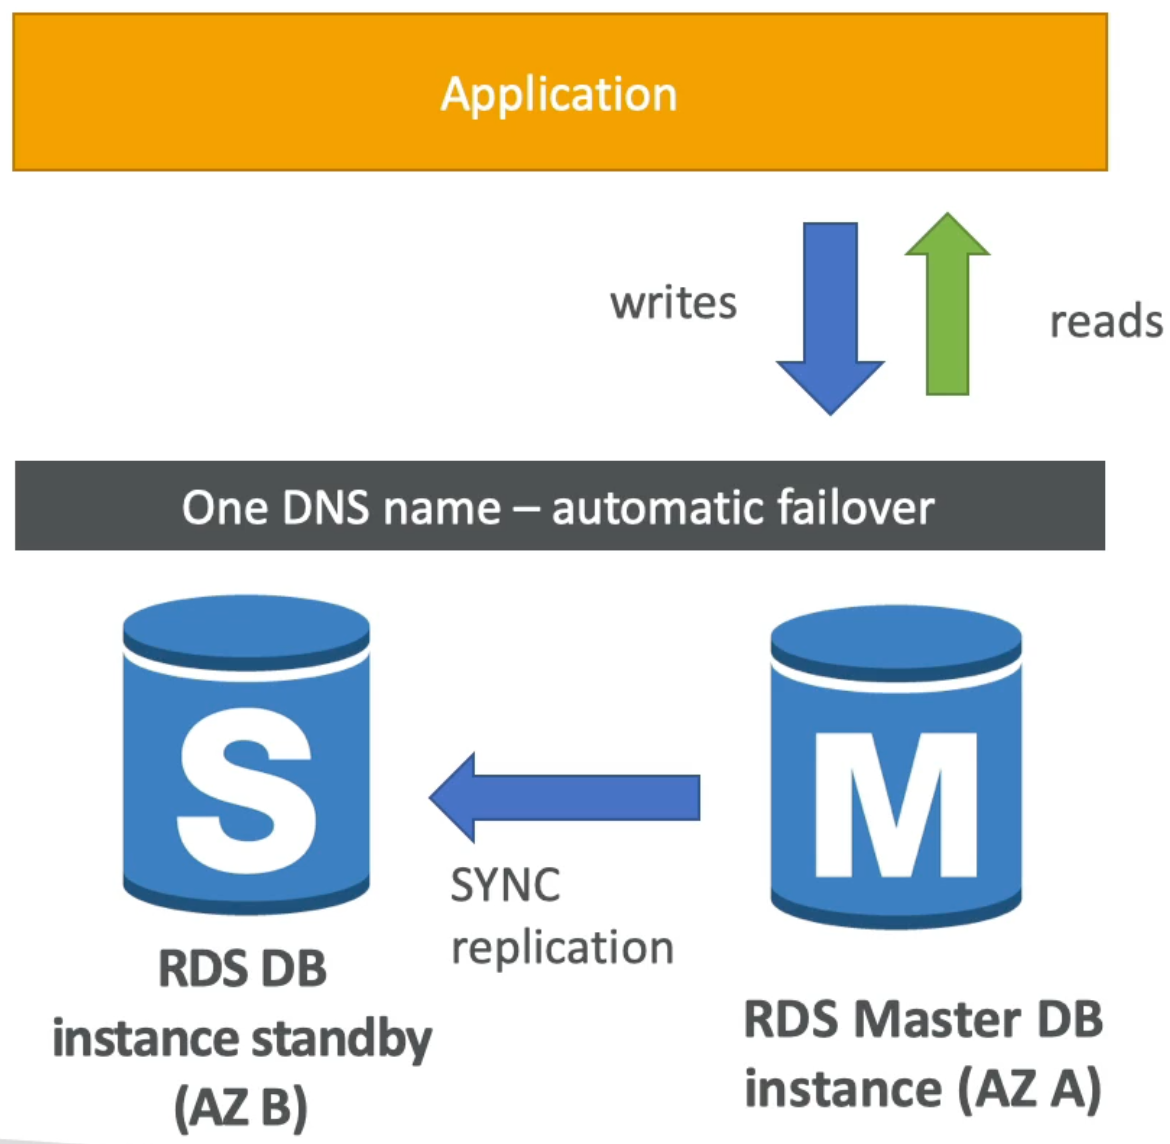
- With Multi AZ, RDS maintains a standby DB instance (in AZ B from figure below) that is a replica of the master DB instance (in AZ A in instance below)
- Multi AZ has synchronous replication from master DB instance to standby instance
- Application uses one DNS name to write and read from DB
- In case the master DB instance fails RDS will (behind the scenes) failover to the standby instance and the DNS name will be updated to resolve to the failover – thereby leaving the application completely unaffected and without any need for developer intervention
- Because the standby instance is in another AZ, we increase our applications availability and enable fault tolerance in case of loss of one AZ
- Note: RDS Read Replicas can be setup as Multi AZ for Disaster Recovery
RDS Encryption + Security
- At rest encryption:
- Possibility to encrypt the master & read replicas with AWS KMS - AES-256 encryption
- Encryption has to be defines at launch time
- If the master is not encrypted, then the read replicas cannot by encrypted
- Transparent Data Encryption (TDE) available for Oracle and SQL Server (an alternative way of encrypting your database)
- In-flight encryption:
- SSL certificates to encrypt data to RDS in flight
- Provide SSL options with trust certificate when connecting to database
- To enforce SSL in PostgreSQL set
rds.force_ssl=1in the AWS RDS Console (Parameter Groups) and inMySQLwithin the DB runGRANT USAGE ON *.* TP 'mysqluser'@'%' REQUIRE SSL;(SQL command)
RDS Encryption Operations
- Encrypting RDS backups
- Snapshots of un-encrypted RDS databases are un-encrypted
- Snapshots of encrypted RDS databases are encrypted
- Can copy an un-encrypted snapshot into an encrypted one (using some options)
- To encrypt an un-encrypted RDS database:
- Create a snapshot of the un-encrypted database
- Copy the snapshot and enable encryption for the snapshot
- Restore the database from the encrypted snapshot
- Migrate applications to the new database and delete the old one
RDS Security - Network & IAM
- Network security
- RDS databases are usually deployed within a private subnet, not in a public one
- RDS security works by leveraging security groups (the same concept as for EC2 instances) which control which IP / security group can communicate with RDS
- Access Management
- IAM policies help control who can manage AWS RDS (through the RDS API)
- Traditional username and password can be used to login into the database
- IAM-based authentication can be used to login into RDS MySQL and PostgreSQL
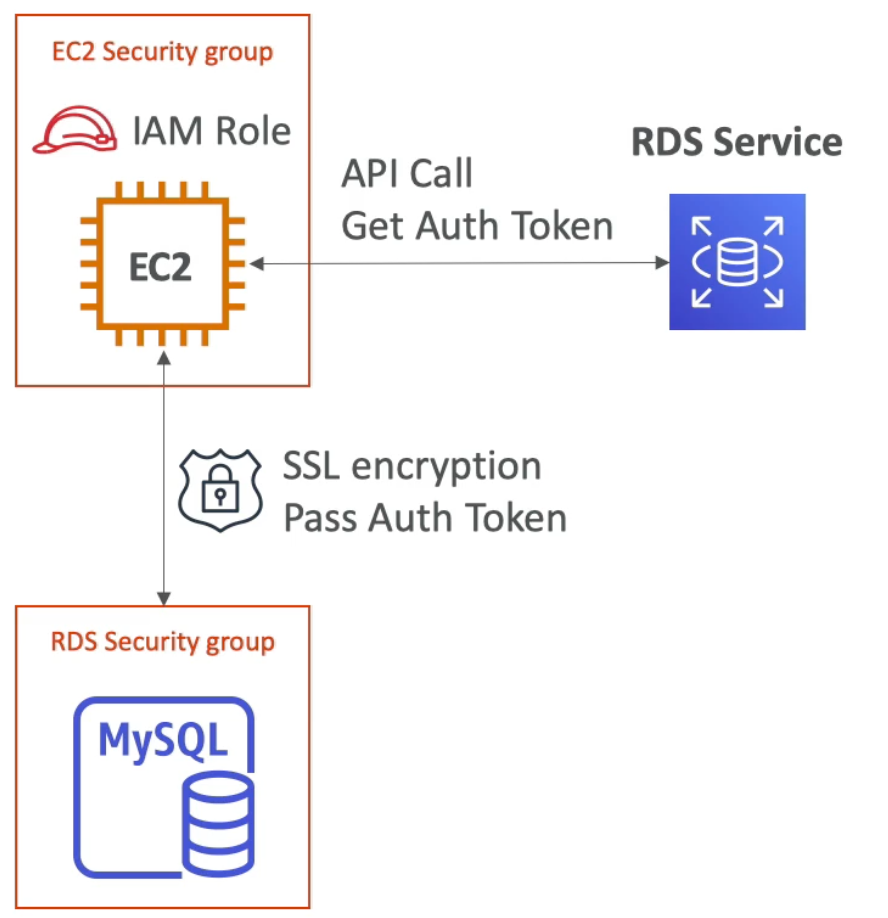
RDS – IAM Authentication
- IAM database authentication works with MySQL and PostgreSQL
- You don’t need a password just an authentication token obtained through IAM & RDS API calls
- Auth token has a lifetime of
15minutes - Benefits of this approach:
- Network in/out must be encrypted using SSL
- IAM is used to centrally manage users instead of DB
- Can leverage IAM Roles and EC2 instance profiles for easy integration
RDS Security – Summary
- Encryption at rest:
- Is done only when you first create the DB instance, or
- Unencrypted DB => snapshot => copy snapshot as encrypted => create encrypted DB from snapshot
- Your responsability:
- Check the ports / IP / security group inbound rules in DB’s security group
- In-database user creation and permissions or manage through IAM
- Creating a database with or without public access
- Ensure parameter groups or DB is configured to only allow SSL connections
- AWS responsability:
- Guarantees nobody can SSH to your DB instance
- Performs all required DB and OS patching
Aurora Overview
- Aurora is a proprietary technology from AWS (not open source)
- PostgreSQL and MySQL are both supported as Aurora DB (that means your drivers will work as if Aurora was a PostgreSQL or MySQL database)
- Aurora is “AWS cloud optimized” and claims 5x performance improvement over MySQL on RDS and over 3x the performance of PostgreSQL on RDS
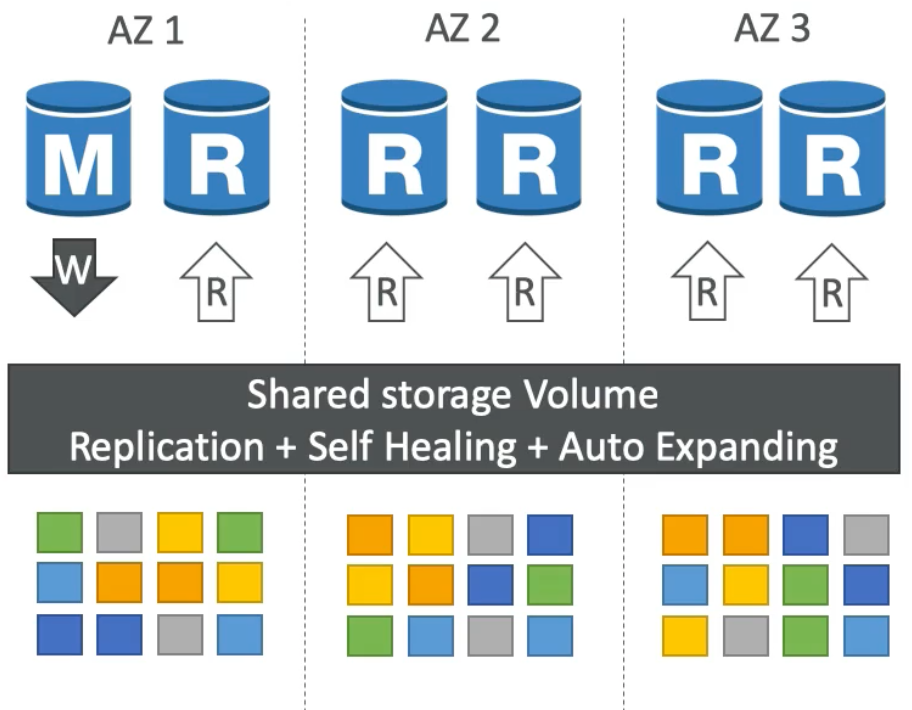
- Aurora has shared storage volume that automatically grows in increments of
10GB, up to64TB - Aurora can have
15replicas (while MySQL can only have5) and the replication process is faster (sub10ms replica lag) - Failover in Aurora is instantaneous
- Aurora costs ~20% more than RDS
Aurora High Availability and Read Scaling
- Store
6copies of you data anytime you write anything across3AZs4copies out of6needed for writes3copies out of6needed for reads- Self healing with peer-to-peer replication
- Storage is striped across hundreds of volumes
- One Aurora instance takes all the writes (i.e., the master instance)
- Automated failover from master in less than
30seconds - Master plus up to
15Aurora read replicas - Support for cross region replication
Aurora DB Cluster
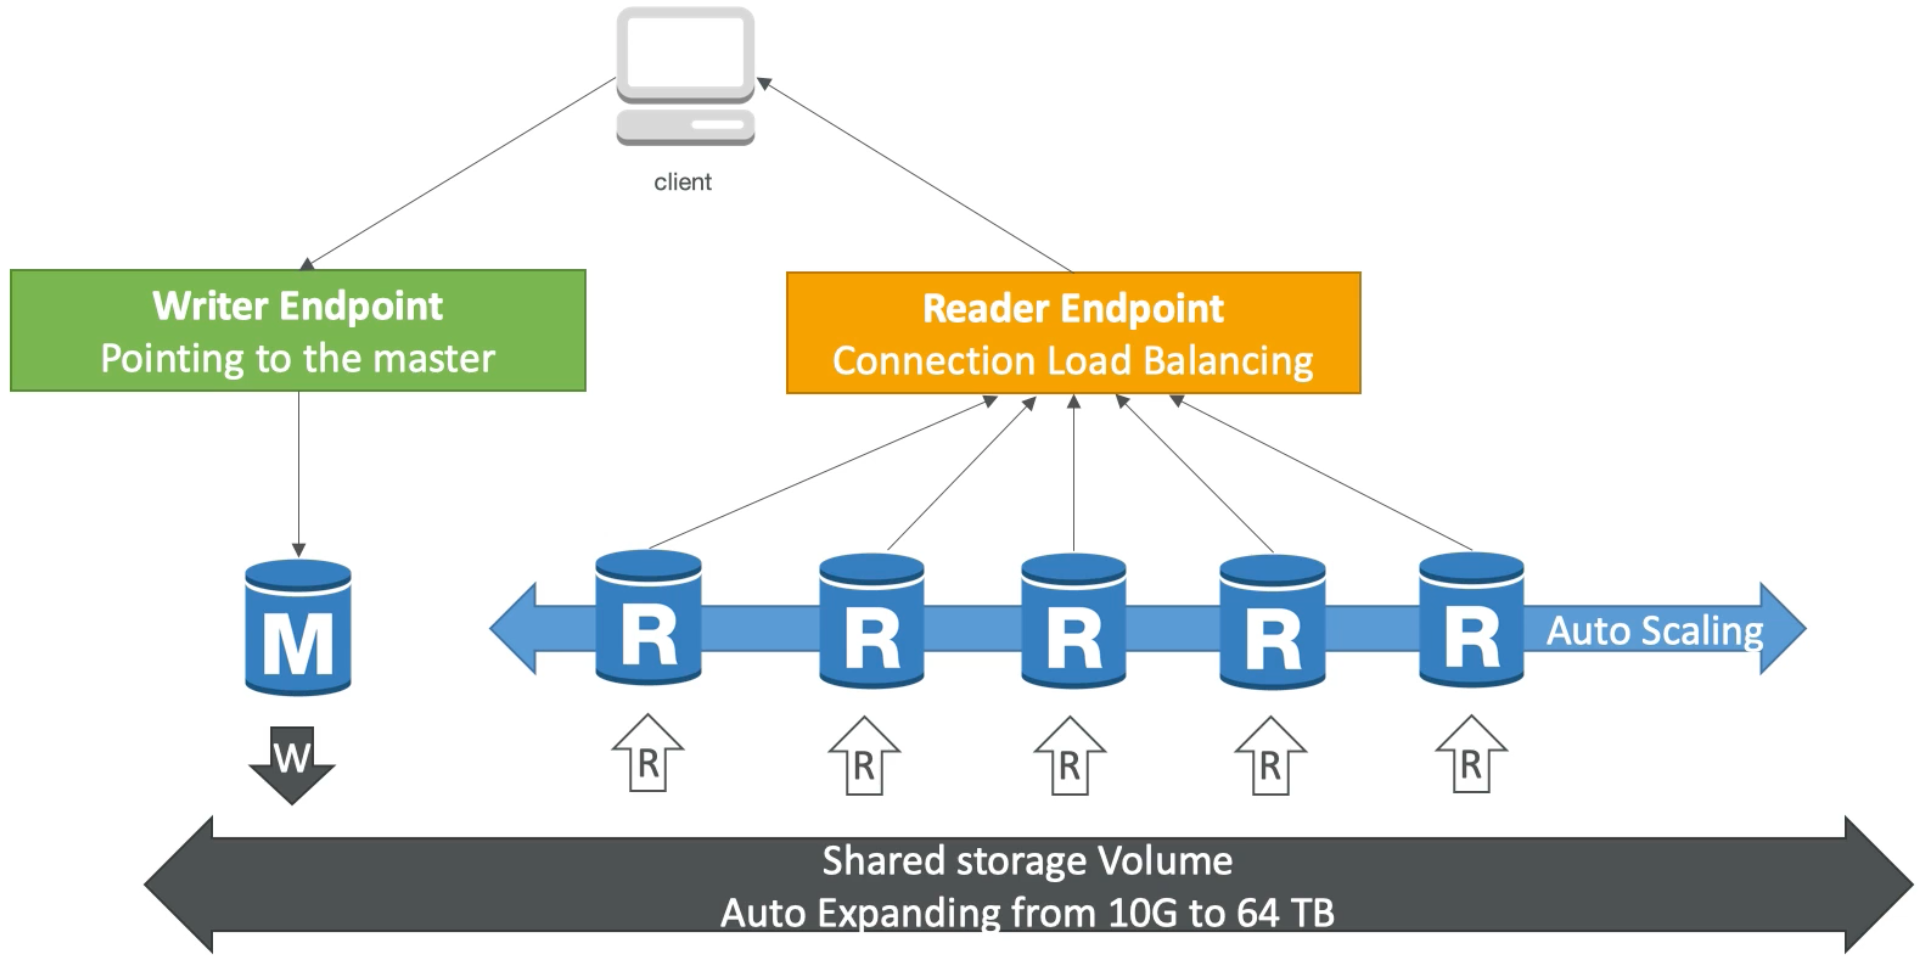
- Aurora provides a constant writer endpoint that always points to the master database instance – even if the master DB instance changes (e.g., during a failover event) the writer endpoint stays the same requiring no intervention
- We also have many read replicas which can be enabled to have auto scaling. Now, because of auto scaling, it can be really hard for applications to keep track where are the read replicas, connection url, etc.. So, Aurora introduced the reader endpoint concept which exposes a constant DNS endpoint (which is actually a load balancer) that we can use to perform all reads
Aurora Security
- Similar to RDS since it uses the same engine
- Encryption at rest using KMS
- Automated backups, snapshots, and replicas are also encrypted
- Encryption in flight using SSL (same process as MySQL and Postgres)
- Possibility to authenticate using IAM token (as in RDS)
- You are responsible for protecting the instance with security groups
- You can’t SSH into the underlying Aurora instances
Aurora Serverless
- Automated database instantiation and auto-scaling based on actual usage
- Good for infrequent intermittent or unpredictable workloads
- No capacity planning needed
- Pay per second, can be more cost-effective

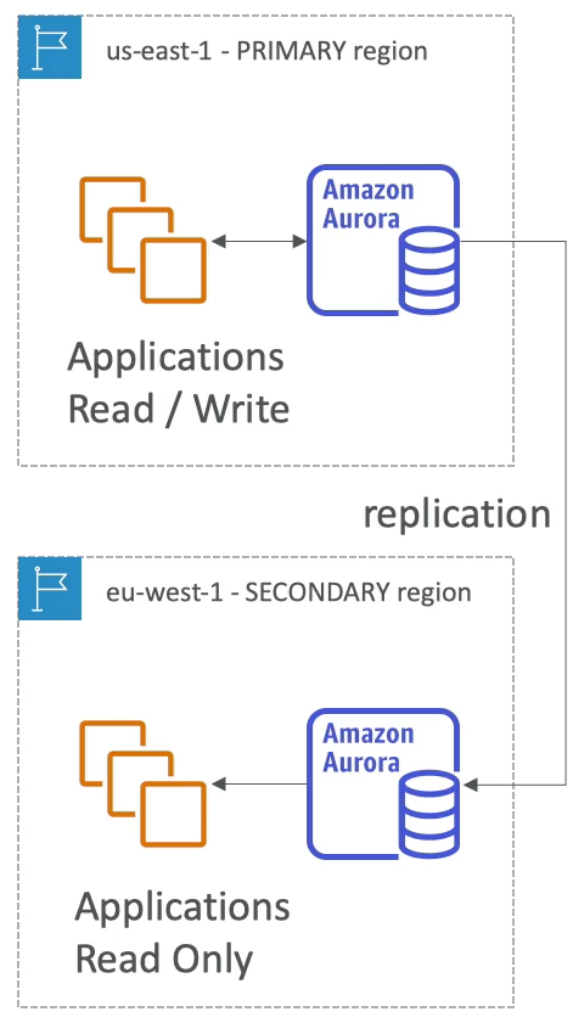
Aurora Global
- Aurora Cross Region Read Replicas:
- Useful for disaster recovery
- Simple to put in place
- Aurora Global Database (recommended):
1primary region (for read / write)- Up to
5secondary read only regions where replication lag is less than1second - **Up to
16Read Replicas per secondary region`` - Helps to decrease latency
- Promoting another region (for DR) has a recovery time objective (RTO) of less than one minute
AWS ElastiCache Overview
- The same way RDS is to get a managed relational database, ElastiCache is to get a managed Redis or Memcached
- Caches are in-memory databases with really high performance, low latency
- Caches are often used to help reduce load off of databases for read intensive workloads
- Helps make your application stateless
- Has write scaling capability using sharding
- Has read scaling capability using read replicas
- Has Multi AZ failover capability
- AWS takes care of OS maintenance / patching, optimizations, setup, configurations, monitoring, failover recovery, backups
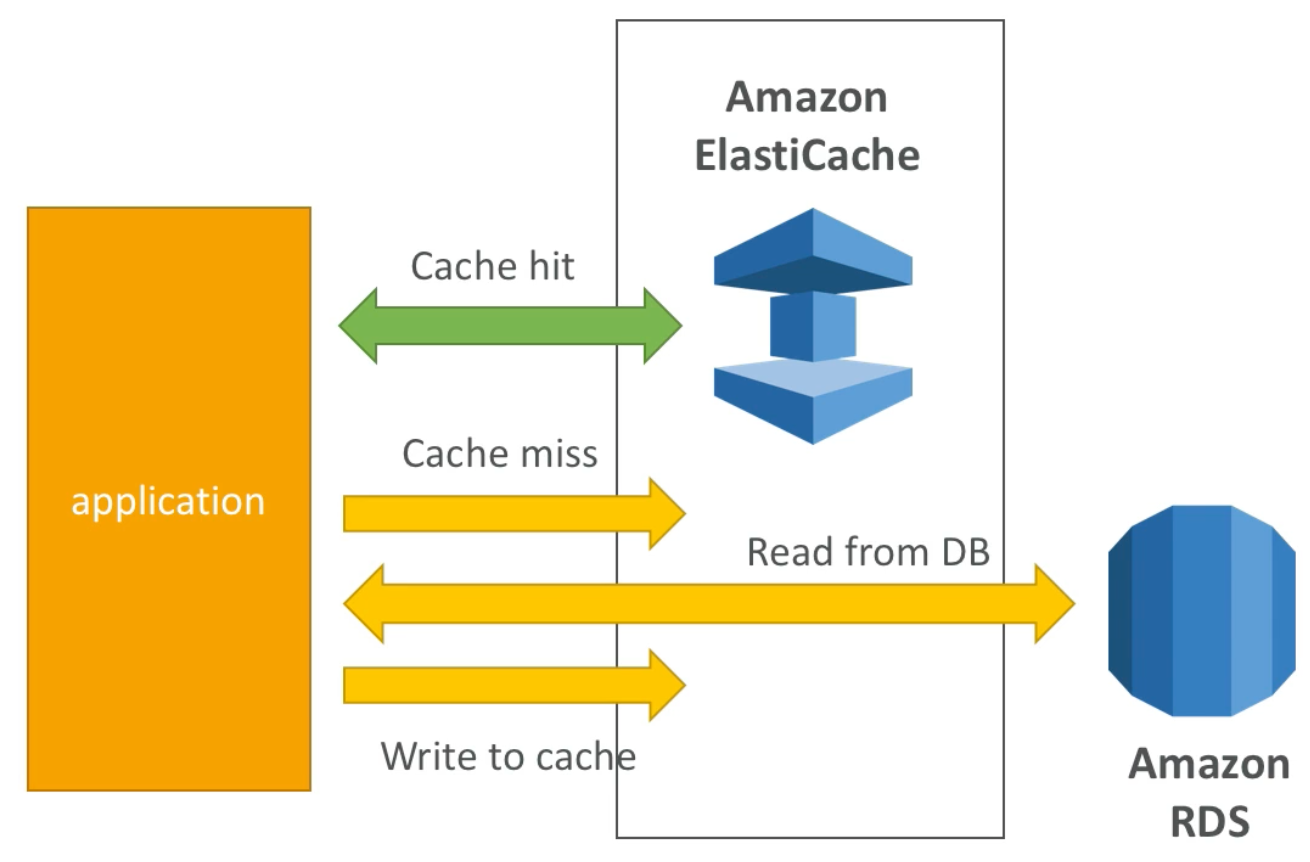
ElastiCache Solution Architecture – DB Cache
- Applications queries ElastiCache. If it does not have the data (“cache miss”), then application queries RDS and stores result in ElastiCache, else it uses the data available from ElastiCache (“cache hit”)
- This design helps relieve load in RDS
- Cache must have an invalidation strategy to make sure only the most current data is kept in the cache (since we are limited in cache size)
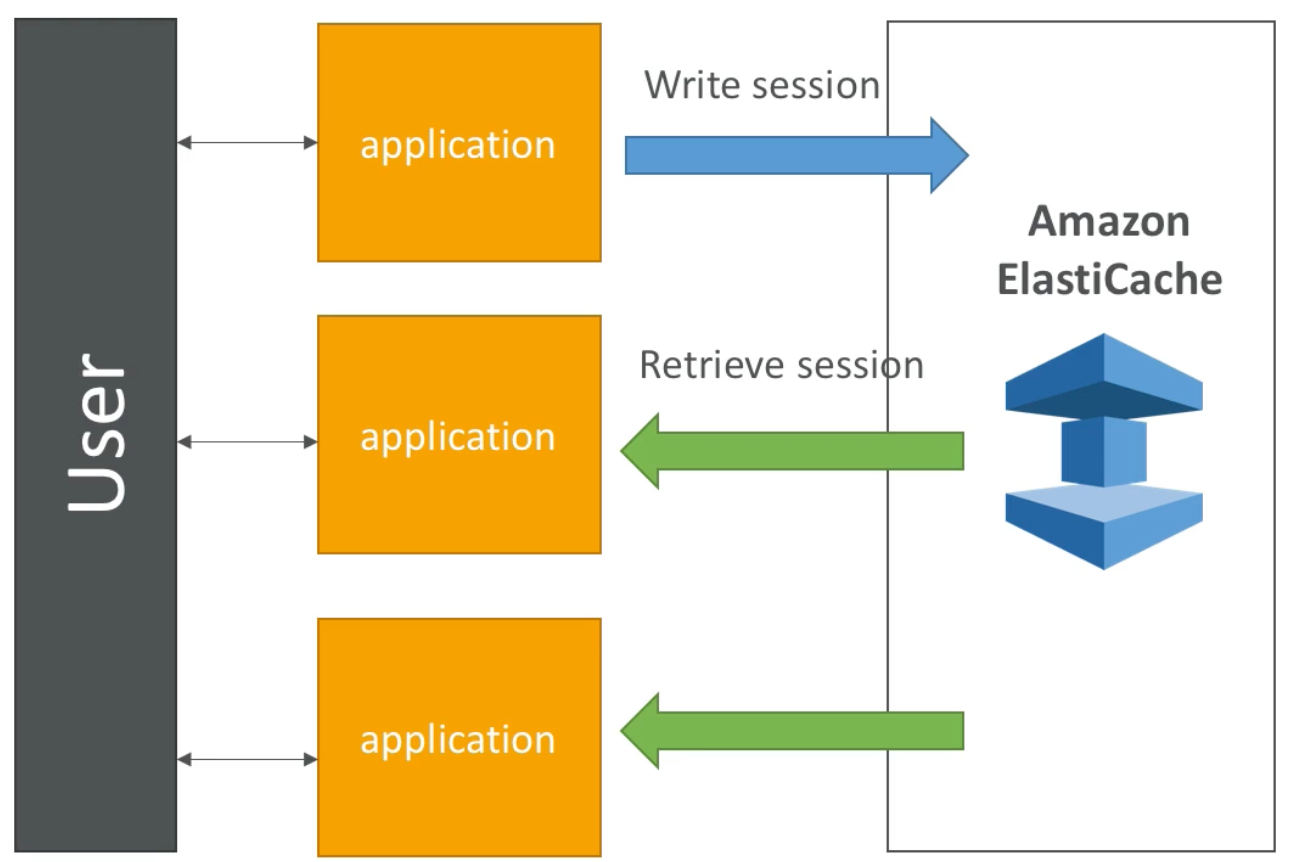
ElastiCache Solution Architecture – User Session Store
- User logs in to any of the application instances
- The application writes the session data into ElastiCache
- When the user hits another instance of our application the instance retrieves the data and user info (e.g., if user is already logge in) from ElastiCache
ElastiCache Common Uses
- To relieve read load from a database
- To share some application state
ElastiCache – Redis vs Memcached
- Redis (Replication)
- Has Multi AZ auto-failover feature to make it highly available
- Has read replicas to scale reads
- Data durability using AOF persistence – meaning even if your cache is stopped and then restarted you can still have the data from before stopping available to you
- Backup and restore features
- Memcached (Sharding)
- Uses multiple nodes for partitioning of data (sharding)
- Non persistent
- No backup and restore
- Multi-threaded architecture
ElastiCache Strategies
Caching Implementation Considerations
Read in more detail here
- Is caching effective for that data?
- Caching will be effective if data is changing slowly and few keys are frequently needed
- Caching will not be effective if data is changing rapidly many keys are frequenly needed.
- Is data structured well for caching?
- Key value based data works great for caching
Lazy Loading / Cache Aside / Lazy Population Caching Strategy
- With lazy loading pattern, application first checks for data in cache
- If the data is there then we take it and use it – this is called a cache hit
- If the data is not in the cache, then this is called a cache miss
- If there is a cache miss the application code does two things: (1) makes a call to the database to retrive the data and (2) updates the cache with this new data, so that the next time we ask for it its there
- Pros of this approach:
- Only requested data is cached (the cached is not filled up with unused data)
- Node failures are not fatal (there is just an increased latency to warm up the cache again will all of our data)
- Cons of this approach:
- Read penalty: cache miss results in
3round trips – which may be a noticeable delay for that request - Stale data: data could be updated in the database and outdated in the cache
- Read penalty: cache miss results in
Write Through Caching Pattern
- With write through pattern, whenever the application writes data it will first write to the cache and then to the database
- Pros:
- The data in the cache is never stale
- Cons:
- Write penalty: each write requires
2calls (still, this might not be so bad since users generally accept that writes may take longer than reads) - There may be missing data in the cache since we only actually write to the cache when we have a need to write to the database (this can be mitigated by combining write through with lazy loading strategy)
- This design is prone to cache churn: the idea that we may end up writing a lot of data which might never be read
- Write penalty: each write requires

Cache Evictions and Time To Live (TTL)
- Cache evictions can occur in three ways:
- You delete the item explicitly
- Item is evicted because the memory is full and it is least recently used (LRU cache)
- The Time To Live for the item expired
Route 53
AWS Route53 Overview
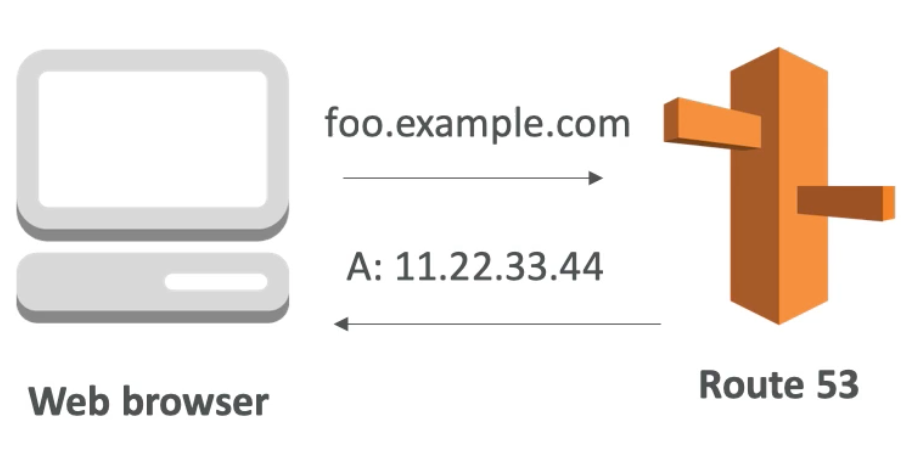
- Route 53 is a managed DNS (Domain Name System)
- DNS is a collection of rules and records which helps clients understand how to reach a server through its domain name
- In AWS, the most common records are:
A: hostname to IPv4AAAA: hostname to IPv6CNAME: hostname to hostnameAlias: hostname to AWS resource
- Route 53 can use:
- Public domain names you own (or buy)
- Private domain names that can be resolved by your instance in your VPCs
- Route53 has advanced features such as:
- Load balancing (through DNS – also called client side load balancing)
- Health checks (although limited)
- Routing policies: simple, failover, geolocation, latency, weighted, multi value
- You pay $0.50 per month per hosted zone
DNS Records TTL (Time to Live)
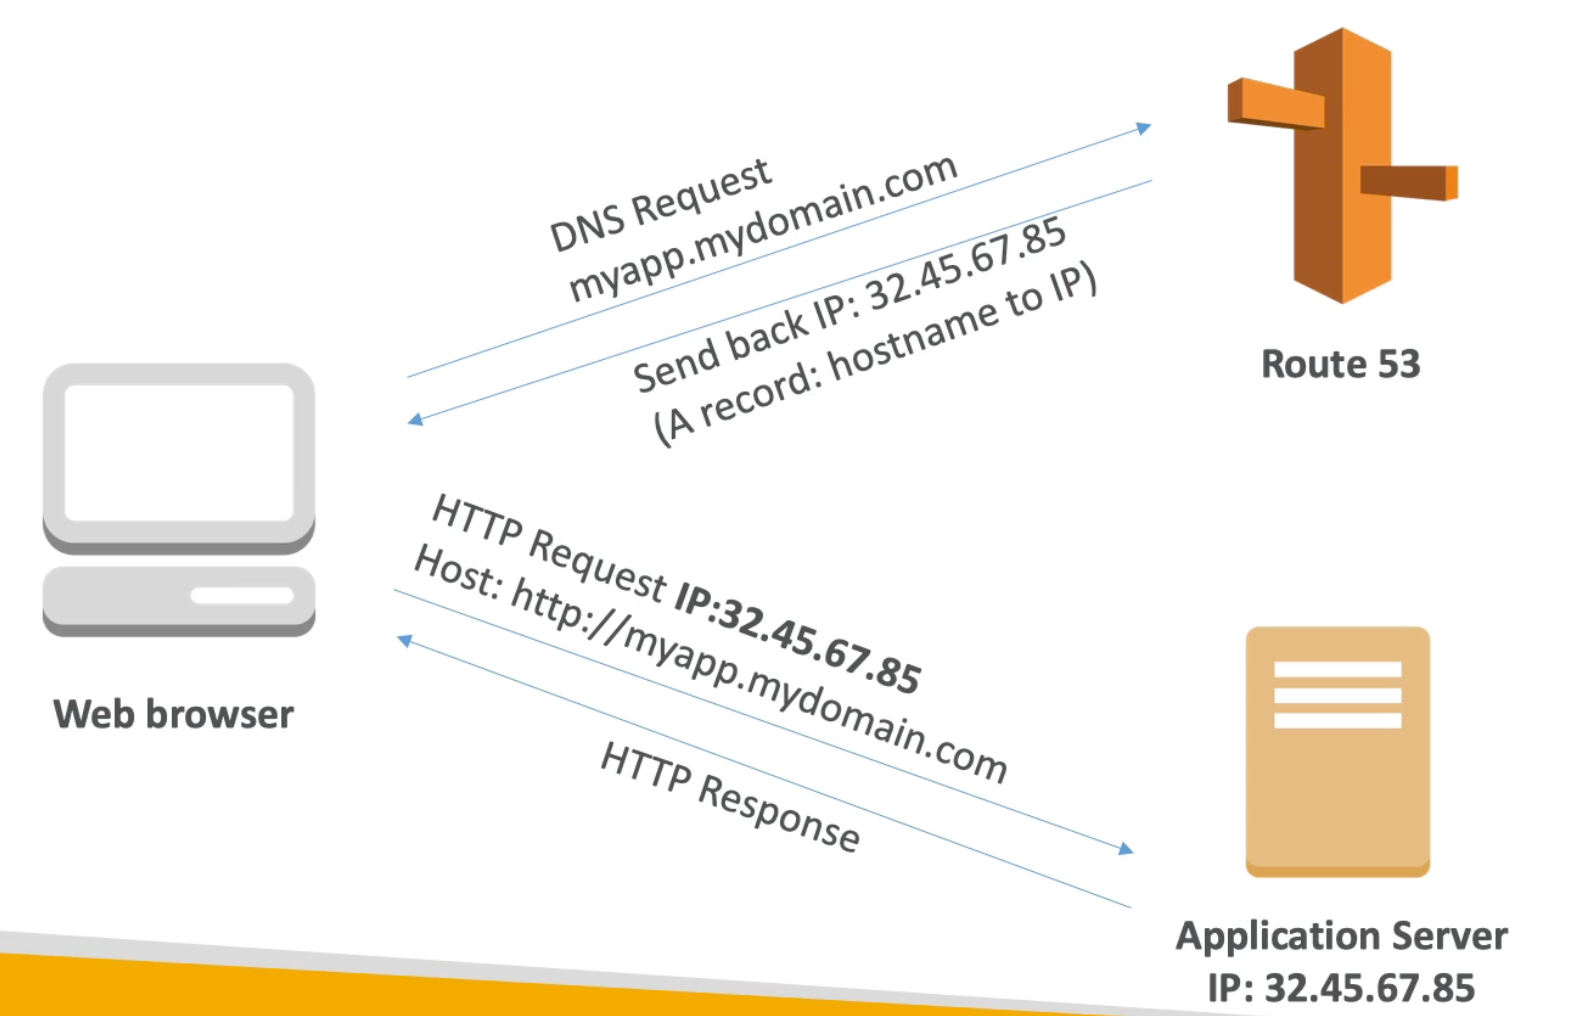
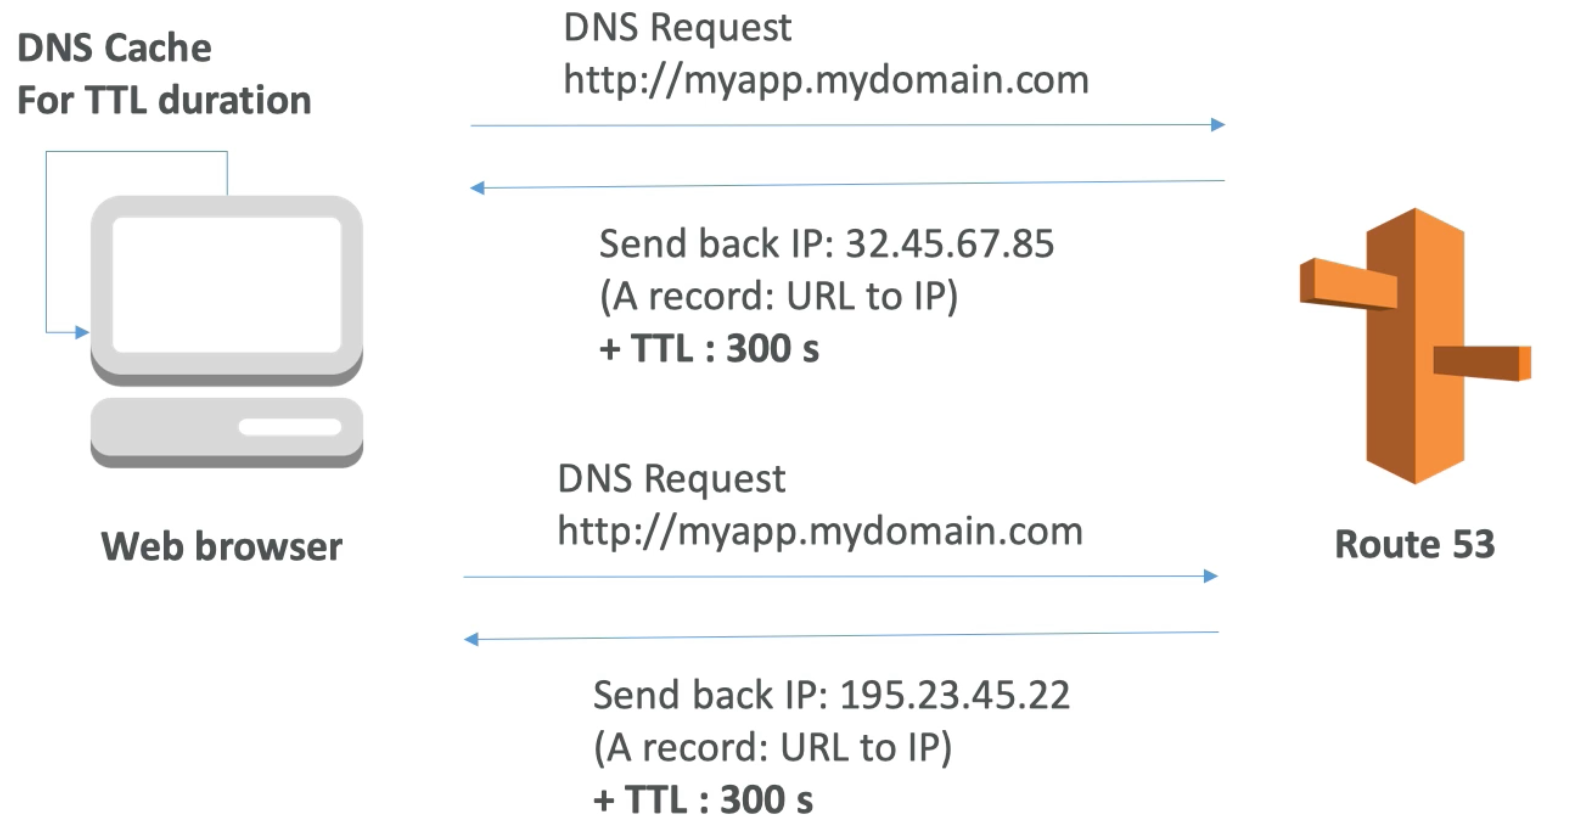
- When we make a DNS request to Route 53 to resolve a certain domain, Route 53 will send back to us the IP as well as a TTL (that is predefined by us in Route 53)
- The web browser will cache the received IP for the requested hostname for the duration of the TTL
- After the TTL is over, if we receive another DNS request for the hostname, then the browser will query Route 53 which will (again) return to us the IP mapped to this domain (which may have changed) as well as the TTL
- A high TTL would be something like
24hours- The downside of a high TTL is that there is a chance that the IP cached by the browser may be out of date for a long time before the TTL expires and the new one is received
- The upside of a high TTL is that it significantly reduces traffic on the DNS server
- A low TTL would be something like
60seconds- The downside of this is that it increases traffic to DNS server significantly
- The upside is that records are outdated for less time (in case the IP mapping for the hostname changes)
- TTL is mandatory for each DNS record
CNAME vs Alias Record
- For example, lets say we have some AWS resource (e.g., Load Balancer, CloudFront, etc..) that exposes an AWS hostname:
lb1-1234.us-east-2.elb.amazonaws.comand we want the hostnamemyapp.mydomain.comto point to it - In this case we can use a
CNAMErecord:CNAMEcan point any non-root (also called non apex) hostname to any other hostname (e.g.,app.mydomain.com=>blabla.anything.com)- Again,
CNAMErecords only work for non root domains (e.g.,abc.mydomain.com)
- We can also use an
Aliasbut note:- An
Aliasrecord can only point a hostname to an AWS resource (e.g.,abc.mydomain.com=>lb1-1234.us-east-2.elb.amazonaws.com) - The benefit of an
Aliasrecord is that it works for root domains and also non-root domains Aliasrecords are also free of charge- Has native health check
- An
Simple Routing Policy
- Use when you need to redirect to a single resource
- You cannot attach health checks to a simple routing policy
- If multiple values are returned (i.e., IPs), a random one is chosen by the client – so there is client side load balancing
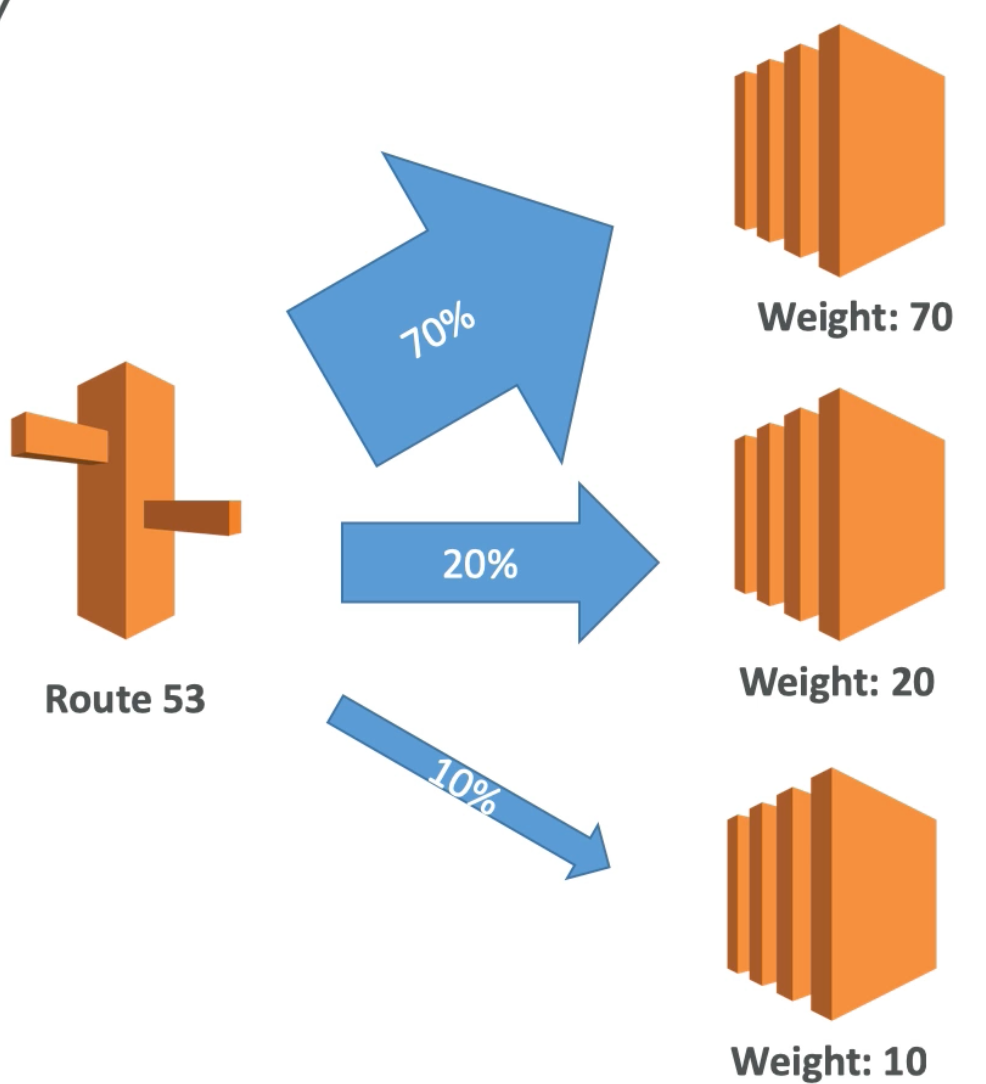
Weighted Routing Policy
- Control the percent of the requests that go to a specific endpoint
- For example, can be used to test a certain percent of traffic to a new app version
- Helpful to split traffic between regions
- Can be associated with health checks
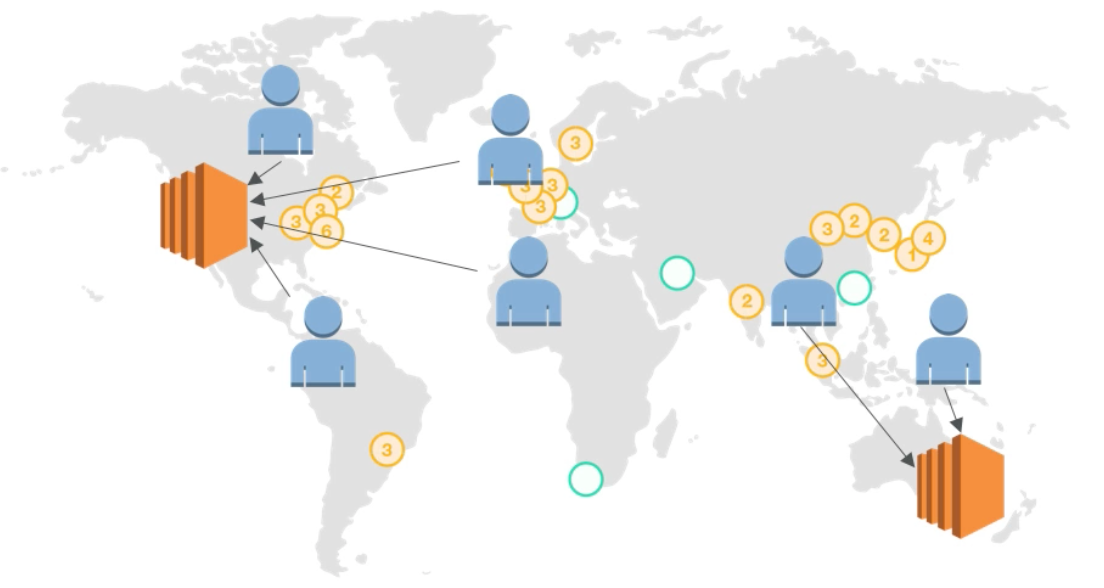
Latency Routing Policy
- Redirect user to the server that would result in least latency
- For example, a user in Germany could be redirected to an instance in the US if AWS Route53 decided that it would yield the lowest latency
- Can be associated with health checks
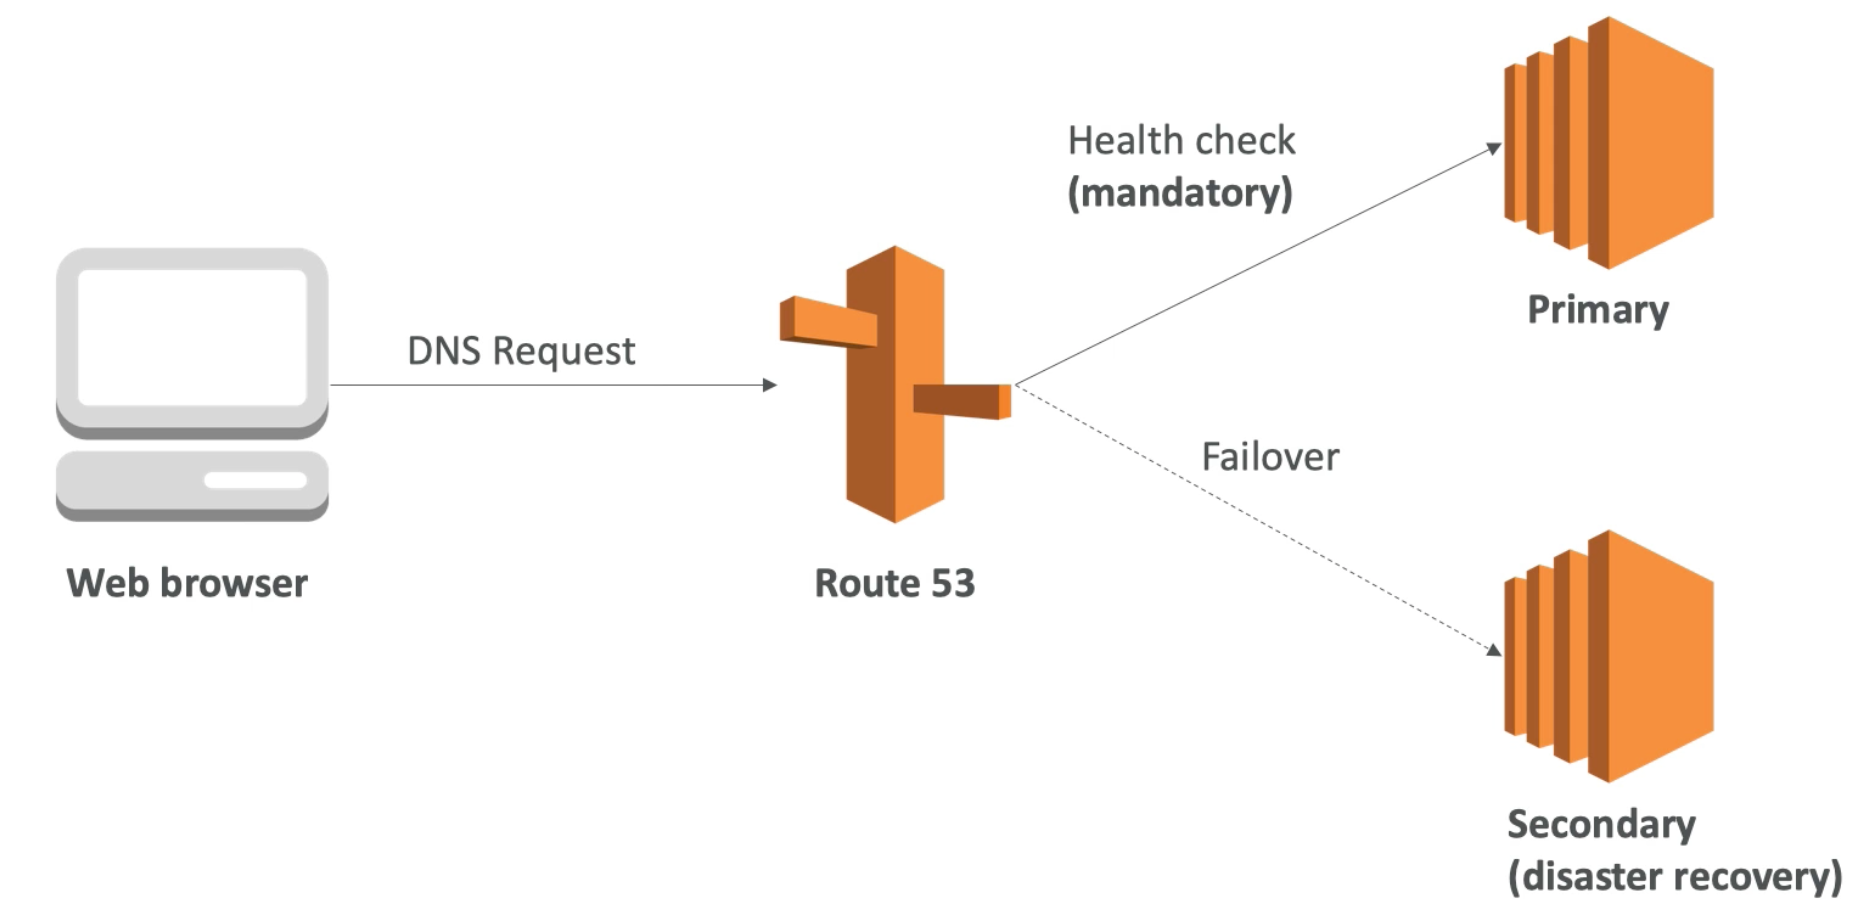
Failover routing
- Use when you want to configure active-passive failover
- Failover routing lets you route traffic to a resource when the resource is healthy or to a different resource when the first resource is unhealthy. The primary and secondary records can route traffic to anything from an Amazon S3 bucket that is configured as a website to a complex tree of records
Geo Location Routing Policy
- Geolocation routing lets you choose the resources that serve your traffic based on the geographic location of your users, meaning the location that DNS queries originate from. For example, you might want all queries from Europe to be routed to an ELB load balancer in the Frankfurt region
- We also need to create a default policy (in case there is no match)

Multi Value Routing Policy
- Use when you want Route 53 to respond to DNS queries with up to
8healthy records selected at random - Multivalue answer routing lets you configure Amazon Route 53 to return multiple values, such as IP addresses for your web servers, in response to DNS queries. You can specify multiple values for almost any record, but multivalue answer routing also lets you check the health of each resource, so Route 53 returns only values for healthy resources. It’s not a substitute for a load balancer, but the ability to return multiple health-checkable IP addresses is a way to use DNS to improve availability and load balancing
- To route traffic approximately randomly to multiple resources, such as web servers, you create one multivalue answer record for each resource and, optionally, associate a Route 53 health check with each record. Route 53 responds to DNS queries with up to
8healthy records and gives different answers to different DNS resolvers. If a web server becomes unavailable after a resolver caches a response, client software can try another IP address in the response - Note the following:
- If you associate a health check with a multivalue answer record, Route 53 responds to DNS queries with the corresponding IP address only when the health check is healthy
- If you don’t associate a health check with a multivalue answer record, Route 53 always considers the record to be healthy
- If you have eight or fewer healthy records, Route 53 responds to all DNS queries with all the healthy records
- When all records are unhealthy, Route 53 responds to DNS queries with up to eight unhealthy records

Health Checks
- If you want Route 53 to check the health of a specified endpoint and to respond to DNS queries using the record only when the endpoint is healthy, choose a health check
- Note if, for example, you have a weighted routing policy with multiple endpoints and you want to use health checks, then you will need to define a Route53 health check for each one of those endpoints
- After
Nfailed health checks instance is considered unhealthy (default is3) - After
Nhealth checks passed instance is considered healthy (default3) - Default health check interval is
30seconds (can be set to10seconds but is more expensive) - About 15 health checkers will check the endpoint we define which means about one request every
2seconds - Can have HTTP, TCP, and HTTPS health checks (no SSL verification)
- We can also integrate health check with CloudWatch
VPC Fundamentals
- VPC, Subnets, Internet Gateways, NAT Gateways
- Security Groups, Network ACL (NACL), VPC Flow Logs
- VPC Peering, VPC Endpoints
- Site to Site VPN & Direct Connect
VPC & Subnets
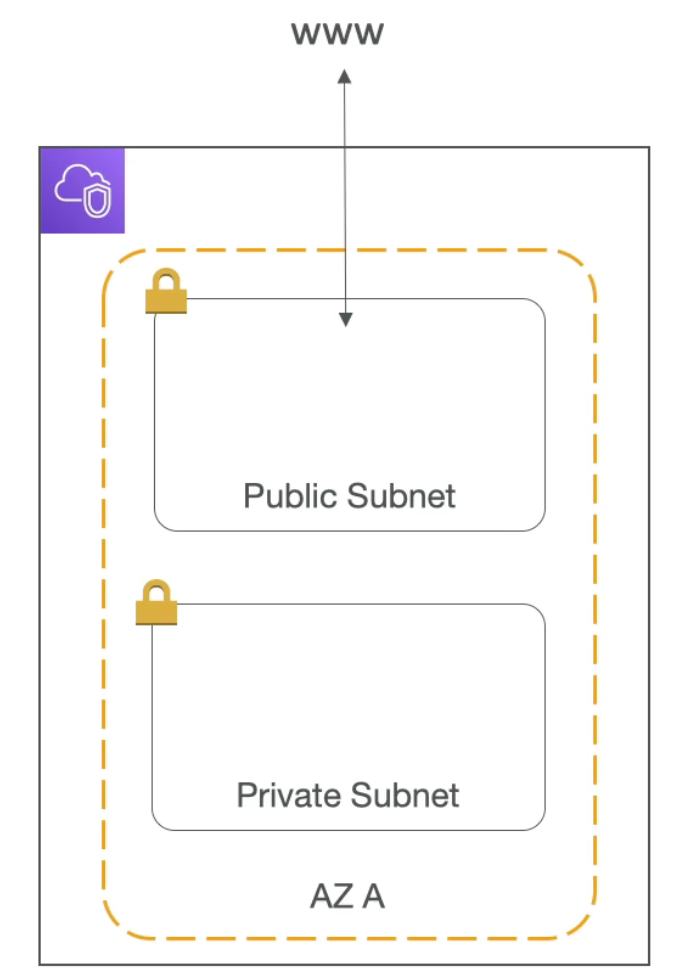
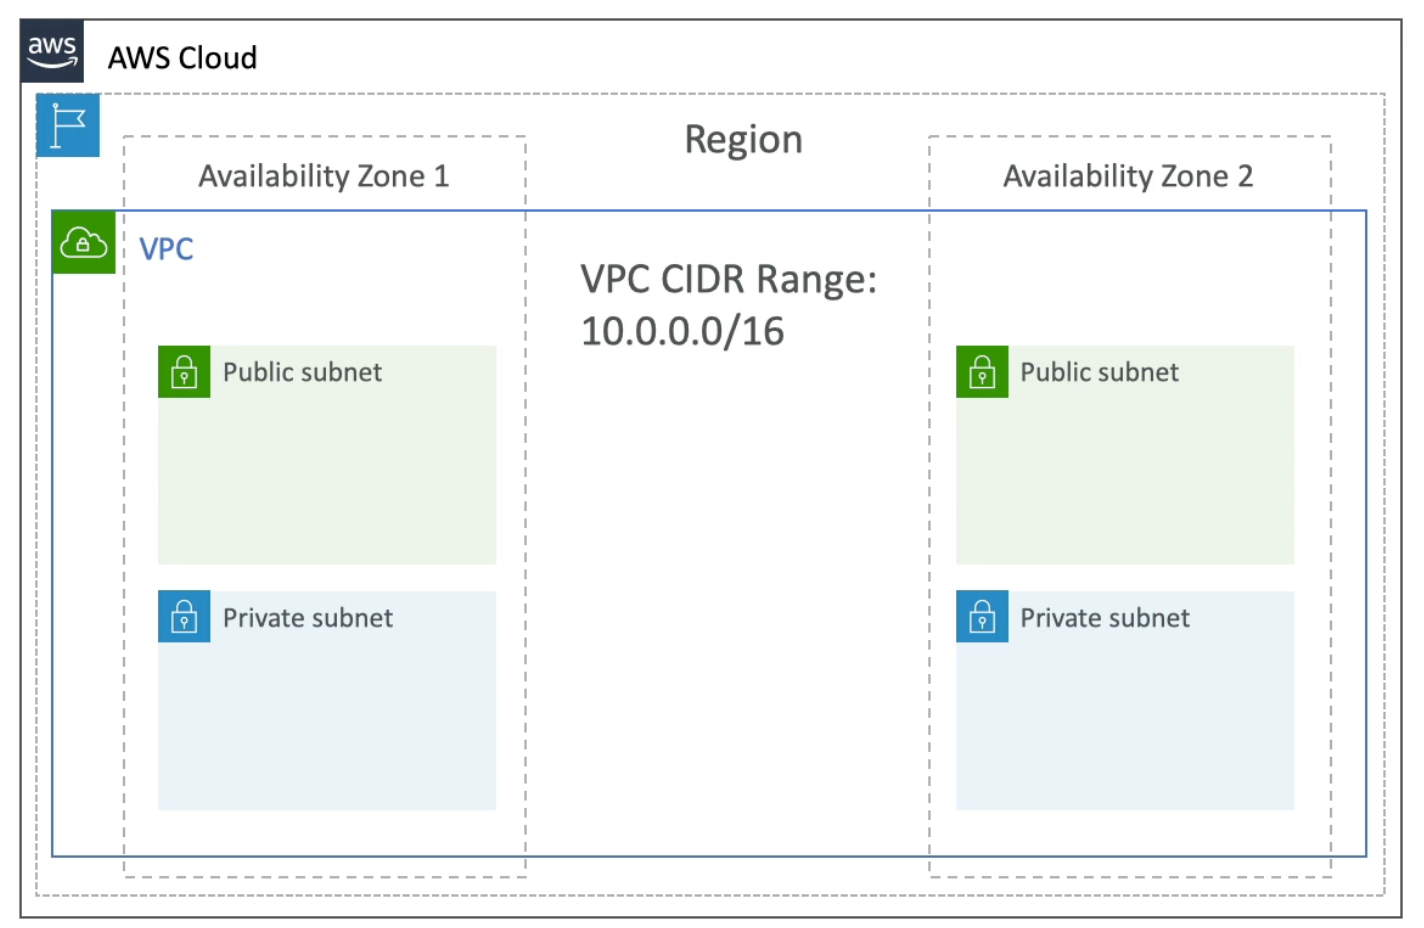
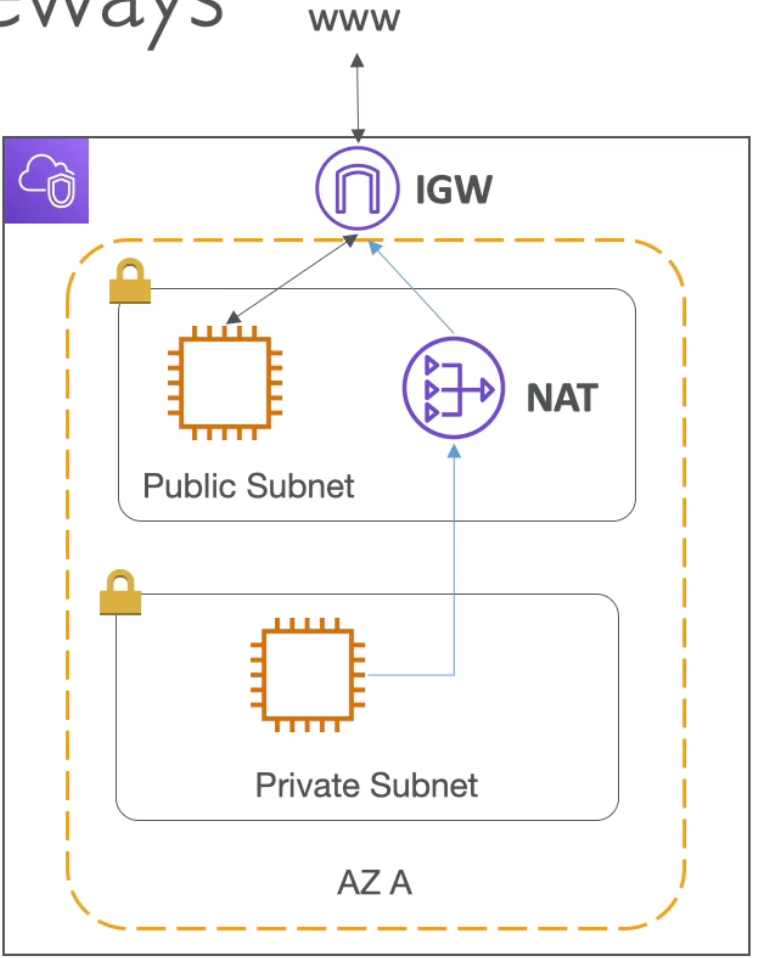
- VPC: private network to deploy your resources (regional resources)
- Subnets: allow you to partition your network inside your VPC (subnets are defined at the Availability Zone level)
- A public subnet is a subnet that is accessible from the internet
- A private subnet is a subnet that is not accessible from the internet
- To define access to the internet and between subnets we use Route Tables
Internet Gateway and NAT Gateways
- Internet Gateways help our VPC instances connect to the internet
- Public subnet has a route to the internet gateway
- NAT Gateways (AWS managed) and NAT Instances (self managed) allow your instances in your Private Subnets to access the internet while remaining private
Network ACL and Security Groups
- NACL (Network ACL)
- A firewall which controls the traffic from and to the subnet (i.e., the first mechanism of defense of our public subnet)
- Can have ALLOW and DENY rules
- Are attached at the Subnet level
- Rules only include IP addresses
- Security Groups
- A firewall that controls the traffic to and from an ENI or an EC2 Instance (i.e., second mechanism of defense)
- Can have only ALLOW rules
- Rules can include IP addresses as well as other security groups

NACL vs Security Groups
VPC Flow Logs
- Capture information about network traffic:
- VPC Flow Logs
- Subnet Flow Logs
- Elastic Network Interface Flow Logs
- Captures network information from AWS managed interfaces too: Elastic Load Balancers, ElastiCache, RDS, Aurora, etc..
- VPC Flow logs data can go to S3 / CloudWatch Logs
VPC Peering
- Connect two VPC privately using AWS network
- Make them behave as if the two VPCs are in the same network
- We do this by setting up a VPC peering connection between them
- The two VPCs must not have overlapping CIDR (IP address range)
- VPC Peering is not transitive. If we have a peering connection between (VPC A and VPC B) and (VPC A and VPC C) this does not mean that VPC C can communicate with VPC B (this means there is no transitivity)
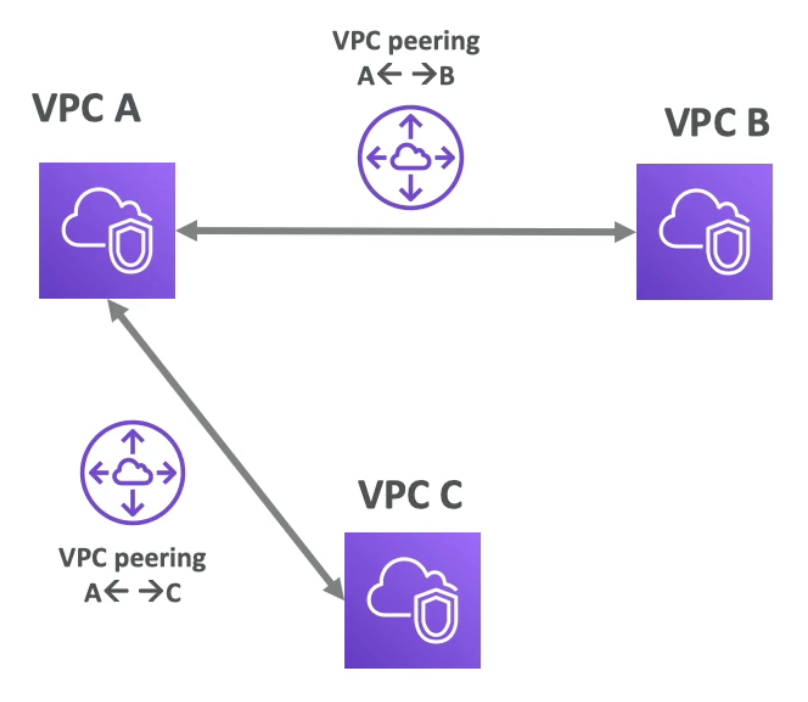
VPC Endpoints
- Use when you need private access from within your VPC to an AWS services
- Endpoints allow you to connect to AWS services using a private network instead of the public network
- This gives you increased security and lower latency to access AWS services
- Use VPC Endpoint Gateway for S3 and DynamoDB
- Use VPC Endpoint Interface for the rest of the services
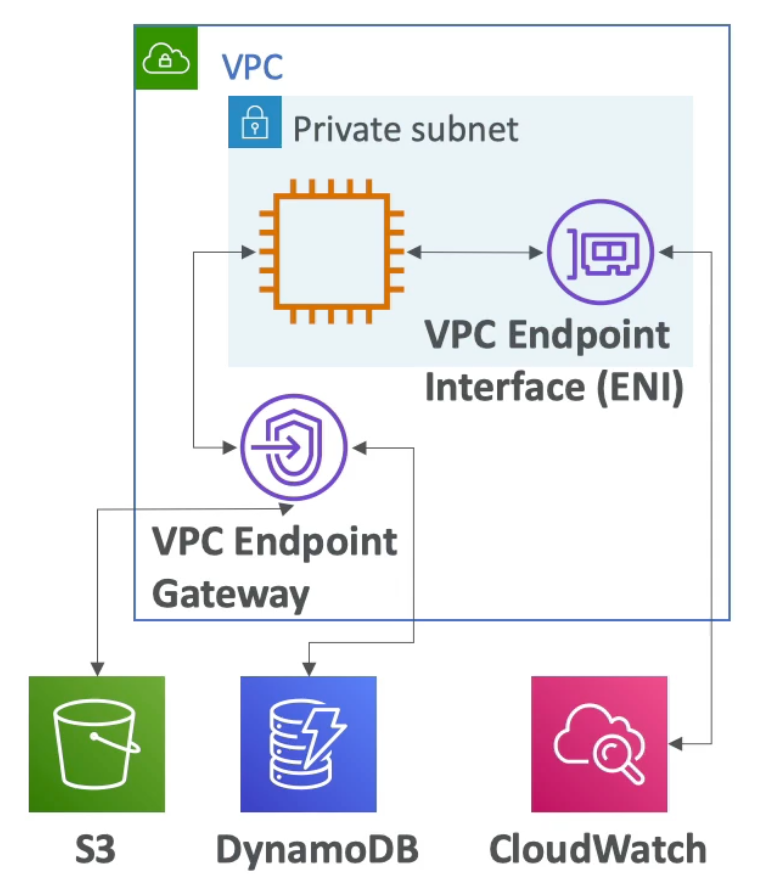
Site to Site VPN & Direct Connect
- Site to Site VPN
- Connect an on premise VPN to AWS
- The connection is automatically encrypted
- Goes over the public internet
- Direct Connect (DX)
- Establish a physical connection between on-premise and AWS
- The connection is private secure and fast
- Goes over a private network
- Note: Site to site VPN and Direct Connect cannot access VPC endpoints
Three Tier Solution Architecture
- The
3tiers:- Public Subnet (e.g., ELB which is publicly available by users)
- Private Subnet (e.g., EC2 instaces with ASG sitting behind the ELB – they do not need to be accessible to anyone beside the ELB, so we use route tables to define network access between public ELB subnet and the EC2 private subnet)
- Data Subnet (e.g., AWS RDS + ElastiCache also sitting in private subnet
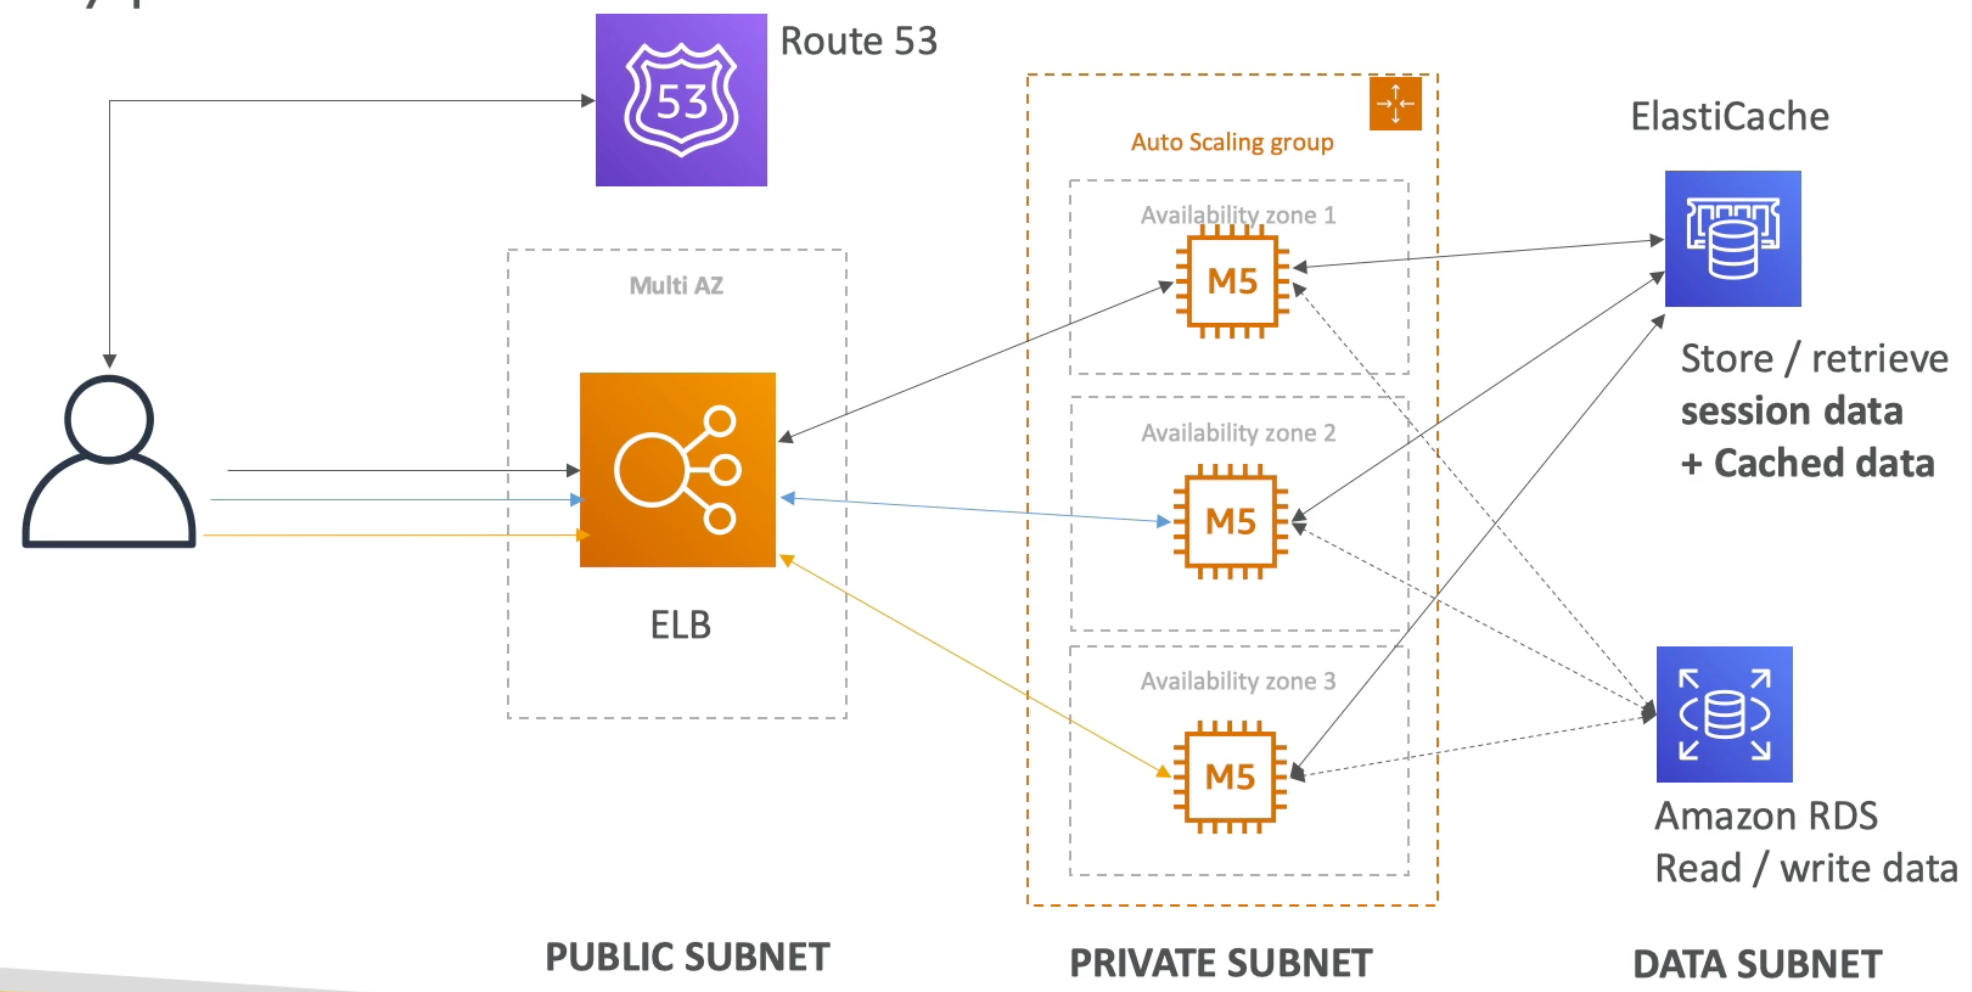
VPC Cheatsheet
- VPC: Virtual Private Cloud
- Subnets: tied to an AZ, network partition of the VPC
- Internet Gateway: at the VPC level, provide Internet Access
- NAT Gateway / Instances: give internet access to private subnets
- NACL: stateless, subnet rules for inbound and outbound
- Security Groups: stateful, operate at the EC2 instance level or ENI (stateful means if you send a request from your instance, the response traffic for that request is allowed to flow in regardless of inbound security group rules. Responses to allowed inbound traffic are allowed to flow out, regardless of outbound rules)
- VPC Peering: connect two VPC with non overlapping IP ranges, non transitive
- VPC Endpoints: provide private access to AWS Services within VPC
- VPC Flow Logs: network traffic logs
- Site to Site VPN: VPN over the public internet between on premise data center and AWS
- Direct Connection: direct private connection to AWS
Simple Storage Service (AWS S3)
- Main building block of AWS
- Advertised as “infinetly scaling” storage
S3 Buckets and Objects
- S3 allows people to store objects (files) in buckets (directories)
- Buckets must have globally unique name
- Buckets are defined at the region level
- Naming convention
- No uppercase
- No underscore
- 3-63 characters long
- Not an IP
- Must start with lowercase letter or number
S3 Overview – Objects
- Objects (files) have a key
- The key is the FULL path:
- s3://my-bucket/my_file.txt
- s3://my-bucket/my_folder/another_folder/my_file.txt
- The key is composed of prefix + object name
- So, from above, my_folder/another_folder/ would be the prefix and my_file.txt would be the object name
- Max object size if 5TB (5000GB)
- If uploading more than 5GB, you must use multi-part upload
- Each object can have metadata (list of text key/value pair)
- Can also have Tags (Unicode key/value pair – up to
10) - Object can also have Version ID (if versioning is enabled)
S3 Versioning
- Not enabled by defauld
- It is enabled at the bucket level
- Same key overwrite will increment the version
- Best practive is to version your buckets
- Protects against unintended deletes (i.e., ability to restore a version)
- Easily roll back to a previous version
- Notes:
- Any file that is not versioned prior to enabling versioning will have a version of null
- Suspending versioning does not delete the previous versions
S3 Encryption for Objects
- There are
4methods of encrypting objects in S3:SSE-S3: encrypts S3 objects using keys handled and managed by AWSSSE-KMS: leverages AWS Key Management Service to manage encryption keysSSE-C: when you want to manage your own encryption keys- Client Side Encryption
SSE-S3
SSE-S3: encryption using keys handled and managed by AWS- Object is encrypted server side
AES-256encryption- Must set header:
"x-amx-server-side-encryption":"AES256"
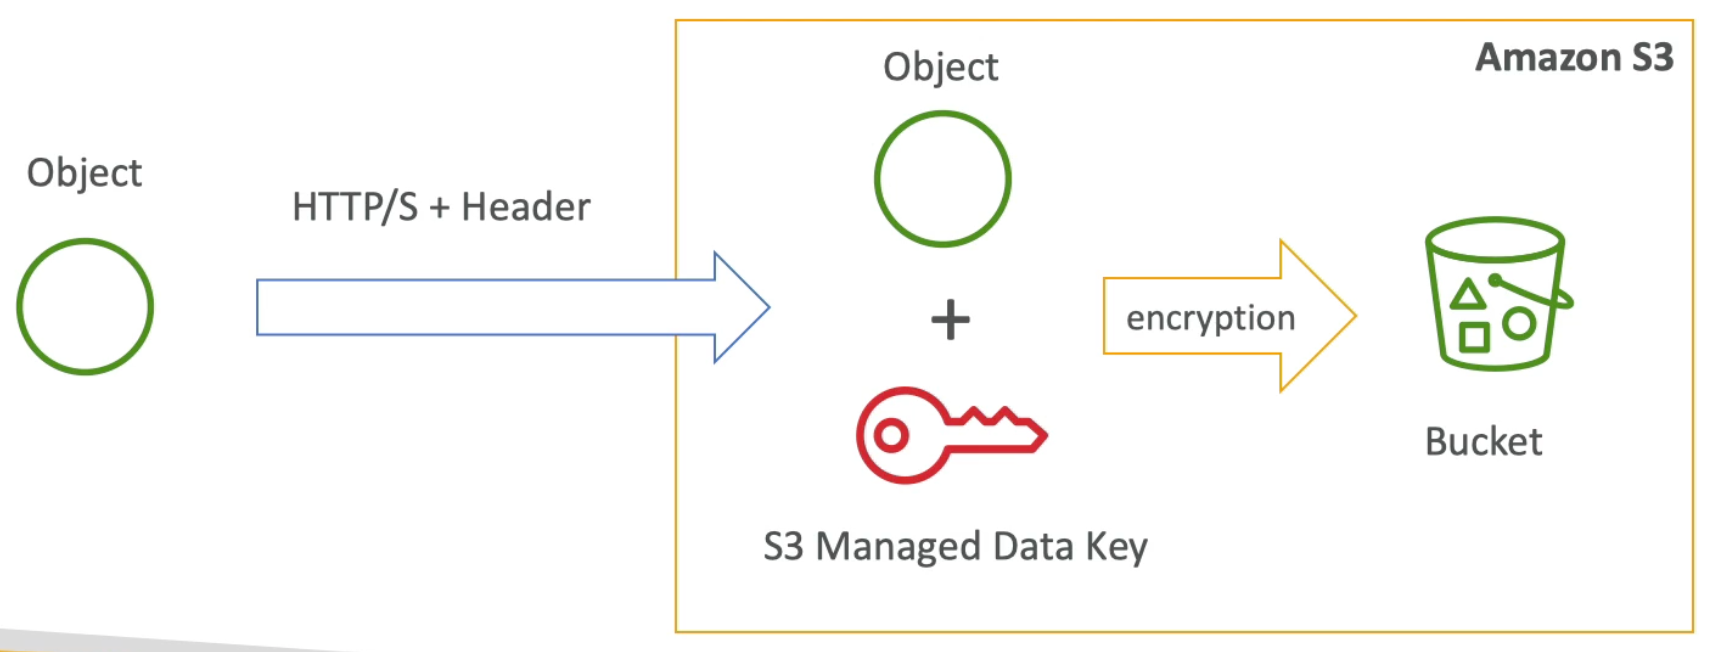
SSE-KMS
SSE-KMS: encryption using keys handled and managed by AWS- KMS advantages: user control + audit trail
- Object is encrypted server side
- Must set header:
"x-amx-server-side-encryption":"aws:kms"
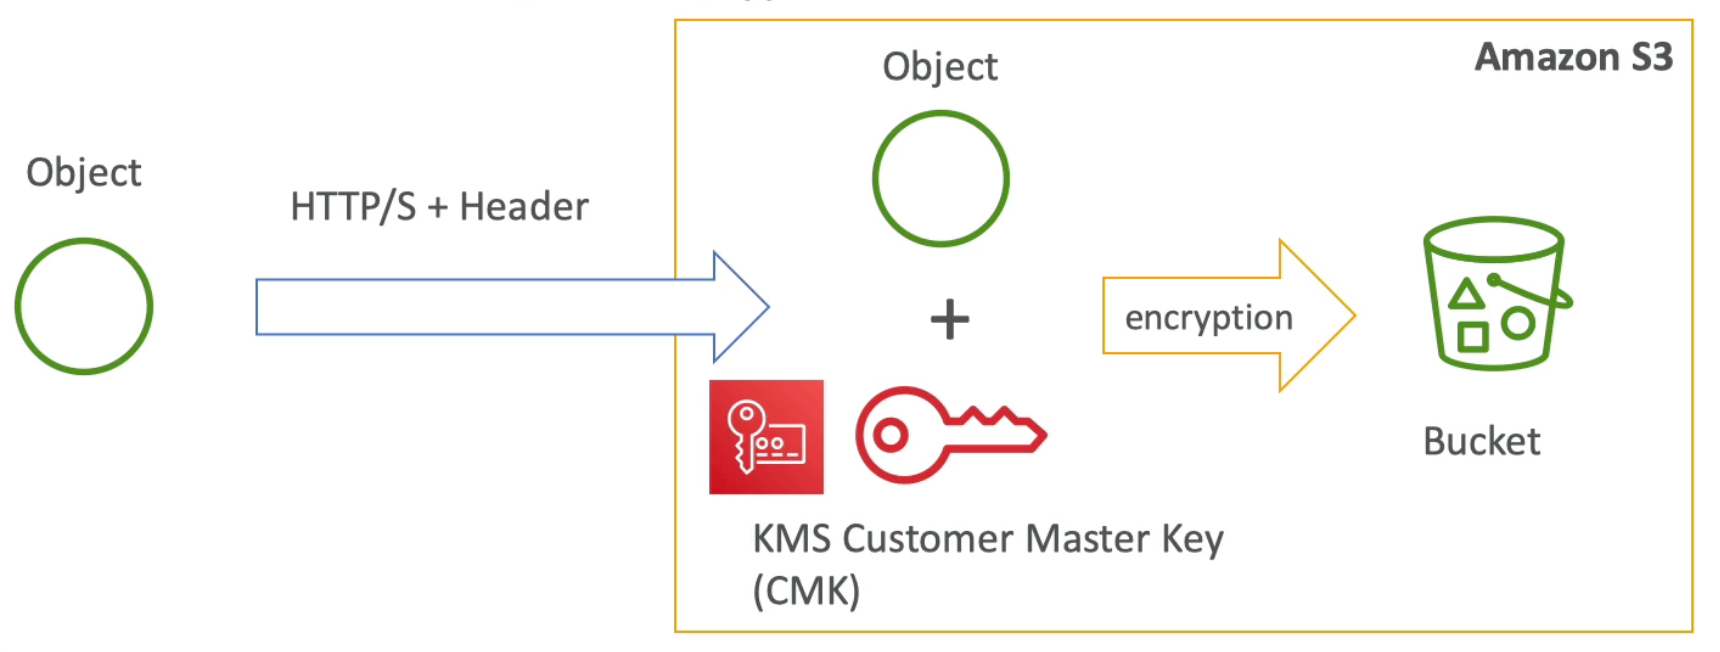
SSE-C
SSE-C: server side encryption using data keys fully managed by the customer outside of AWS- Amazon S3 does not store the encryption key you provide
HTTPSmust be used (because you are sending a secret over the wire to AWS)- Encryption key must be provided in
HTTPheaders for everyHTTPrequest made
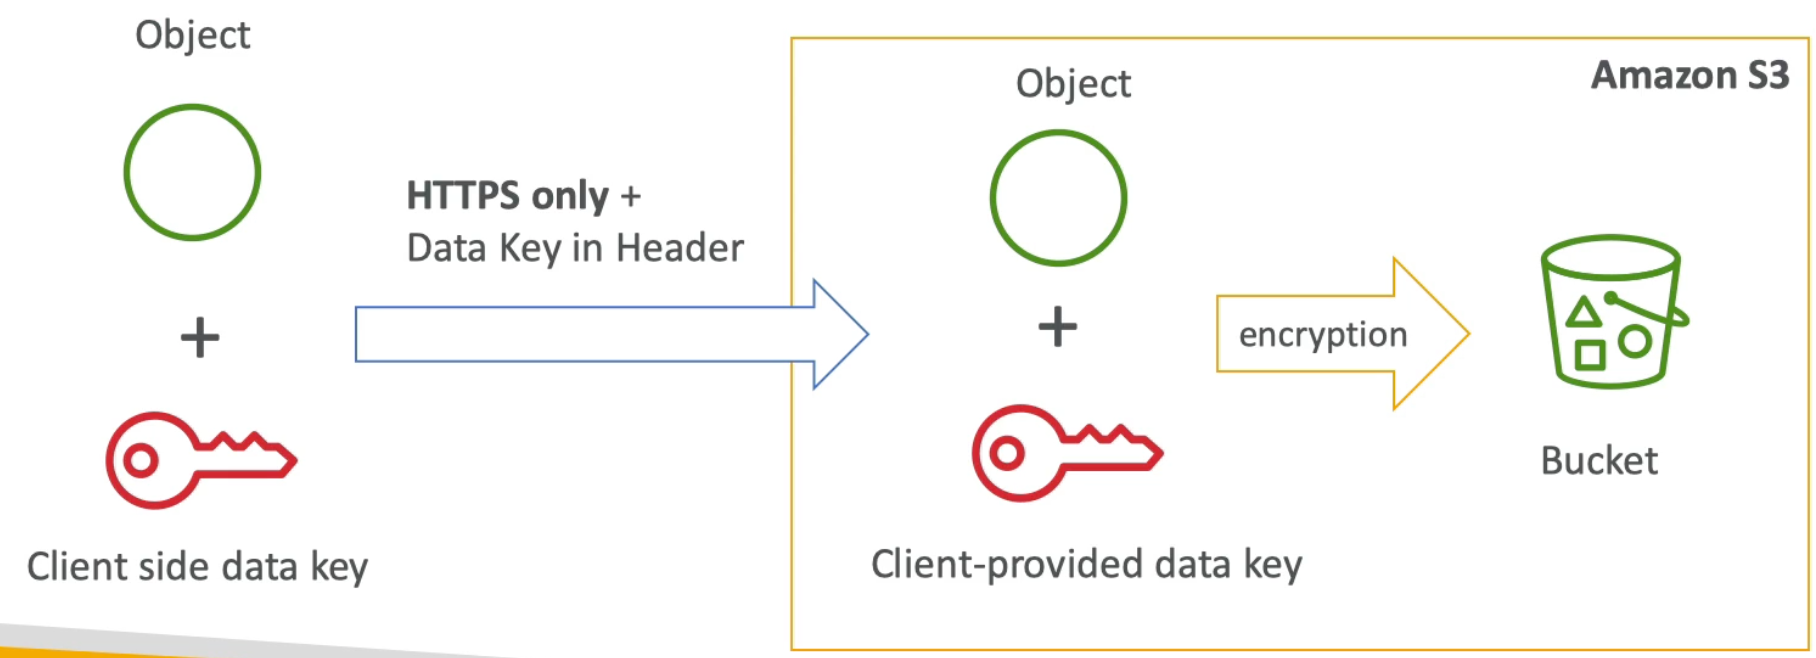
Client Side Encryption
- Data is encrypted before sending it over to S3
- Client must decrypt the data themselves when retrieving from S3
- Customer fully manages encryption / decryption cycle
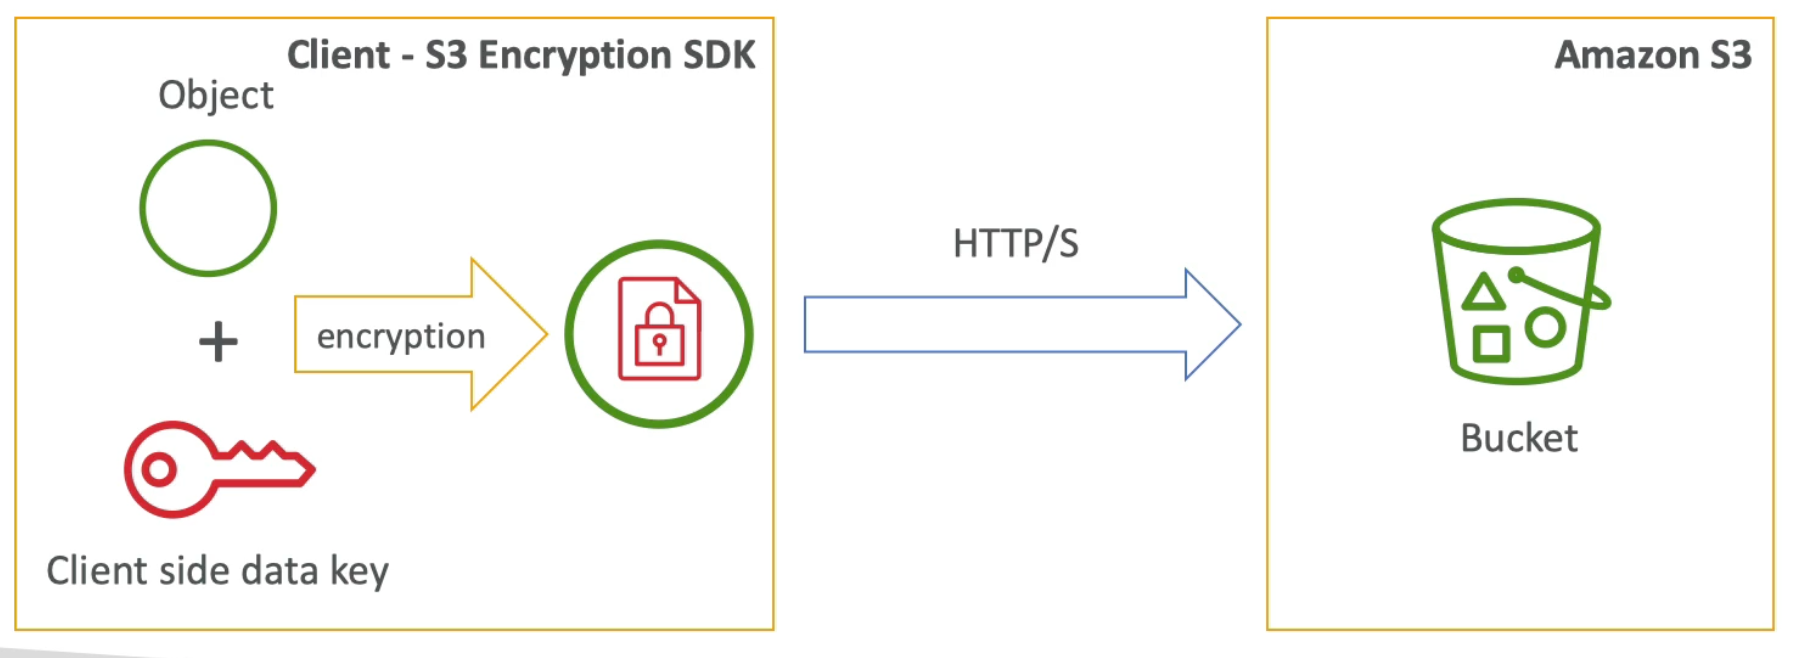
Encryption in transit
- In terms of retrieving an object S3 exposes:
HTTPendpoint: non encryptedHTTPSendpoint: encryption in flight
- Note:
HTTPSis mandatory forSSE-C
S3 Security
- User based
- IAM policies – which API calls should be allowed for a specific user from IAM console
- Resource based
- Bucket Policies – bucket wide rules that we can set from the S3 console (bucket rules say what principals can and cannot do on our S3 bucket – enables us to do cross account access on our buckets)
- Object Access Control List (ACL) – finer grain (we set the access rule at the object level)
- Bucket Access Control List (ACL) – less common
- Note: an IAM principal can access an S3 object if:
- The user IAM permissions allow it OR the bucket policy ALLOWS it
- AND if there is no explicit DENY
- Thus: explicit DENY in an IAM policy will take precedence over a bucket policy permission
Bucket Policies
- JSON based policies:
Resource: buckets and object which policy applies toAction: Set of actions to ALLOW or DENY (as dictated byEffect)Effect: ALLOW or DENY actions defined inActionarrayPrincipal: the account of user to apply the policy to
- Bucket policies are also commonly used to:
- Grant public access to a bucket
- Force objects to be encrypted at upload
- Grant access to another account (Cross Account S3 Bucket policies)
Bucket settings for Block Public Access
- Below details are not required for the exam, but, in general, you should know that it is possible to block public access to your S3 bucket through these settings
- Block public access to buckets and objects granted through:
- new access control lists (ACLs)
- any access control lists (ACLs)
- new public bucket or access point policies
- Block public and cross-account access to buckets and objects through any public bucket or access point policies
S3 Security – Other
- Networking:
- Can access S3 privately through VPC Endpoints (e.g., an EC2 instance in a VPC can use VPC Endpoints to make a request to S3 without going through public internet)
- Logging and Audit:
- S3 Access Logs can be stored in other S3 buckets
- API calls can be logged in AWS CloudTrail
- User Security:
- MFA Delete: Multi Factor Authentication can be setup so that it is required in versioned objects whenever someone tries to delete objects
- Pre-Signed URLs: URLs that are valid only for a limited time (e.g., premium video service)
S3 Websites
- S3 can host static websites and have them accessible on the public internet
- The website URL will look like:
<bucket-name>.s3-website-<AWS-region>.amazonaws.com - If you get a
403 Forbiddenerror, make sure the bucket policy allows public reads
Cross-Origin Resource Sharing (CORS) Explained
- An origin is a scheme (protocol) + host (domain) + port (e.g.,
https://www.mydomain.com:8080) - (CORS) is an HTTP-header based mechanism that allows a server to indicate any other origins (domain, scheme, or port) than its own from which a browser should permit loading of resources
- Read more here
- Preflight Request: a request that browser does before the actual request is sent to check that the cross origin allows us to make a request to it
- Preflight Response: returns back to us information regarding whether we are allows to perform the cross origin request to the specified endpoint along with all of the allowed methods
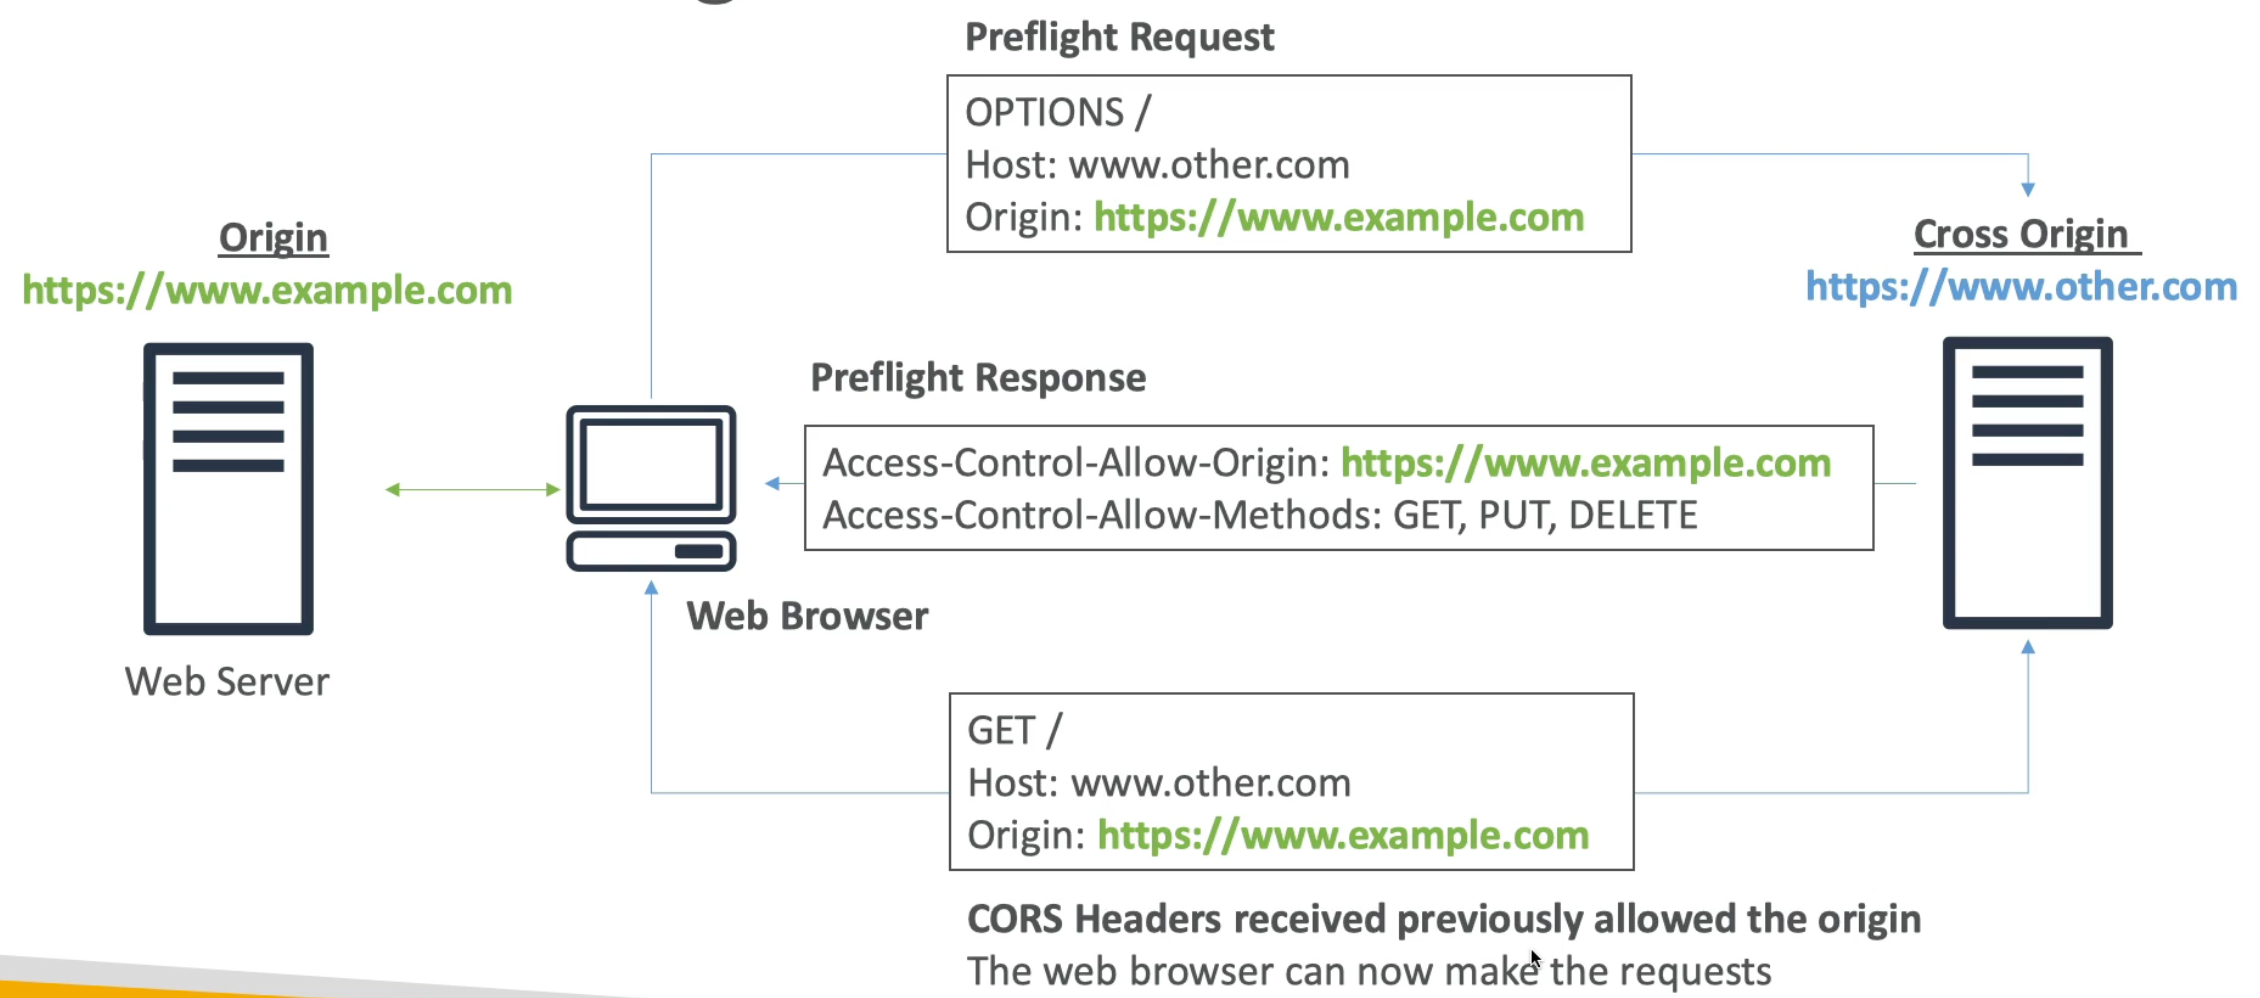
S3 CORS
- If a client does a cross origin request on our S3 bucket, we need to enable the correct CORS headers
- You can allow for a specific origin (or
*for all origins)

S3 Consistency Model – Before December 2020
Before December 2020 S3 did not have strong eventual consistency
There was a happy path scenario. This is where we are writing a brand new object to an S3 bucket.
PUT /key-prefix/cool-file.jpg 200GET /key-prefix/cool-file.jpg 200
When we GET the file right after we PUT we get a status code of 200 and we know the file is the most up to date copy. Otherwise known as read-after-write consistency
But then there was this caveat scenario with overwriting. We write an object to the bucket. Another process writes that object again (with new content), and then we try to read the object:
PUT /key-prefix/cool-file.jpg 200PUT /key-prefix/cool-file.jpg 200(new content)GET /key-prefix/cool-file.jpg 200
Here we used to end up with the eventual consistency issue. Namely, when we called GET we could have received the file contents of the first PUT or the second. The reason being that S3 is a distributed service and it could take time for the change to be propagated behind the scenes – thus yielding the the eventual consistency problem.
Then there was the fussy 404 caveat. This occurred when you would issue a GET before the PUT had finished.
GET /key-prefix/cool-file.jpg 404PUT /key-prefix/cool-file.jpg 200GET /key-prefix/cool-file.jpg 404
Here because the GET happened on the object before the PUT was complete, we got a 404. Because of eventual consistency, it was possible to get a 404 again (after 2) because the PUT may have still been propagating.
S3 Consistency Model – Post December 2020 (S3 Strong Consistency)
AWS announced strong read-after-write consistency for all GET, PUT, and LIST operations in S3.
So what does that mean for the scenarios we talked about up above? Well, if a PUT call of an object to S3 is successful you can assume that any subsequent GET or LIST call for that object will return the latest version of the object.
The overwrite scenario will return the latest data as well. But the first GET request must happen after all PUT requests have finished to guarantee the latest object.
This last bit is important. You can have concurrent processes writing the same object, with different data, to the same bucket:
- The first process finishes writing the object and then the next process starts writing the object with new data
- Meanwhile, before this second write finishes, we start a
GETrequest on the object
In this scenario our GET request will return the object with data before the second PUT and, as expected, this is because the second PUT hasn’t yet completed.
We can also have a scenario where there are simultaneous writes. Meaning that before process one finishes writing the object, process two starts writing to that object as well. This is what we call concurrent writes. In this scenario, S3 uses last-write wins semantics. But our GET request will return mixed results until the final write finishes.
Basically the issue before was that even after a successful PUT S3 did not guaranteed that a subsequent GET request for this object will return the latest object that we just wrote because of eventual consistency and the time required to propagate changes across entire system. With the new update there is strong read-after-write consistency which means that after a successful PUT request any subsequent GET is guaranteed to get the data that was just written (not an older previous version).
Read more from here.
AWS CLI
- Developing and performing AWS tasks against AWS can be done in several ways:
- Using the AWS CLI on our local computer (Create Access keys and use them to set up in AWS CLI
aws configure) - Using the AWS CLI on our EC2 machines
- Using the AWS SDK on our local machine
- Using the AWS SDK on our EC2 machines
- Using the AWS Instance Metadata Service for EC2
- Using the AWS CLI on our local computer (Create Access keys and use them to set up in AWS CLI
- Note: to create additional AWS CLI profiles run
aws configure --profile <your-desired-profile-name>
AWS CLI on EC2
- The BAD way:
- Run
aws configureas we do locally on the EC2 instance - This is dangerous because if EC2 instance gets compromised then so will your account
- Run
- The RIGHT way:
- Use an IAM Role and attach it to the EC2 instance (Note: an EC2 instance can only have up to one role at a time)
- IAM Roles can come with a policy authorizing exactly what the EC2 instance should be able to do
- Anytime your EC2 instance needs to perform something, never put your credentials on it, always use an IAM Role

IAM Policy Simulator
Among other things, can be used to test the policies with selected services, actions, and resources. For example, you can test to ensure that your policy allows an entity to perform the ListAllMyBuckets, CreateBucket, and DeleteBucket actions in the Amazon S3 service on a specific bucket.
Find it here.
AWS CLI Dry Runs
Sometimes we just want to make sure we have the permissions to run a command, but not actually run it.
For example, we want to test that we can use the AWS CLI to create an EC2 instance, but not actually create it because it may be expensive.
For this some AWS CLI command have the --dry-run option to simulate API calls.
AWS CLI STS Decode Errors
- When you run API calls and they fail you can get long error messages
- Decodes additional information about the authorization status of a request from an encoded message returned in response to an AWS request:
aws decode-authorization-message --encoded-message <encoded-err-msg-value>
AWS EC2 Instance Metadata
- AWS EC2 Instances Metadata allows EC2 instances to learn about themselves without using an IAM Role for that purpose
- The URL is
http://169.254.169.254/latest/metadata - This IP is an internal IP to AWS (it will not work from your computer) it will only work from the EC2 instance (Note: you cannot retrieve the AIM Policy from the instance metadata URL)
- Metadata = info about the EC2 instance
- Userdata = launch script of the EC2 instance
- Good to know:
- You can retrieve the role name attached to your EC2 instance using the metadata service but not the policy itself
- You can also retrieve the temporary security credentials that the EC2 instance is using to make API calls based on its attached IAM Role through the instance metadata endpoint
MFA with CLI
To use MFA with the CLI you must create a temporary session.
To do so, you must run the STS GetSessionToken API call:
aws sts get-session-token --serial-number arn-of-the-mfa-device --token-code code-from-token --duration-seconds 3600
Which would return something like:
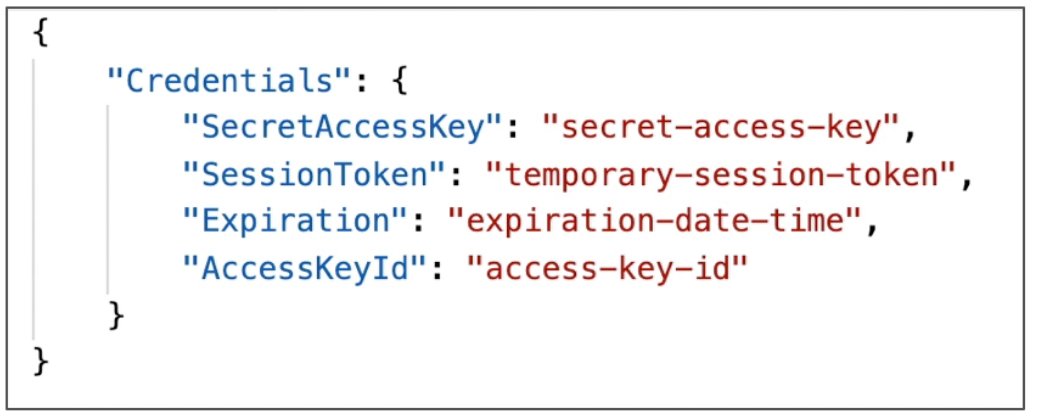
That has a new access key and id a session token (which we will need to use in all the API calls to AWS) and an expiration date time.
AWS SDK Overview
- Use if you want to perform actions on AWS without directly going through AWS Console or AWS CLI
- Good to know: if you don’t specify or configure a default region, then
us-east-1is chosen by default by the SDK
AWS Limit (Quotas)
- API Rate Limits (how many times you can call an API in a row)
- DescribeInstances API for EC2 has a limit of
100calls per second - GetObject on S3 has a limit of
5500GET per second per prefix - For intermitent errors: implement exponential backoff strategy
- For consistent errors: request an API throttling limit increase
- DescribeInstances API for EC2 has a limit of
- Service Quotas (service limits)
- Running on-demand standard instances:
1152vCPU - You can request a service limit increase by opening a ticket
- You can request a service quota increase by using the Service Quotas API
- Running on-demand standard instances:
Exponential Backoff
- If you get a ThrottlingException intermittently, use exponential backoff
- Retry mechanism included in SDK API calls
- Must implement yourself if using the API as is w/o SDK
- Exponential backoff means that everytime an API call fails with double the amount of time we wait before making another request
AWS Credentials Provider & Chain
When using the CLI it will look for credentials in this order:
- Command line options:
--region,--output,--profile - Environment variables:
AWS_ACCESS_KEY_ID,AWS_SECRET_ACCESS_KEY, andAWS_SESSION_TOKEN - CLI credentials file:
~/.aws/credentialson Mac - CLI configuration file:
~/.aws/configon Mac - Container credentials: for ECS tasks
- Instance profile credentials: for EC2 Instance Profiles
When using an SDK (e.g., the Java SDK) it will look for credentials in this order:
- Java system properties:
aws.accessKeyIdandaws.secretKey - Environment variables:
AWS_ACCESS_KEY_ID,AWS_SECRET_ACCESS_KEY, andAWS_SESSION_TOKEN - The default credential profiles file:
~/.aws/credentials - Amazon ECS container credentials for ECS containers
- Instance profile credentials for EC2 instances
AWS Credentials Scenario
Assume we have a scenario where an application deployed to an EC2 instance has Access Key and ID credentials from an IAM user set in the environment variables which are being used to make API calls to S3. Furthermore, assume that the IAM user has S3FullAccess permissions.
As a developer, you realize this is against best practices and decide to:
- Create a separate IAM Role and EC2 Instance Profile for the EC2 instance, and
- Assign the role (which has minimum read only permissions to the specific bucket that it needs) to the EC2 instance
Out expectation is that now the EC2 instance will use the instance profile (which defines who am I) to assume the role it was assigned and because of that will noe only have access read only permissions to the specific S3 bucket that we defined.
However, you notice that despite this the EC2 instance still has access to all S3 buckets. Why?
Answer: the credentials chain is still giving priority to the environment variables. So, to get the behaviour we desire, we would have to delete the environment variables from the EC2 instance and, after that, step 5 in the chain will become most relevant and credentials will be retrieved from the instance profile.
Read here on more about AWS Role vs instance profile.
AWS Credentials Best Practices
- Never ever store AWS credentials in your code
- Best practice is for your credentials to be inherited from the credentials chain
- So, if working within AWS, use IAM Roles:
- EC2 Instance Roles + EC2 Instance Profile for EC2 instances
- ECS Roles for ECS tasks
- Lambda Roles for Lambda functions
- Ultimatelly, the idea is that we assign a role to each service and the service assumes the role with temporary credentials and is able to perform API calls depending on what the role defines (read more here
- If working outside of AWS use environmental variables / named profiles
Signing AWS API requests
- When you call the AWS HTTPS API you sign the request (so that AWS can identify you) using your AWS credentials (access key & secret key)
- Note: some requests to Amazon S3 don’t need to be signed
- If you use the SDK or CLI, the HTTP requests are already signed for you
- As an AWS Certified Developer you only need to know at a high level how AWS HTTP requests are signed using Signature v4 (SigV4) – an AWS protocol

SigV4 Requests Examples
HTTP Header Option:
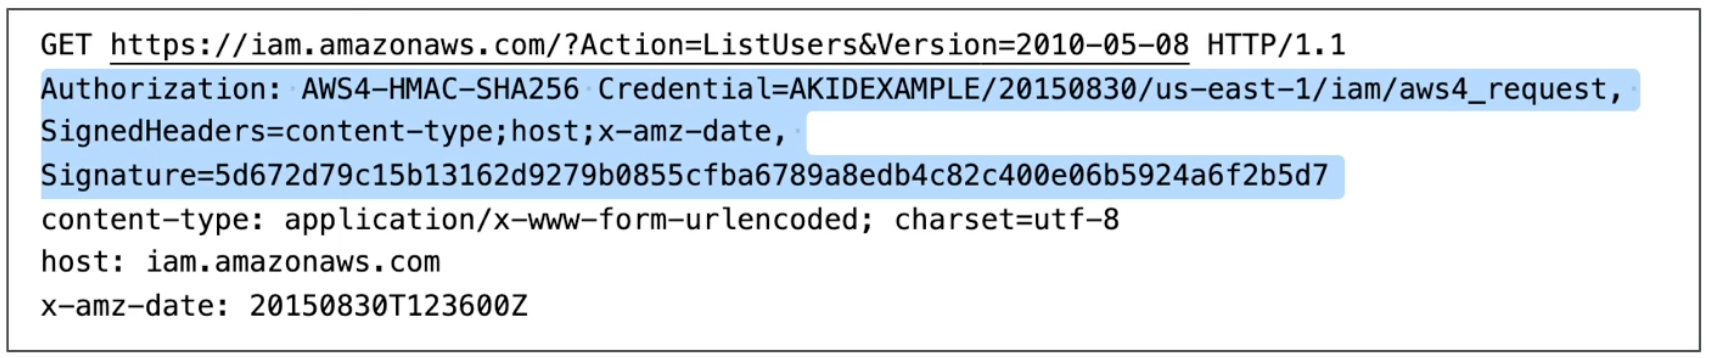
Query String Option (e.g., S3 pre-signed URLs)

Advanced S3 & Athena
S3 MFA Delete
- MFA (multi factor authentication) forces user to generate a code on a device (usually mobile) before doing important operations on S3
- To use MFA Delete versioning must be enabled on the S3 bucket
- You will need MFA to:
- Permanently delete an object version
- Suspernd versioning on the bucket
- You won’t need MFA for:
- Enabling versions
- Listing deleted versions, etc..
- Only the bucket owner (root account) can enable/disable MFA Delete
- MFA Delete currently can only be enabled using the CLI
S3 Access Logs
- For audit purposes we may want to log all access to S3 buckets
- We can enable so that any request made to some S3 bucket(s), from any account, authorized or denied, will be logged into another S3 bucket so we can analyze it later (using AWS Athena for example)
- Note: never set the logging bucket to be the bucket that you are monitoring – if you do this, then it will create a logging loop and your bucket will grow infinetly
S3 Replication – Cross Region Replication (CRR) and Same Region Replication (SRR)
- In order for CRR or SRR to work you must enable versioning in source and destination buckets
- Buckets can be in different accounts
- Copying is asynchronous
- Must give proper IAM permissions to S3 (so that first bucket has permissions to copy to second bucket)
- CRR use cases: compliance, lower latency access across regions, replication across accounts
- SRR use cases: log aggregation, live replication between production and test accounts
S3 Replication – Notes
- After activating only new objects are replicated (so its not retroactive)
DELETEoperations are not replicated- There is no “chaining” of replication:
- If bucket
1has replication into bucket2and bucket2has replication into bucket3, when we write to bucket1it does not replicate into bucket3(so not transitive)
- If bucket
S3 Pre-Signed URLs
- Can generate pre-signed URLs using SDK or CLI
- For uploads (easy, can use CLI)
- For downloads (harder, must use the SDK)
- Valid for a default of
3600seconds – can change timeour with--expires-in <time-by-seconds>argument - Users given a pre-signed URL inherit the permissions of the person who generated the URL for
GET/PUT - Example use cases:
- Allow only logged-in users to download a premium video on your S3 bucket
- Allow an ever changing list of users to download files by generating URLs dynamically
- Allow a user to upload a file to a precise location temporarily (e.g., a profile picture)
## S3 Storage Classes
- Standard – General Purpose
- Standard-Infrequent Access (IA)
- One Zone-Infrequent Access
- Intelligent Tiering
- Glacier
- Glacier Deep Archive
Standard – General Purpose
- High durability of objects across multiple AZs
- Can sustain
2concurrent facility failures - Use cases: mobile & gaming applications, big data analytics, content distribution
Standard-Infrequent Access (IA)
- High durability of objects across multiple AZs
- Suitable for data that is less frequently accessed (but required rapid access when needed)
- Slightly lower cost than S3 Standard tier
- Can sustain
2concurrent facility failures - Use cases: data store for disaster recovery, backups, etc..
### One Zone-Infrequent Access
- Same as IA tier but data is stored in a single AZ – so decreased availability (will be lost if AZ is destroyed)
- Cost is 20% lower than IA tier
- Use cases: storing secondary backups copies of on-premise data or data that we can re-create
Intelligent Tiering
- High durability of objects across multiple AZs
- Same low latency and high throughput performance of S3 standard
- Small monthly monitoring and auto-tiering fee
- Automatically moves objects between two access tiers based on changing access patterns
Glacier
- Low cost object storage meant for archiving / backup
- Data is retained long term (
10s of years) - Alternative to on-premise magnetic tape storage
- High durability
- Storage cost per month is $0.004 / GB + retrieval cost
- Each item in Glacier is not called an object, but, instead, an archive and can be up to
40TB
Glacier & Glacier Deep Archive
- Amazon Glacier -
3retrieval options:- Expedited (
1to5minutes) - Standard (
3to5hours) - Bulk (
5to12hours) - Minimum storage duration of
90days
- Expedited (
- Amazon Glacier Deep Archive – for long term storage (cheaper):
- Standard (
12hours) - Bulk (
48hours) - Minimum storage duration of
180days
- Standard (
S3 Storage Tiers Summary

S3 Lifecycle Rules
- You can transition objects between storage classes
- For infrequent accessed objects, move them to
STANDARD_IA - For archived objects that we don’t need in real time move to
GLACIERorDEEP_ARCHIVE - Moving objects can be automated using a lifecycle configuration
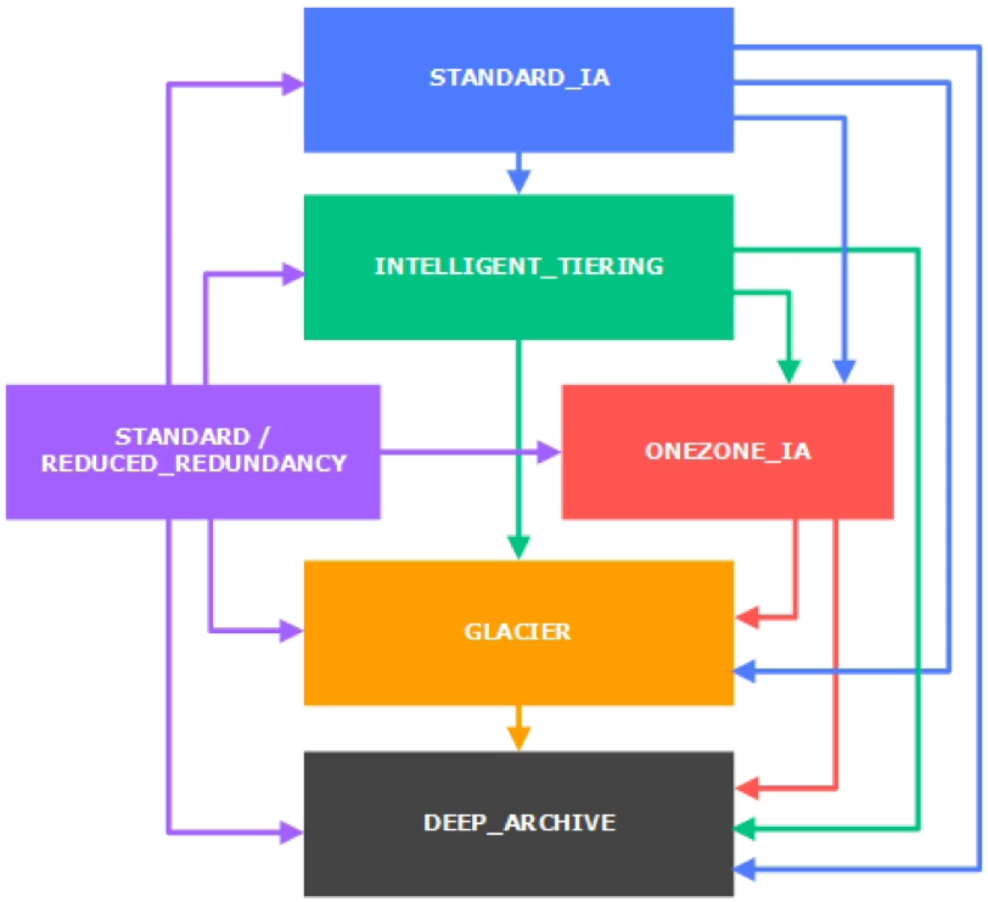
- Transition actions: it defines when objects are transitioned to another storage. For example:
- Move objects to Standard IA class
60days after creation - Move to Glacier class
6months after that
- Move objects to Standard IA class
- Expiration actions: configure objects to expire (delete) after some time. For example:
- Access log files can be set to be deleted after
Ndays - Can be used to delete old versions of files (if versioning is enabled) – for example, delete old versions of files after
60days - Can be used to delete incomplete multi-part uploads
- Access log files can be set to be deleted after
- Rules can be created for a certain prefix (e.g., prefix of
s3://mybucket/mp3/*) - Rules can be created for certain object tags (e.g.,
Department: Finance)
S3 Baseline Performance
- S3 automatically scales to high request rates (latency
100-200ms) - Your application can achieve at least
3500 PUT/COPY/POST/DELETEand5500 GET/HEADrequests per second per prefix in a bucket
S3 KMS Limitation
- If you use
SSE-KMSyou may be impacted by the KMS limits - When you upload it calls the
GenerateDataKeyKMS API and when you download it calls theDecryptKMS API - The KMS quota for requests per second for these operations is either
5500,10000, or30000depending on the region - As of today you cannot request a quota increase for KMS
S3 Increasing Upload Performance
- Multi-Part upload:
- Recommended for files greater than
100MB and must use for files greater than5GB - The idea of multi-part upload is that we split file into smaller pieces which allows us to upload in parallel – this speeds up transfers
- Recommended for files greater than
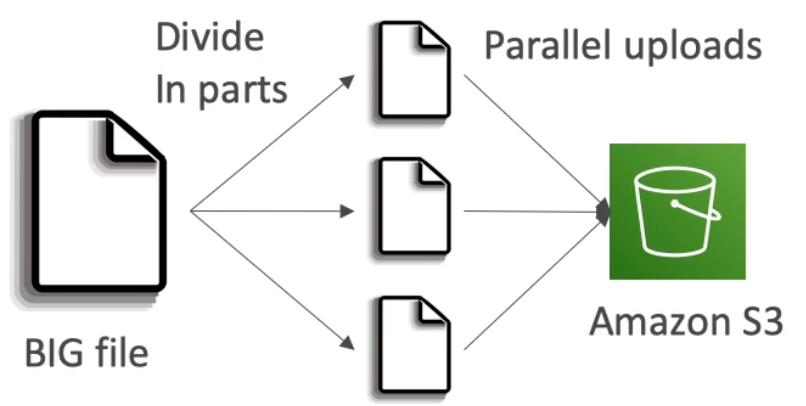
- S3 Transfer Acceleration (upload only):
- Increase transfer speed by transferring file to an AWS edge location (via public internet) which will forward the data to the S3 bucket in the target region (via private AWS network – which is faster)
- Compatible with multi-part upload
- The idea is that we minimize the amt. of public internet which we go through (which is slower) and maximize the amt. of private AWS internet that we go through (which is faster)
![]()
S3 Increasing Download Performance
Use S3 Byte-Range Fetches to parallelize GETs by requesting specific range of bytes in our file – we can pick and choose what sections we are downloading.
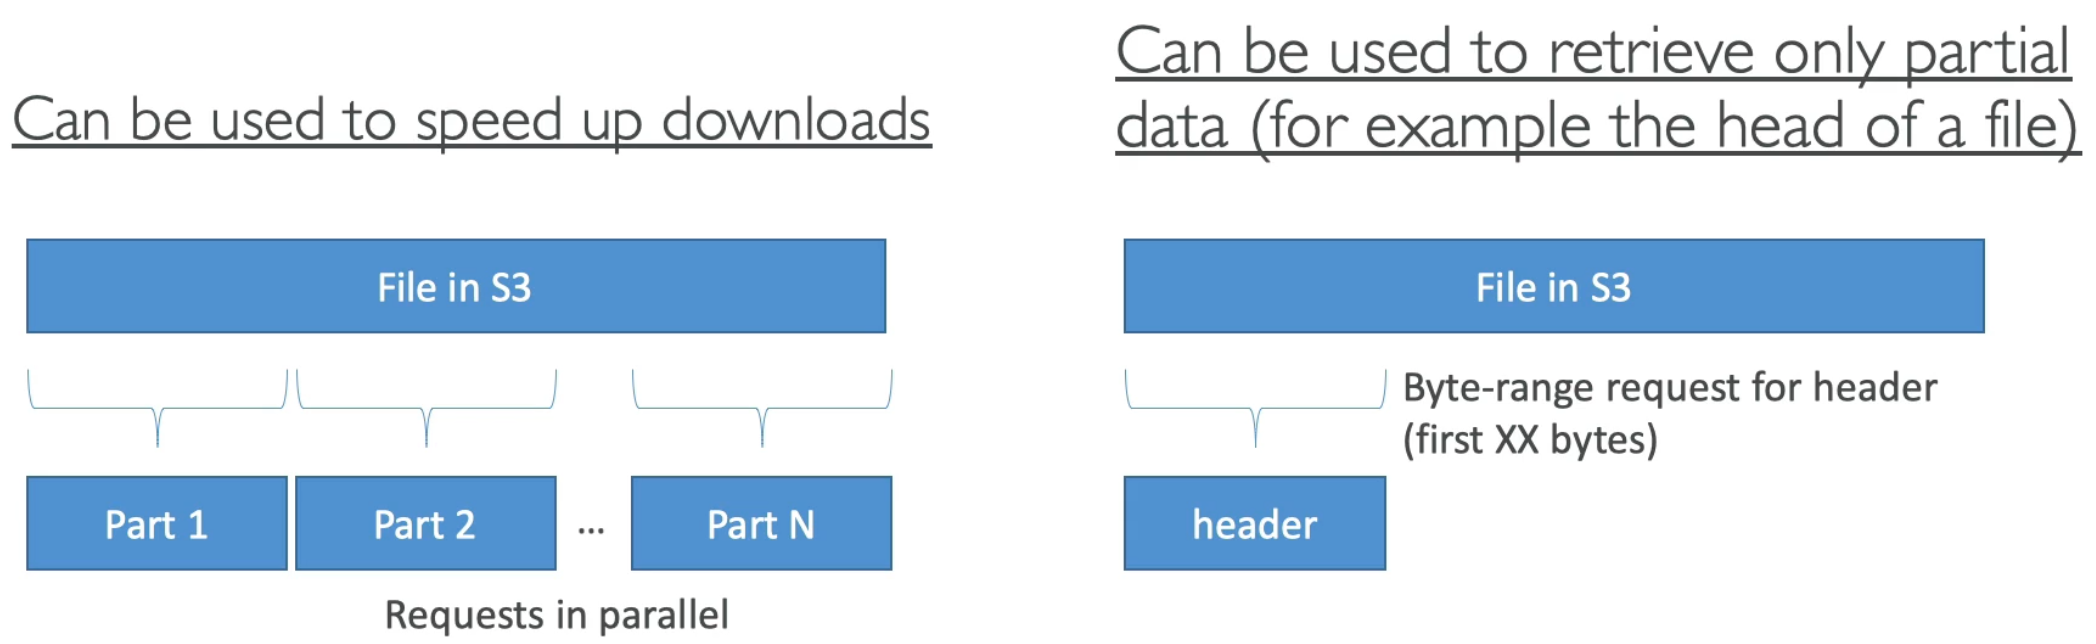
S3 Select & Glacier Select
- Retrieve less data using SQL by performing server side filtering
- Can filter S3 data by rows and columns (simple SQL statements only – no aggregations, etc..)
- Less network transfer, less CPU cost client-side
- For more complex querying we can use AWS Athena

S3 Event Notifications
- Trigger certain actions (to three possible targets: SNS, SQS, or Lambda) when there is a state change on some S3 bucket (e.g.,
S3:ObjectCreated,S3:ObjectRemoved,S3:Replication, etc..) - Object name filtering possible (e.g.,
\*.jpg) - Classic use case: generate thumbnails of images uploaded to S3
- S3 event notifications typically take a few seconds to be delivered but can sometimes take a minute or longer
- If two writes are made to a single non-versioned bucket at the same time, it is possible that only a single event notification will be sent
- If you want to ensure that an event notification is sent for every successful write, you must enable versioning on your bucket
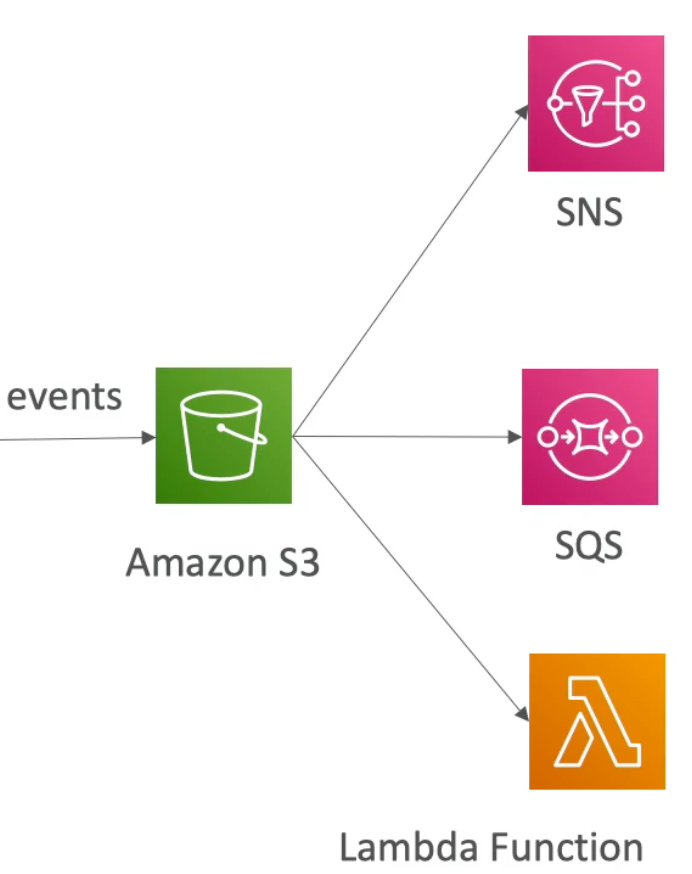
AWS Athena
- Serverless service to perform analytics directly against S3 files
- Uses SQL to query the files
- Has a JDBC / ODBC driver
- Charged per query and amount of data scanned
- Supports CSV, JSON, ORC, Avro, and Parquet (built on Presto)
- Can be used to query VPC Flow Logs, ELB Logs, CloudTrail trails, build BI / analytics / reporting tools, etc..
S3 Object Lock & Glacier Vault Lock
S3 Object Lock
- Adopt a WORM (Write Once Read Many) model
- Prevent an object version deletion for a SPECIFIED AMOUNT OF TIME
- Object retention:
- Retention period: specifies a fixed period
- Legal holds: no expiry date
- Modes:
- Governance mode: users can’t overwrite or delete an object version or alter its lock settings unless they have special permissions
- Complicance mode: a protected object version can’t be overwritten or deleted by any user including the root user. When an object is locked in compliance mode, its retention mode can’t be changed and its retention period cannot be shortened
Glacier Vault Lock
- Adopt a WORM (Write Once Read Many) model
- Once the policy is locked the S3 object(s) and policy cannot be altered or deleted
- Helpful for compliance and data retention
AWS CloudFront
CloudFront Overview
- Content Delivery Network (CDN)
- Improves read performance by caching content at Edge Locations (
216globally) - Provides DDoS protection, integration with Shield, AWS Web Application Firewall (WAF)
- Can expose external HTTPS and can talk with internal HTTPS backend
CloudFront Origins
- S3 bucket
- For distributing files and caching them at the edge
- Enhanced security with CloudFront Origin Access Identity (OAI)
- CloudFront can be used as an ingress (to upload files to S3)
- Custom Origin (HTTP)
- Application Load Balancer
- EC2 Instance
- S3 Website (must first enable the bucket as a static website)
- Any HTTP backend you want
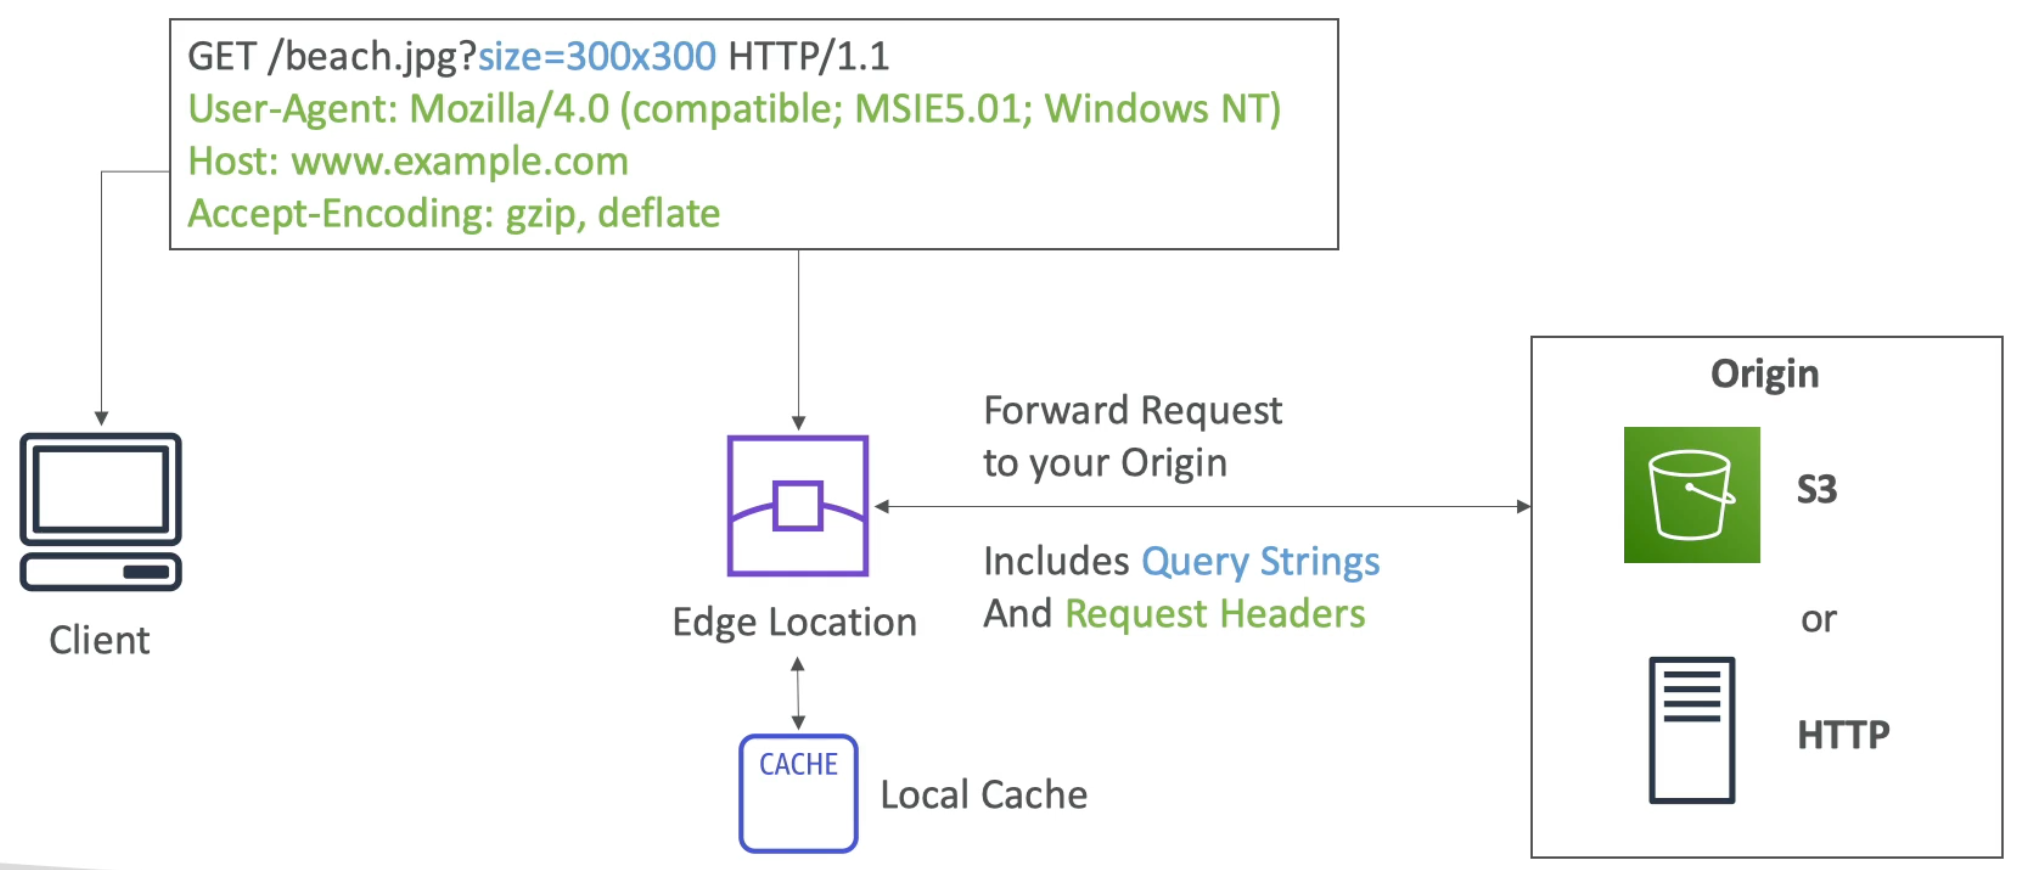
CloudFront S3 as an Origin

ALB or EC2 as an Origin

Geo Restriction
- We can whitelist and blacklist certain countries in CloudFront based on business requirements
- Country is determined by a
3rdparty Geo-IP database
CloudFront vs S3 Cross Region Replication
- CloudFront:
- Global Edge Network
- Files are cached for some predefined TTL
- Good for static content that must be available everywhere
- S3 Cross Region Replication:
- Must be setup for each region you want replication to happen in (i.e., not global)
- Files are updated in near real time
- Read only
CloudFront Caching
- Cache can be based on:
- Headers
- Session Cookies
- Query String Parameters
- The cache lives at each CloudFront Edge Location
- Our goal is to maximize the amount of cache hits and minimize requests to origin
- We can control the cache TTL (
0seconds to1year) – which can be set by the origin usingCache-Controlheader,Expiresheader… - We can also invalidate part of the cache using the
CreateInvalidationAPI
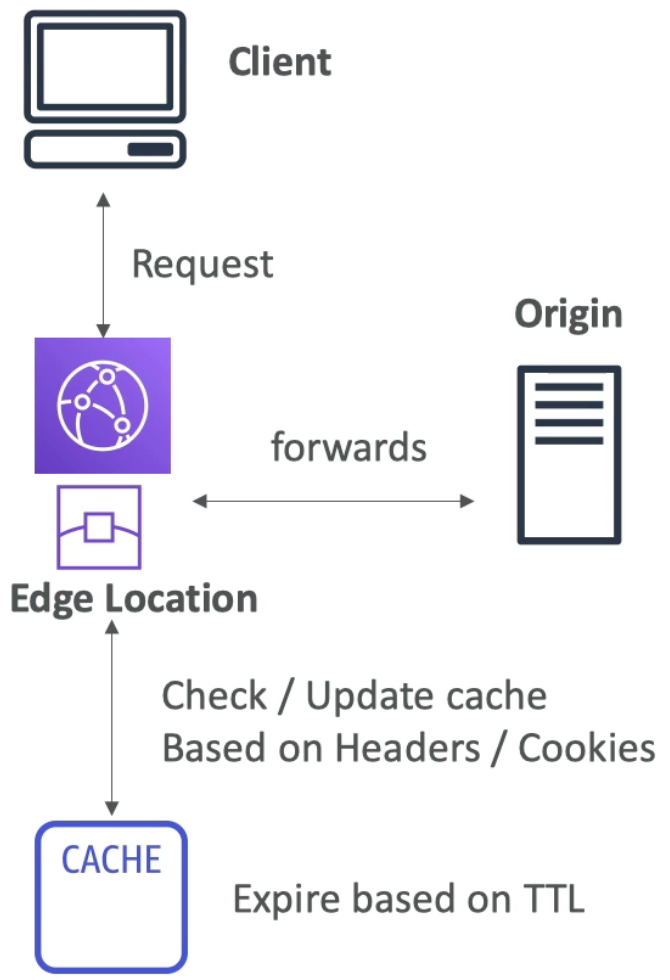
Maximize cache hits by separating static and dynamic distributions

Cloud Front Security
- As mentioned in Geo Restriction, we can whitelist and blacklist certain countries in CloudFront based on business requirements
- Viewer Protocol Policy:
- Redirect HTTP to HTTPS
- Or use HTTPS only
- Origin Protocol Policy (HTTP or S3):
- You can set it to be HTTPS, or
- You can set it to Match Viewer policy which means that if request came in as HTTP (or HTTPS) it will go to origin also as HTTP (or HTTPS)
- Note: S3 bucket websites do not support HTTPS
CloudFront Signed URL / Signed Cookie
- Say you want to distribute paid shared content to premium users around the world
- We can use CloudFront Signed URL / Cookie and need to attach a policy that defines:
- URL expiration
- Allowed IP ranges to access the data from
- Trusted signers (which AWS accounts can create signed URLs)
- Signed URL = access to individual files (one signed URL per file)
- Signed Cookies = access to multiple files (one signed cookie for many files)
CloudFront Signed URL Diagram
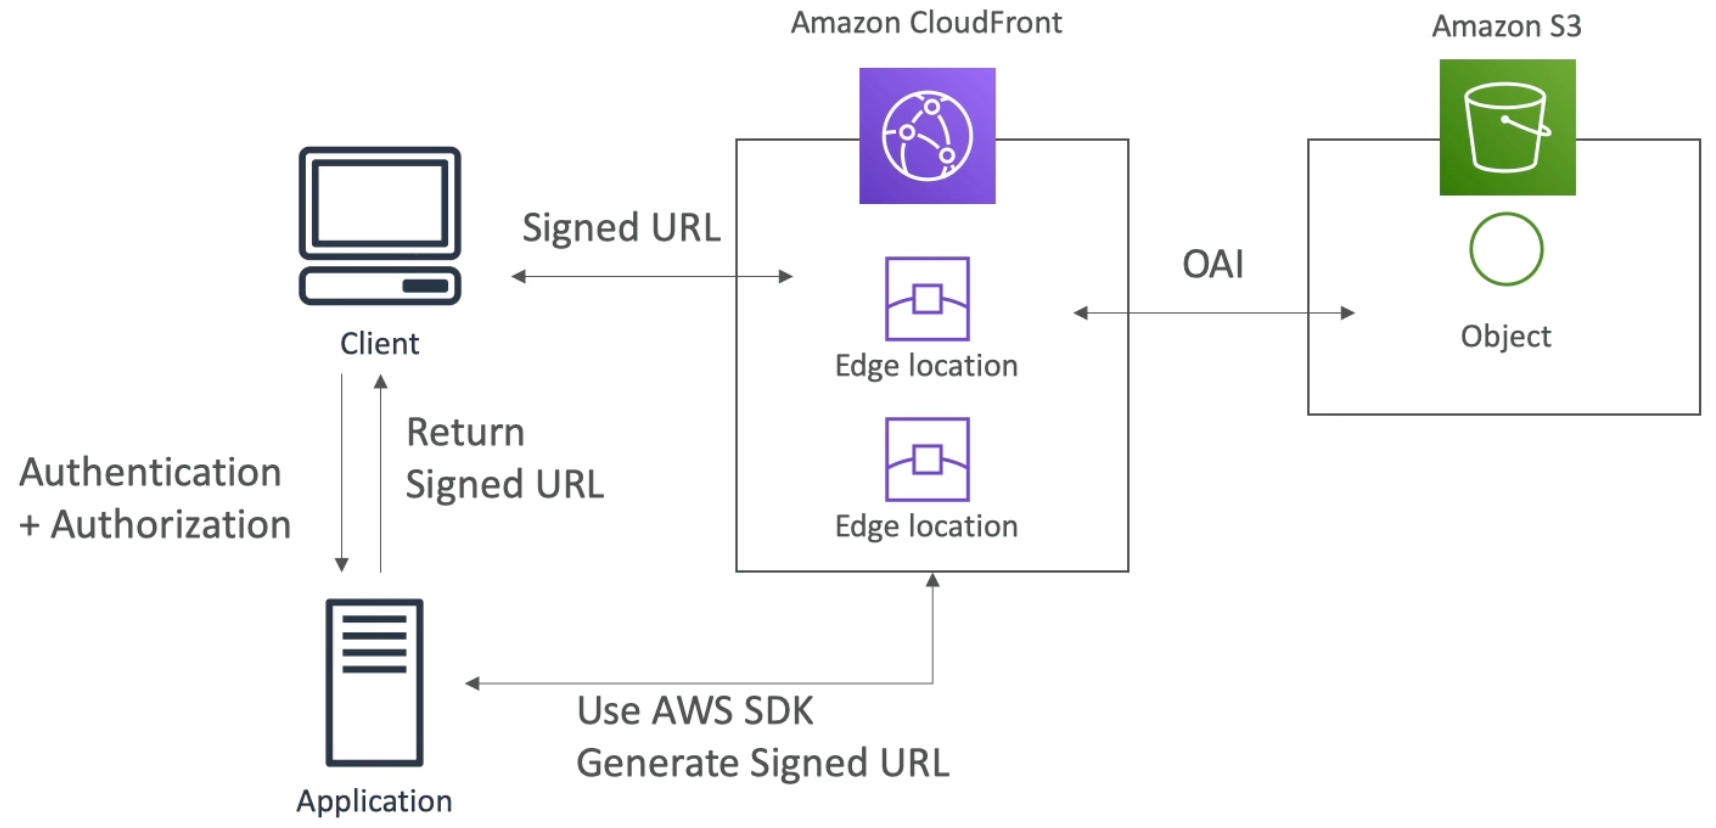
CloudFront Signed URL vs S3 Pre-Signed URL
At a high level, use S3 Pre-Signed URL if you want to distribute file securely to user without having CloudFront layer (so going to S3 directly), else use CloudFront Signed URL.

CloudFront Signer URL Process
There are two types of signers.
First: a trusted key group (recommended):
- This approach leverages APIs to create and rotate keys (and IAM for API security)
- You generate your own public and private keys
- Private key is used by your applications (e.g., EC2) to sign the URLs
- Public key is used by CloudFront to verify the URLs
- AWS account that contains a CloudFront Key Pair. For this you need to manage the keys using the root account and the AWS console! This approach is NOT RECOMMENDED since using root account is bad practice
CloudFront Advanced Concepts
Pricing
There are CloudFront Edge locations all around the world. The cost of outbound data per edge location varies (e.g., North America is cheaper but India is more expensive). Also if you transfer more data, then the price goes down.
Price Classes
You can reduce the number of edge locations used for cost reduction.
Three price classes:
- Price Class All: all regions – best performance (more expensive)
- Price Class 200: most regions, but excludes the most expensive regions
- Price Class 100: only includes the least expensive regions
Multiple Origins
Use to route traffic to different origins / resources based on the content type or path pattern.
For example, if we get a request with /api/* path we can route to ALB origin, if we get with /images/* we can route to S3 origin and so on.
Origin Groups (for high availability)
- To provide high availability and failover
- Allows us to define one primary and one secondary origin for CloudFront
- If the primary fails, requests are routed to the secondary
Field Level Encryption (for added security)
- Scope: protect user sensitive data
- Adds an additional layer of security along with in-flight encryption via HTTPS
- Encryption of the field(s) happens at the edge
- Uses asymmetric encryption (i.e., public key is used to encrypt and private is for decrypt)
- How it works:
- Specify the set of fields that you want to be encrypted in
POSTrequest (THE MAX NUMBER OF FIELDS IS 10) - Specify the public key to encrypt them
- Specify the set of fields that you want to be encrypted in
Elastic Container Service (ECS)
Docker
- Apps are packaged into containers that can be run ony OS
- Apps run the same regardless of where they run
- In Docker, resources are shared with the host and we can have many containers on one server

Docker Image
- A docker image is a set of layers that describe a container
- A running instance of an image is a container
- Docker images are stored in Docker repositories (e.g., DockerHub, AWS Elastic Container Registry)
Docker Container Management
- To manage containers we need a container management platform
- In AWS we have three choices:
- AWS Elastic Container Service (ECS)
- Fargate (Amazon’s own serverless container management platform)
- EKS (Amazon’s managed Kubernetes)
ECS Clusters
- ECS Clusters are a logical grouping of EC2 instances
- ECS instances run the ECS agent (Docker containers)
- An instance of the ECS agents runs on each EC2 instance in the ECS cluster and (among other things) is responsible for registering the container instances to the ECS cluster (read more here)
- The EC2 instances run a special AMI made specifically for ECS
Bootstrapping Container Instances with Amazon EC2 User Data
When you launch an Amazon ECS container instance, you have the option of passing user data to the instance. The data can be used to perform common automated configuration tasks and even run scripts when the instance boots. For Amazon ECS, the most common use cases for user data are to pass configuration information to the Docker daemon and the Amazon ECS container agent.
The Linux variants of the Amazon ECS-optimized AMI look for agent configuration data in the /etc/ecs/ecs.config file when the container agent starts. You can specify this configuration data at launch with Amazon EC2 user data.
To set only a single agent configuration variable, such as the cluster name, use echo to copy the variable to the configuration file:
1
2
  #!/bin/bash
  echo "ECS_CLUSTER=MyCluster" >> /etc/ecs/ecs.config
ECS Task Definition
A task definition is metadata in JSON form that tells ECS how to run a Docker container in our cluster.
It contains important information like:
- Image Name
- Port Binding for Container and Host
- Memory and CPU required
- Environment variables
- Networking information
ECS Task
A Task is created when you run a Task directly, which launches container(s) (defined in the task definition) until they are stopped or exit on their own, at which point they are not replaced automatically. Running Tasks directly is ideal for short running jobs, perhaps as an example things that were accomplished via CRON.
ECS Service
A Service is used to guarantee that you always have some number of Tasks running at all times. If a Task’s container exits due to error, or the underlying EC2 instance fails and is replaced, the ECS Service will replace the failed Task. This is why we create Clusters so that the Service has plenty of resources in terms of CPU, Memory and Network ports to use. To us it doesn’t really matter which instance Tasks run on so long as they run. A Service configuration references a Task definition. A Service is responsible for creating Tasks.
ECS Service with Load Balancer
- This time we don’t specify a host port. Instead, we just specify a container port and the host port will be random
- The load balancer (only works with ALB and NLB not CLB) uses dynamic port forwarding to spread the load dynamically across the containers
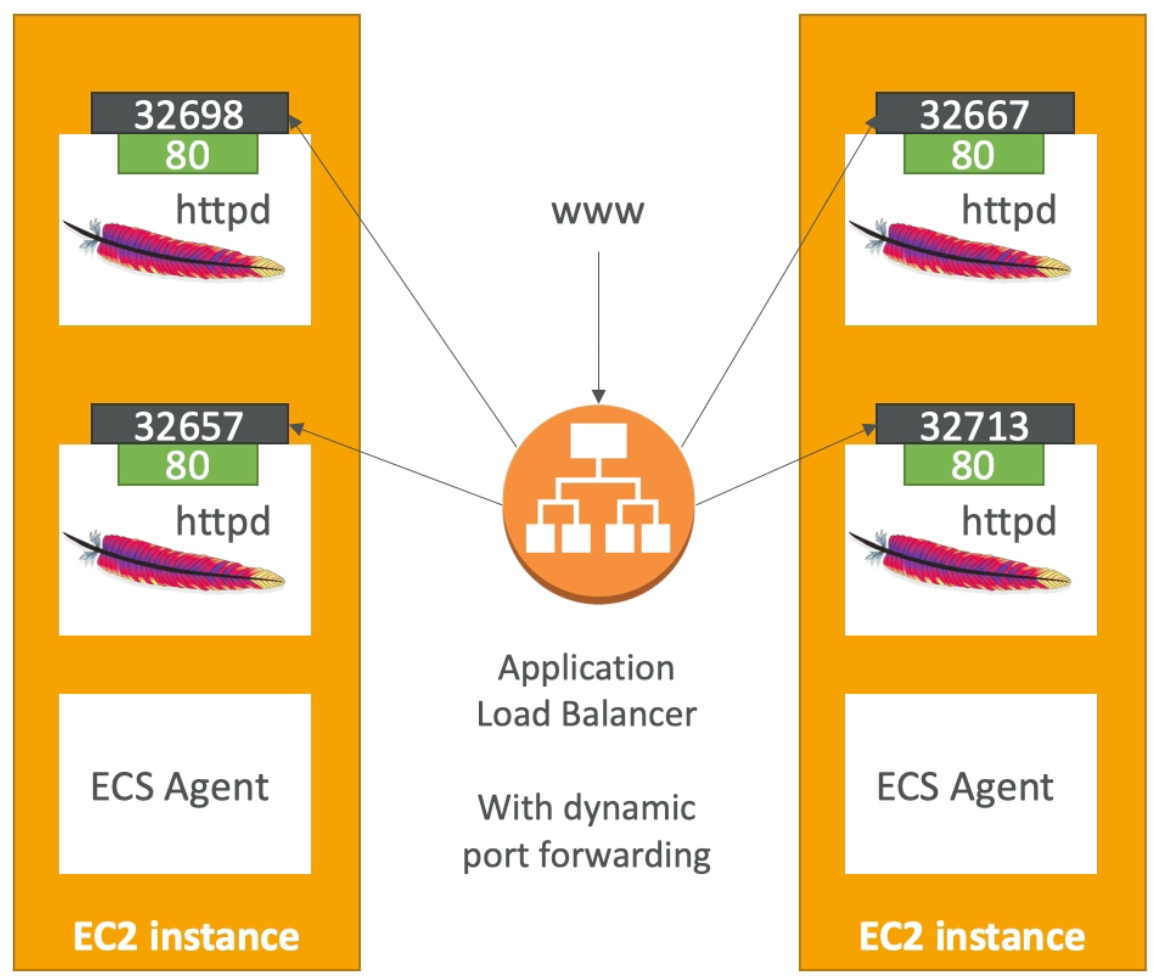
ECR
- ECR is a private Docker image repository
- Access is controlled through IAM (if we have permissions error, then it is an IAM policy issue)
- Docker Push & Pull from ECR:
docker push <full-ecr-image-url>docker pull <full-ecr-image-url>
- AWS CLI ECR login commands:

Fargate
- Before, when we launched an ECS Cluster we had to create our EC2 instances and if we needed to scale we had to add more EC2 instances
- So we managed the infrastructure..
- With Fargate, it’s all serverless
- We don’t have to provision EC2 instances
- We just create task definitions and AWS will run the containers for us
- To scale we just increase the task number – we no longer have to worry about the underlying infrastructure as we did with EC2
ECS IAM Roles
- EC2 Instance Profile:
- An instance profile defines “who am I?” Just like an IAM user represents a person, an instance profile represents EC2 instances. The only permissions an EC2 instance profile has is the power to assume a role (read more here)
- Used by the ECS Agent to make API calls to ECS service, send container logs to CloudWatch, to pull Docker images from ECR, etc..
- ECS Task Role:
- Allow each task to have a specific role
- Use different task roles for different ECS service you run
- Task roles are defined in the task definition
- Important parts here:
- We want to have an IAM role at the EC2 instance level to help the ECS Agent
- We want task roles at the task level, so that each task has just enough permissions but not more than it needs
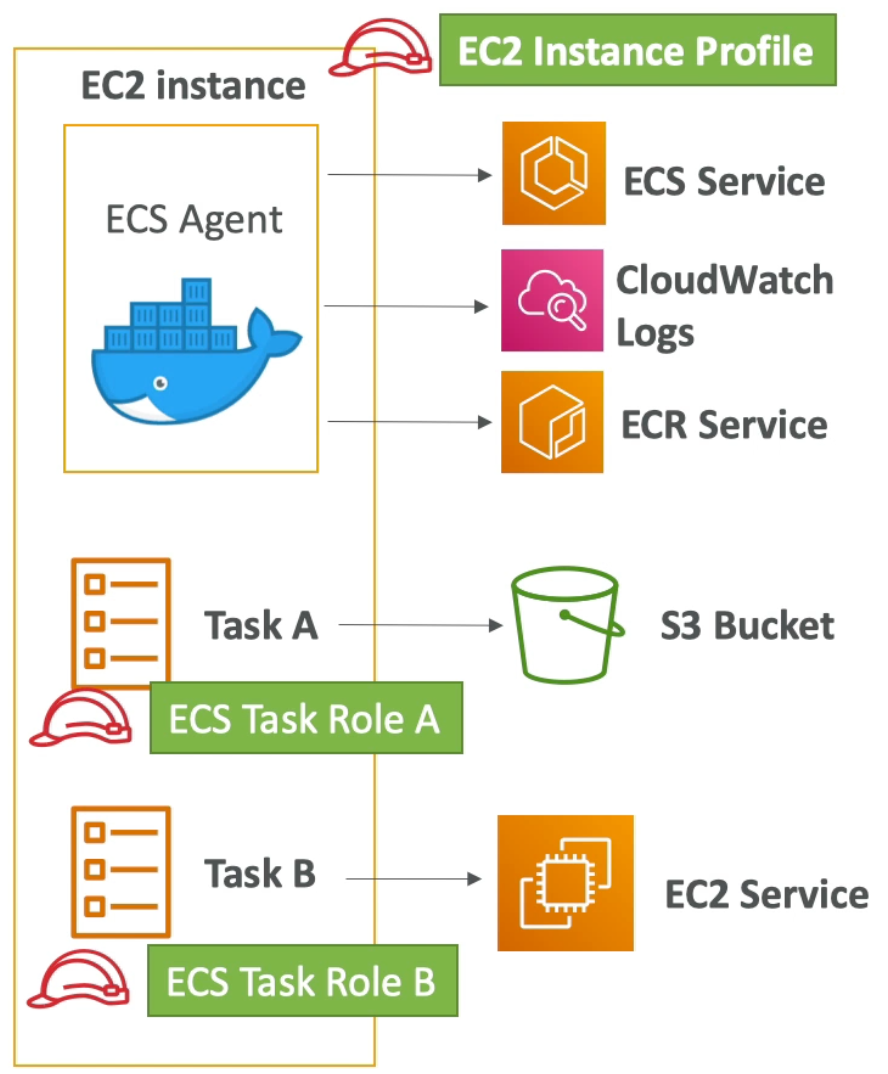
For the exam you need to remember:
- Your ECS instance role that gets attached to your EC2 instance allows your ECS agent to function correctly
- For each task that we create we should create a separate IAM Task Role
Task
- When a task of type EC2 is launched, ECS must determine where to place it with the constraints of CPU, memory, and available port
- Similarly, when a service scales in, ECS needs to determine which tasks to terminate
- To assist with this, you can define a task placement strategy and task placement constraints
- Note this only applies to ECS with ECS not for Fargate – Fargate does all of this for us since its serverless and we don’t manage any infrastructure
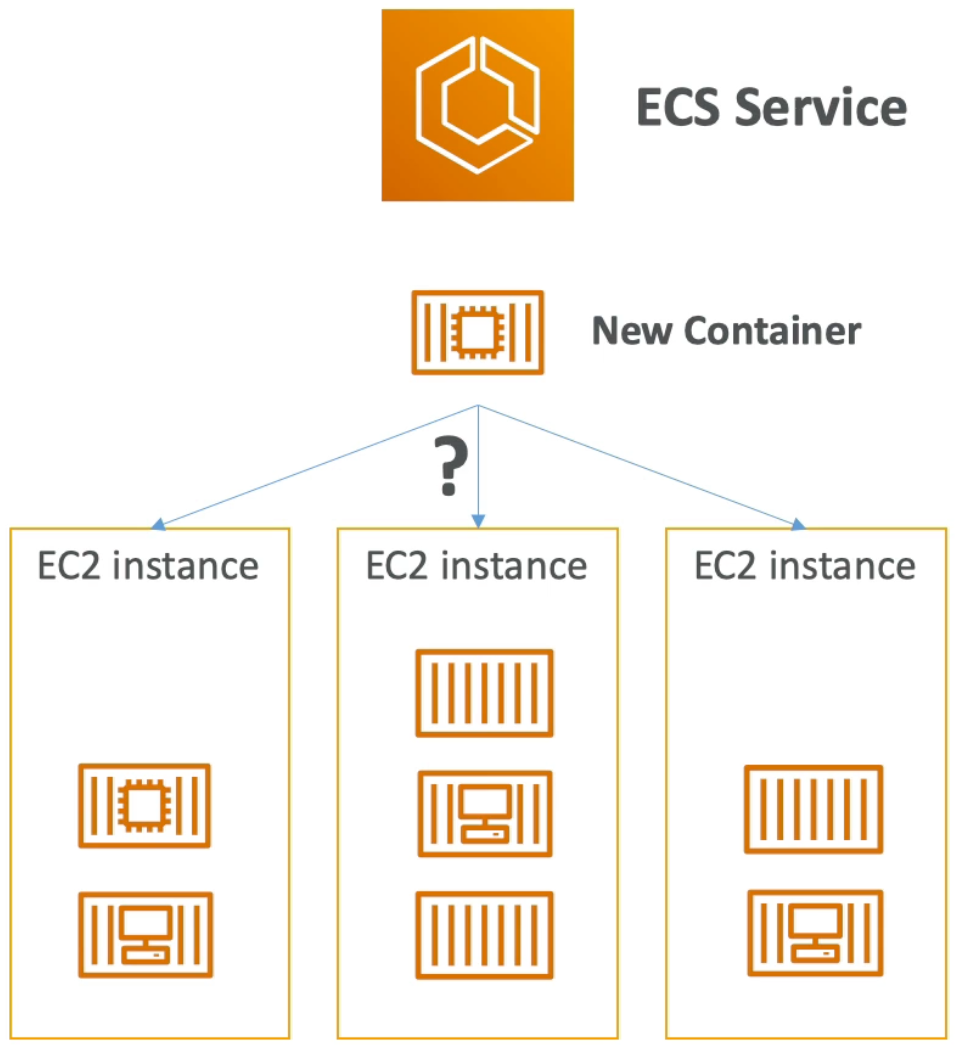
ECS Task Placement Process
Task placement strategies are a best effort.
When AWS ECS places tasks it uses the following process to select container instances:
- Identify the instance that satisfy the CPU, memory, and port requirement in the task definition (so basically which instances can we even place the task on in the first place)
- Identify the instances that satisfy the task placement constraints
- Identify the instances that satisfy the task placement strategy
- Select the instance for task placement
ECS Task Placement Strategies
- Binpack:
- Place tasks such that we use the amount of resource (i.e., tries to pack all Tasks in an existing instance to fill it up before putting in a new one)
- This minimizes number of instance and, thus, cost
- Random:
- Places the tasks randomly
- Spread:
- Spreads the tasks evenly based on the specified value
- This value can be an ECS Availability Zone, instance id, etc..
Note that we can mix task placement strategies.
ECS Task Placement Constraints
- distinctInstance: place each task on a different container instance
- memberOf: places task on instances that satisfy the expression (e.g., place task only on instances that are of type
t2.*)- Uses the Cluster Query Language
ECS – Service Auto Scaling
- CPU and RAM are tracked in CloudWatch at the ECS service level
- Target Tracking: target a specific average CloudWatch metric
- Step Scaling: scale based on CloudWatch alarms
- Scheduled Scaling: scale based on a schedule b/c of predictable changes
- Note: ECS Service Scaling (task level) is not the same as EC2 Auto Scaling (instance level). In other words, if the serice scaling sees that it needs to scale the task count up (to meet some new demand) but we don’t have enough underlying EC2 resources in our cluster to handle this, then we won’t be able to increase the task count. This is because the the number of EC2 instances will not, by default, scale up
- With Fargate Auto Scaling, the issue of underlying hardware not being able to support scaling no longer is a problem because Fargate is serverless and it manages all the infrastructure for us
ECS – Cluster Capacity Provider
- A Capacity Provider is used in association with a cluster to determine the infrastructure that a task runs on
- For ECS with Fargate, the FARGATE and FARGATE_SPOT capacity providers are added automatically
- For ECS on EC2, you need to associate the capacity provider with an auto scaling group (this will allow your auto scaling group to automatically add EC2 instances when needed)
- When you run a task or service you define a capacity provider strategy to prioritize in which provider to run
- This allows the capacity provider to automatically provision infrastructure for you

ECS Summary and Exam Tips
- ECS is used to run Docker containers and has three flavors
- ECS “Classic”: provision EC2 instances to run containers onto
- Fargate: ECS Serverless (removes need to provision and manage EC2 infrastructure)
- EKS: Managed Kubernetes by AWS
ECS Classic
- EC2 instances must be created
- We must configure the file
/etc/ecs/ecs.configwith the cluster name so that ECS agent knows what cluster instance is part of - The EC2 must run an ECS agent (which allows us to register an EC2 instance with the cluster)
- The EC2 instance can run multiple containers of the same type:
- You must not specify a host port (only container port)
- You should use an Application Load Balancer with the dynamic port mapping
- The EC2 instance security group must allow traffic from the ALB on all ports for dynamic port forwarding to work
- ECS tasks must have IAM Roles to execute actions against AWS
- Security groups operate at the instance level not the task level
ECR is used to store Docker Images
- ECR is tightly integrated with IAM
- AWS CLI v1 login command:
$(aws ecr get-login --no-include-email --region us-east-1) - AWS CLI v2 login command:
aws ecr get-login-password --region us-east-1 | docker login --username AWS --password-stdin MY-REGISTRY-URL - Docker
pushandpull:docker push MY-REGISTRY-URLdocker pull MY-REGISTRY-URL
- In case an EC2 instance (or you) cannot pull a Docker image check IAM
Fargate
- Fargate is serverless (no EC2 to manage)
- AWS provisions containers for us and assigns ENI
- Fargate containers are provisioned based on the container spec (task definition)
- Fargate tasks must have corresponding IAM Roles in order to execute actions against AWS
ECS Other
- ECS does integrate with CloudWatch Logs:
- You need to setup logging at the task definition level
- Each container will have a different log stream
- The EC2 Instance Profile needs to have the correct IAM permissions
- Use IAM Task Roles for your tasks
- Task Placement Strategies: binpack, random, spread
- Service Auto Scaling with target tracking, step scaling, or scheduled
- Cluster Auto Scaling can be achieved through Capacity Provider by associating it with an Auto Scaling Group
Elastic Bean Stalk
- AWS Elastic Beanstalk is an easy-to-use service for deploying and scaling web applications and services
- There is no additional charge for Elastic Beanstalk - you pay only for the AWS resources needed to store and run your applications
- Three popular architecture models used with Elastic Beanstalk:
- Single instance deployment (good for development environments)
- Load Balancer + Auto Scaling Group (good for production or pre-production web applications)
- ASG only (great for non-web apps in production – e.g., workers, etc..)
- Elastic Beanstalk has three components:
- Application
- Application version (each deployment gets assigned a version)
- Environment name (can be whatever you want – e.g., dev, test, prod)
- You deploy application versions to environments and can promote them to the next environment
-
Has feature to rollback to previous application version
- If you create an RDS instance with Beanstalk, then if you delete your RDS environment your RDS instance will also be deleted (if you want RDS to be decoupled from EB, then create a separate RDS instance outside of Beanstalk and point to it instead)
- You cannot change load balancer type after creating an EB environment – if you want to change it you will have to create another environment
- With EB we can configure instances to log to S3, CloudWatch
- We can also configure X-Ray to trace all infrastructure communications
- We can pass environment variables to instances
- Regarding instances, we can specify root volume type, security groups
- In terms of capacity, we can define an ASG for out instances, EC2 fleet composition (e.g., on demand, spot instances, etc..), AMI ID, instance type, number of AZs to launch in, AZ placement, scaling policies / triggers
- We can define which load balancer we would like to use (e.g., ALB, CLB, NLB) as well as security groups for load balancers
- For the load balancers we can configure settings so that it’s logs go into a dedicated S3 bucket
- We also need to define how Elastic Beanstalk should deploy our infrastructure (there are various deployment modes)
- We can define databases EB should launch for us
Elastic Beanstalk Deployment Modes
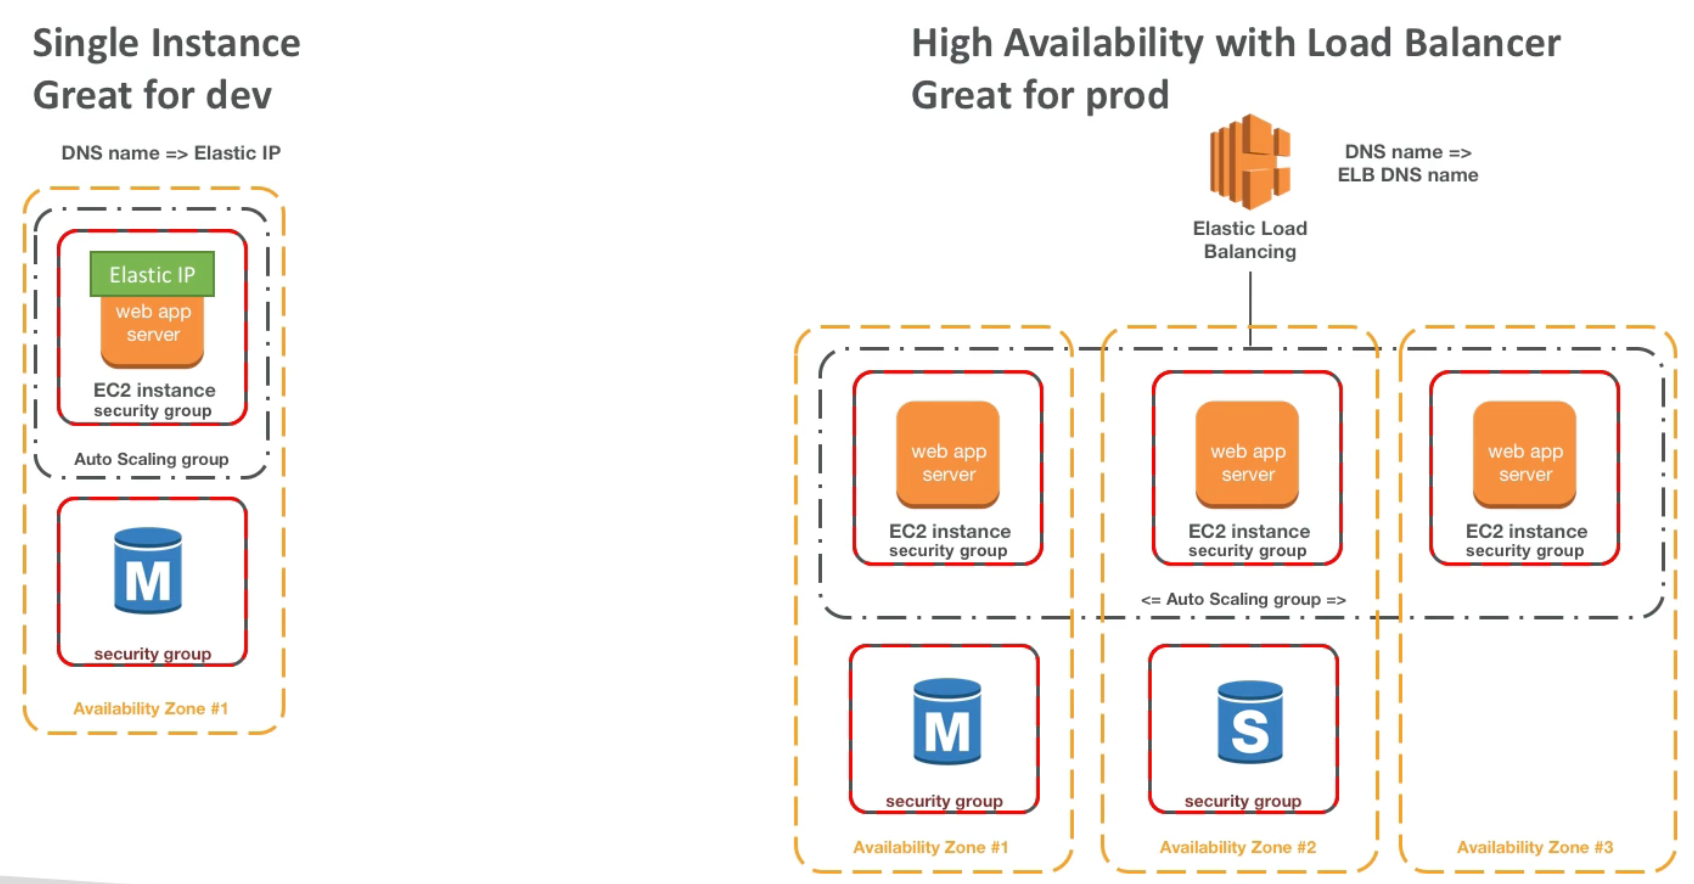
- All at once (deploy all in one go): fastest, but instances aren’t available to serve traffic for a bit (downtime)
- Rolling: update a few instances at a time (bucket) and then move onto the next bucket once the first bucket is healty (for a short period of time, the application will be operating below full capacity)
- Rolling with additional batches: like rolling, but spins up new instances to move the batch (so that old application is still available and operating at full capacity)
- Immutable: spins up new instances in a completely new ASG, deploys version to these instances, and then swaps all the instances when everything is healthy
All at Once Deployment
- Fastest deployment type
- Application has downtime
- Good for development environments
- No additional cost
Rolling Deployment
- Application is running below capacity for some time
- Can set the bucket size
- Application is running both versions simultaneously
- If you set a small bucket size, it will be a very long deployment
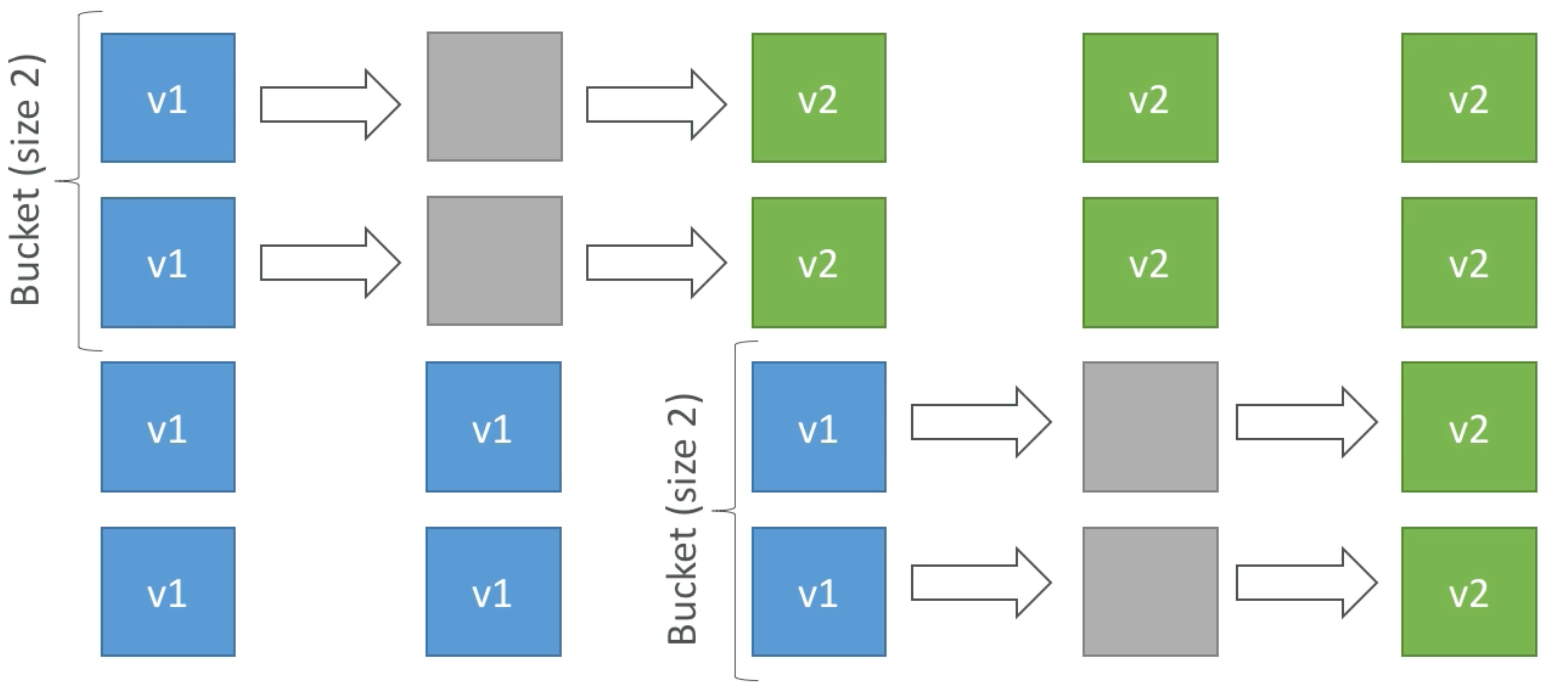
Rolling Deployment With Additional Batches
- Application is always running at capacity (sometimes above capacity)
- Can set the bucket size
- Application is running both versions simultaneously
- Small additional cost
- Additional batch is removed at end of the deployment
- Longer deployment
- Good for production environment

Immutable Deployment
- Zero downtime
- High cost, double capacity
- New code is deployed to new intances on a temporary ASG
- Quick rollback in case of failures (just terminate the new ASG)
- Great for production environment
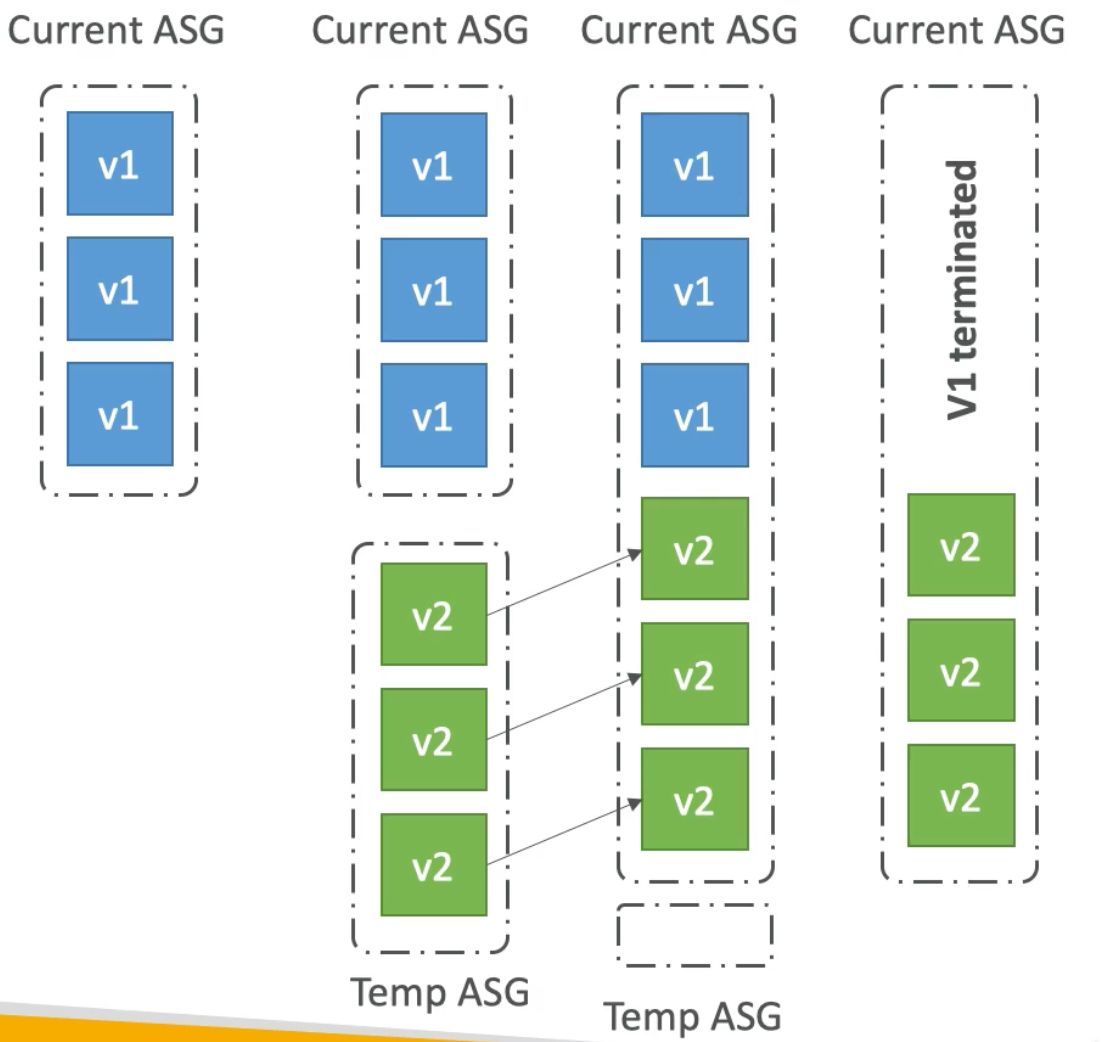
Blue Green Deployment
- Not a direct feature of EB
- Zero downtime and release facility
- Create a new stage environment and deploy v2 there
- The new environment (green) can be validated independently and roll back if issues arise
- Route 53 can be setup with weighted policies to redirect a little bit of traffic to the stage environment (green) to test
- Using EB we can swap URLs when done with the environment testing so that new environment gets URL of old one – thereby leaving users unaffected (Note: “swap” here refers to a
CNAMEswap)
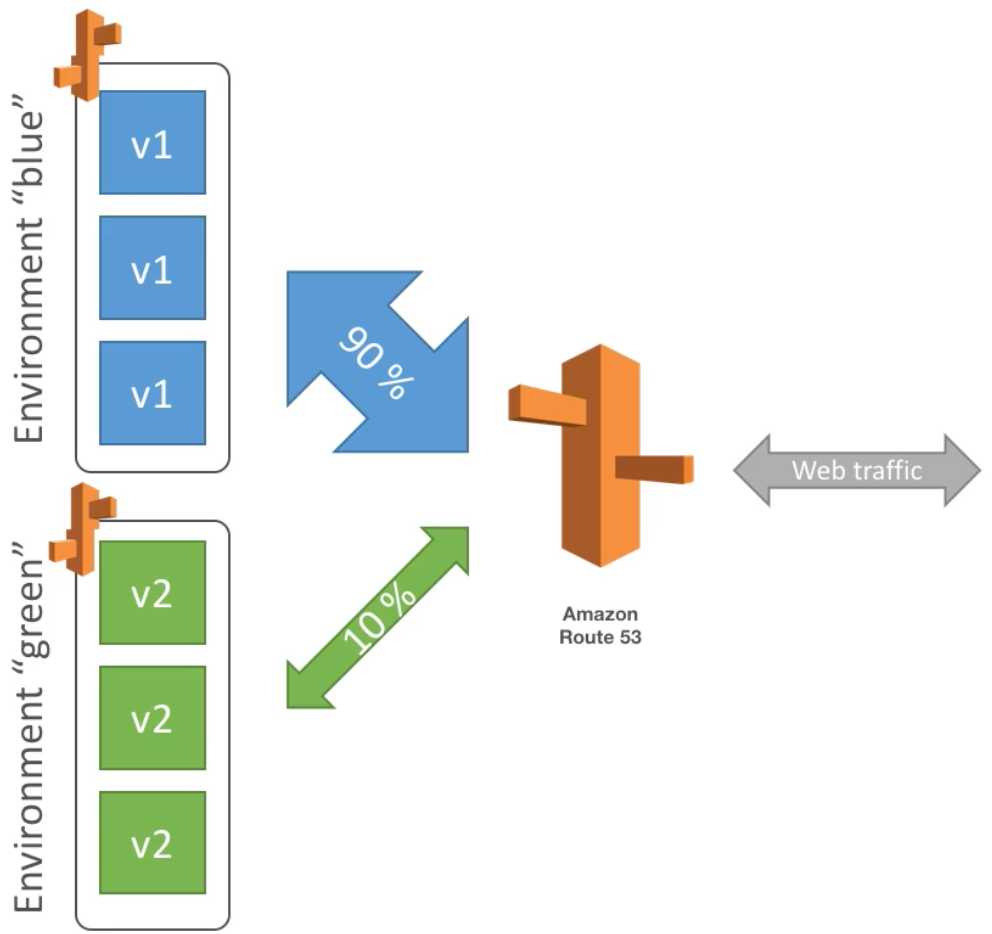
Elastic Beanstalk CLI
- We can install an additional CLI called “EB ClI” which makes working with Beanstalk from the CLI easier
- It is helpful for your automated deployment pipelines
Elastic Beanstalk Deployment Process
- Describe dependencies
- Package code as zip
- Via console: you can upload zip file (creates a new app version) and then deploy
- CLI: create a new app version using CLI (uploads zip) and then deploy
- Note when app artifact is uploaded as zip, it actually goes to S3 and EB picks it up from there
- EB will deploy the zip on each EC2 instance, resolve dependencies, and start the application
- Note: this process can also be automated with CodePipeline and CodeBuild such that CodePipeline detects when there was a change to our source code (either on CodeCommit, GitHub, BitBucket) and packages the code & uploads the artifact to S3. From S3, CodeBuild can pick it up and run some predefined script to test / build our project and upload the new artifact again to S3. From there, CodePipeline can be configured so that Elastic Beanstalk picks up the artifact from S3 and then deploys it to our desired infrastructure as describe by our
.configfiles in theebextensionsdirectory in our artifact
Elastic Beanstalk Lifecycle Policy
- Elastic Beanstalk can store at most
1000application versions - If you don’t remove old versions you won’t be able to deploy anymore
- To phase out old application versions use a lifecycle policy
- Based on time (old versions are removed)
- Based on space (when you have too many versions)
- Versions that are currently used won’t be deleted
- There is an option not to delete the source bundle in S3 to prevent data loss
Elastic Beanstalk extensions
- All the parameters set in the UI can be configured with code using files
- Requirements:
- Configuration files must all end with
.configand they must all be in the.ebextensions/directory in the root of your source code - Able to modify some default settings using the
option_settings - Ability to add any resource (e.g., RDS, ElastiCache, DynamoDB, etc..)
- Configuration files must all end with
- Note: resources managed by
.ebextensions/get deleted if the environment goes away
Elastic Beanstalk Under the Hood
- Under the hood Elastic Beanstalk relies on CloudFormation
- CloudFormation is used to provision other AWS services (infrastrucure as code)
- Use case: you can define CloudFormation resources in your
.ebextensions/to provision any AWS resource
Elastic Beanstalk Cloning
- You can clone an environment with the same exact configuration
- All resources and configurations are preserved. For example:
- Load balancer type and configuration
- RDS database type (but the data is not preserved)
- Environment variables, etc..
Elastic Beanstalk Migration: Load Balancer
After creating an Elastic Beanstalk environment you cannot change the Elastic Load Balancer type (only the configuration).
To migrate:
- Create a new environment with the same configuration except the Load Balancer (to do this we can’t use the “clone” feature described above since that would copy the same exact LB type and configuration – so we have to create a new EB environment with the desired configuration)
- Deploy your application onto the new environment
- Perform a CNAME swap or Route 53 update
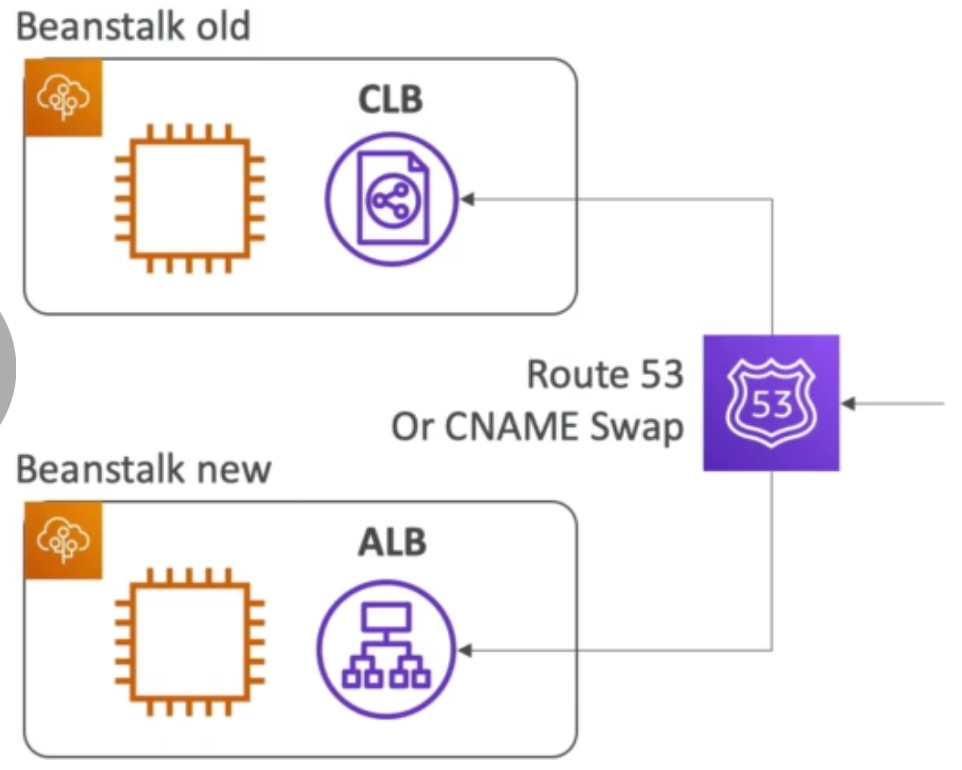
RDS with Elastic Beanstalk
- RDS can be provisioned with Beanstalk which is great for a dev / test environment
- This is not great for prod as the database lifecycle is tied to the Beanstalk environment lifecycle
- The best way to do it for a production environment is to separately create an RDS database and provide our EB application with the connection string instead
How to Decouple RDS if it is Already In Our Beanstalk Stack
- Create a snapshot or RDS DB instance (as a safeguard – so we have backed data in case something goes wrong)
- Go to the RDS console and protect the existing RDS instance (that is part of our EB stack) from deletion
- Create a new EB stack environment without RDS and point you application to the RDS instance from step (2)
- Perform a CNAME swap so that the new EB load balancer takes the URL of our original EB load balancer – this way consumers are not affected since the load balancer endpoint does not change (this is a blue / green deployment approach)
- Terminate the old environment. Because we enabled RDS delete termination protection in step (2) the RDS instance will not be deleted
- Because RDS has delete protection, the EB CloudFormation stack will be in a
DELETE_FAILEDstate so we have to delete CloudFormation stack manually
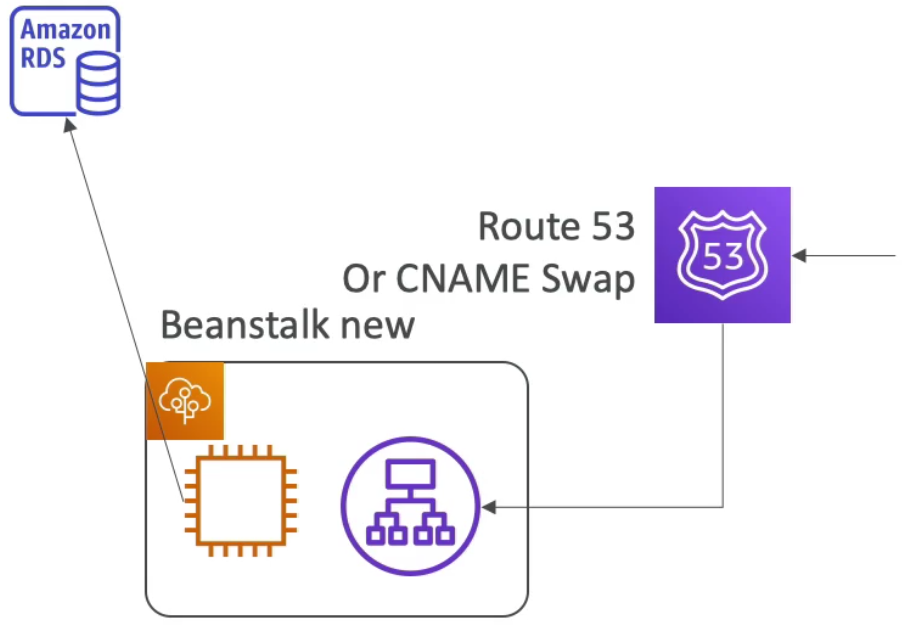
Elastic Beanstalk with Docker
EB Single Container Mode
- Run your application as a single Docker container
- Either provide:
- Dockerfile: Elastic Beanstalk will build and run the Docker container
- Dockerrun.aws.json: describe where already built Docker image is
- Note: EB in single Docker container does not use ECS
EB Multi Docker Container
- Multi Docker helps run multiple containers per EC2 instance in EB
- This will create for you:
- ECS Cluster
- EC2 instances configured to use the ECS Cluster
- Load Balancer (in high availability mode)
- Task definitions and execution
- Requires a config Dockerrun.aws.json at the root of the source code
- Dockerrun.aws.json is used to generate the ECS task definition
- Your Docker images must be pre-built and stored in AWS ECR or Docker Hub for example
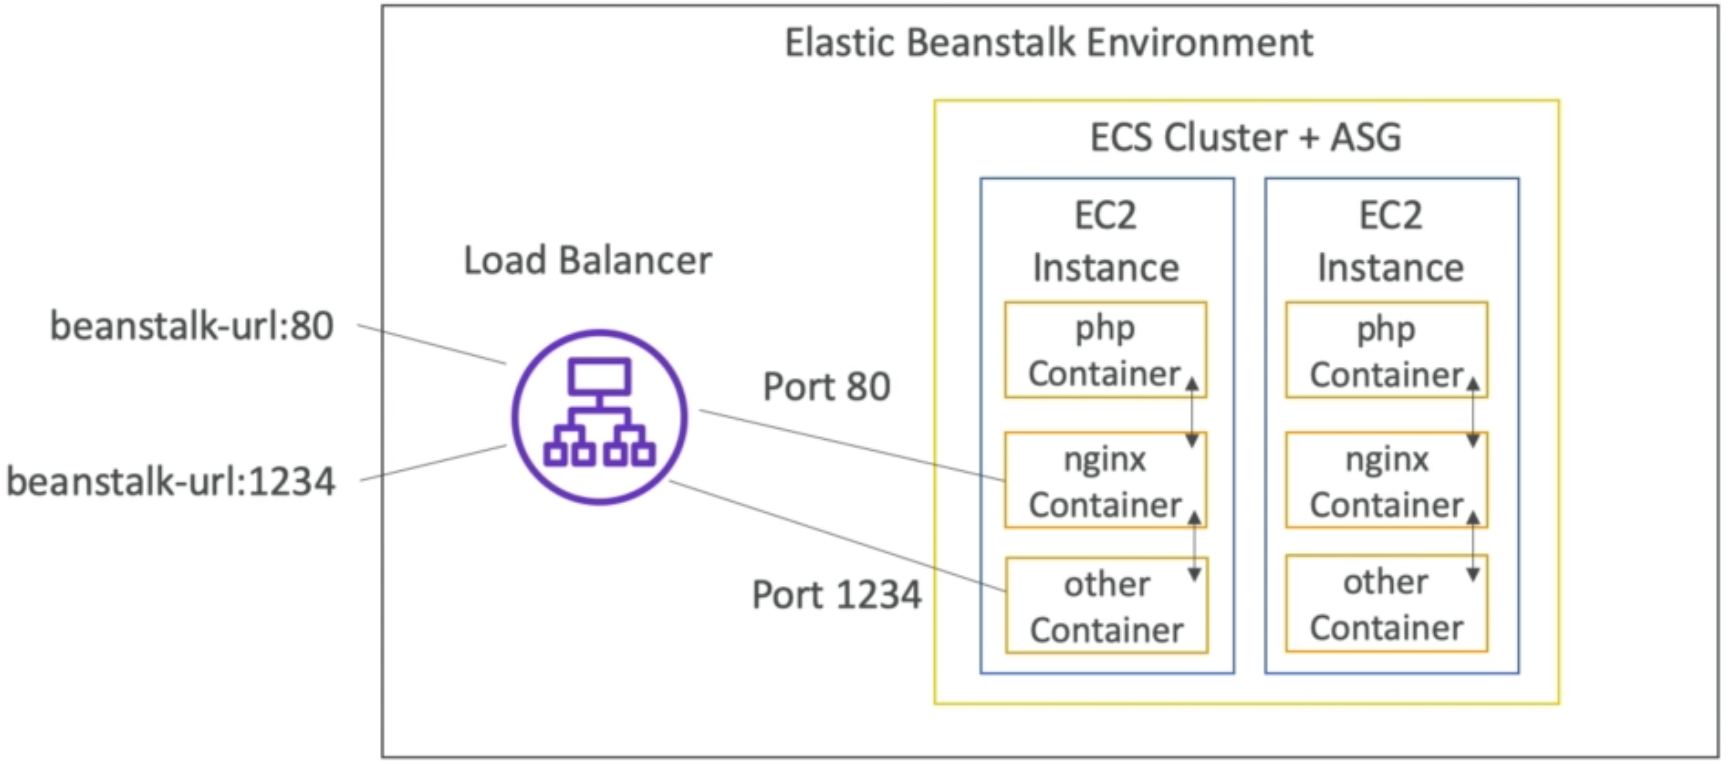
Elastic Beanstalk and HTTPS
- Beanstalk with HTTPS:
- Load the SSL certificate onto the Load Balancer
- Configure it from the code using
.ebextensions/securitylistener-alb.config - SSL certificate can be provisioned using ACM (AWS Certificate Manager) or CLI
- Must configure a security group rule to allow incoming traffic on port
443(HTTPS port)
- Beanstalk redirect HTTP to HTTPS:
- Configure your instances to redirect HTTP to HTTPS, or
- Configure the ALB with a rule
- Make sure health checks are not redirected (so they keep giving
200 OK)
Webserver vs Worker Environment
- If your application performs tasks that are long to complete, offload these tasks to a dedicated worker environment
- Decoupling your application into two tiers is common
- Example: processing a video, generating a zip file, etc..
- You can define periodic tasks in a file cron.yaml

Elastic Beanstalk – Custom Platform (Advanced)
- Custom Platforms are very advanced they allow to define from scratch:
- OS
- Additional software
- Scrips that EB should run on these platforms
- Use case: app language is incompatible with Beanstalk and doesn’t use Docker
- To create you own platform:
- Define an AMI using Platform.yaml file
- Build that platform using the Packer software (open source tool to create AMIs)
- Custom Platform vs Custom Image (AMI):
- Custom Image is tweak an existing EB platform
- Custom Platform is to create an entirely new EB platform
AWS CI/CD: CodeCommit, CodePipeline, CodeBuild, CodeDeploy
- CI/CD stands for Continuous Integration / Continuous Deployment
- We know how to create AWS resources manually (Console)
- We know how to interact with AWS programatically (CLI)
- We’ve seen how to deploy code to AWS using Elastic Beanstalk
- But all of this is very manual
- We would like to push our code to some repository and have it deployed automatically to AWS (maybe even run tests, deploy to different stages, and have manual approval where needed)
- This section focuses on automating the deployments we’ve been doing so far
- We will learn about:
- AWS CodeCommit: storing code
- AWS CodePipeline: automating our pipeline from code to Elastic Beanstalk
- AWS CodeBuild: building and testing our code
- AWS CodeDeploy: deploying the code to EC2 fleets (not Beanstalk)
Continuous Integration
- Developers push the code to a code repository often (e.g., GitHub, CodeCommit, BitBucket)
- A testing / build server checks the code as soon as it’s pushed (e.g., CodeBuild, Jenkins, etc..)
- The developer gets feedback about the tests and checks that have passed / failed
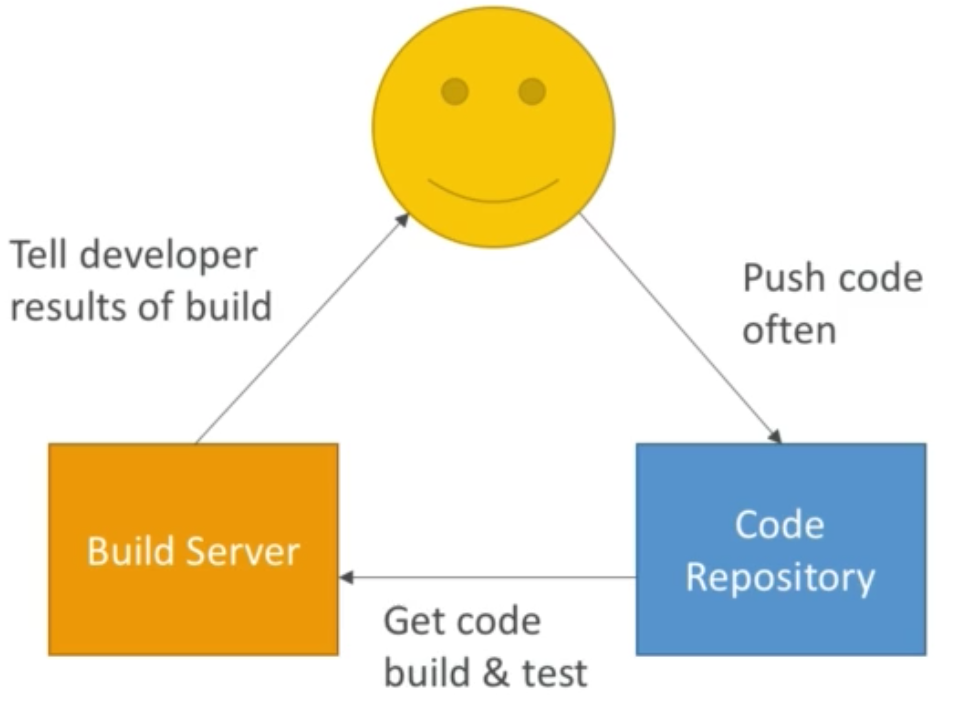
Continuous Deployment
- Ensure that the software can be released reliably whenever needed
- Ensures deployment happen often and quick
- Automated Deployment:
- CodeDeploy
- Jenkins CD
- Spinnaker, etc..
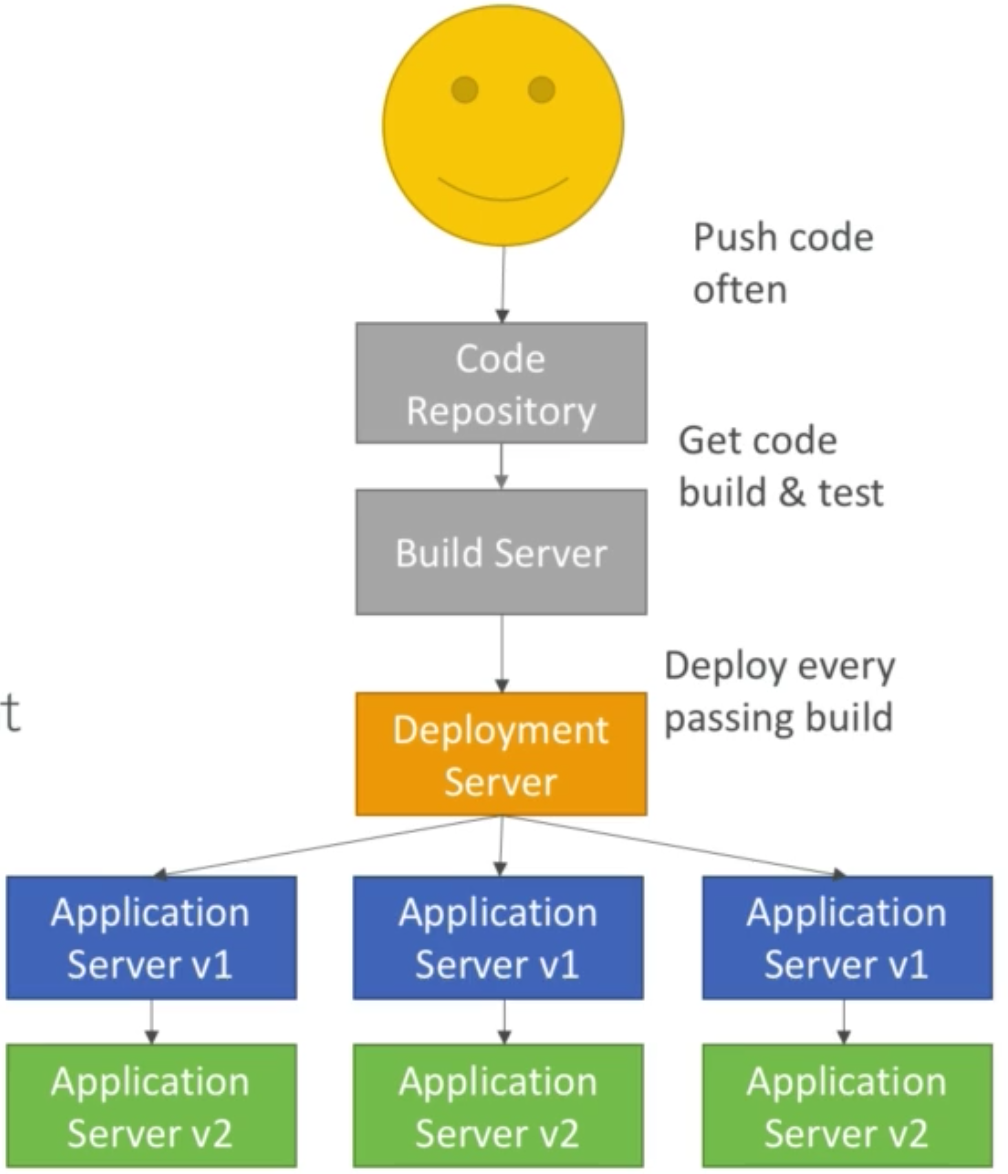
## Technology Stack for CI/CD

CodeCommit
- Version Control is the ability to track and manage the various changes and versions of an application across its lifetime
- There are many version control systems. The most popular one today is git
- A git repository can live on a developers machine, but it usually lives in a central repository
- Common version control hosting platforms:
- GitHub
- BitBucket
- And AWS CodeCommit:
- private git repos
- no size limit on repos
- fully managed , highly available
- secure
- integrates with Jenkins, CodeBuild, etc..
CodeCommit Security
- Interactions are done using git
- Authentication in git:
- SSH keys: AWS users can configure SSH keys in their IAM Console
- HTTPS: done through the AWS CLI Authentication helper or Generating HTTPS credentials
- MFA can be enabled for extra security
- Authorization in git:
- IAM Policies manage user / roles rights to repos
- Encryption:
- Repos are automatically encrypted at rest using KMS
- Encrypted in transit (can only use HTTPS or SSH)
- Cross account access:
- DO NOT share your SSH keys
- DO NOT share your AWS credentials
- Use IAM Role in you AWS account and the person needing in the other account would use AWS STS to assume role (using AssumeRole API)
CodeCommit Notifications
- You can trigger notifications in CodeCommit using AWS SNS (Simple Notification Service) or AWS Lambda or AWS CloudWatch Event Rules – these are all called targets for the notification
- Use cases for notifications SNS / AWS Lambda notifications:
- Generally used for cases when something changed / happened to the code itself
- Deletion of branches
- Trigger for pushes that happens in master branch
- Notify external build system
- Trigger AWS Lambda to perform codebase analysis
- Use cases for CloudWatch Event Rules:
- Trigger for pull request updates
- commit comments events (e.g., something added a comment)
- CloudWatch Event Rules goes into an SNS topic
CodeCommit Notifictions vs Triggers
Notifications should be used for literal notification and not for taking action based on them.
Triggers are supposed to initiate action. So, if I need to invoke some service based on this event on which trigger is based, I would do that and hence the option to integrate Lambda service. In a way to add automation after codecommit events.
CodePipeline
- Continuous delivery
- Source: GitHub, CodeCommit, S3, etc..
- Build: CodeBuild, Jenkins, etc..
- Load testing: 3rd party tools
- Deploy: AWS CodeDeploy, Beanstalk, CloudFormation, ECS, etc..
- CodePipeline is for orchestrating all these services to provide a continuous delivery pipeline – hence the name
- Made of stages:
- Each stage can have sequential and or parallel actions (note that action groups and actions go within a stage)
- Stage examples: Build / Test / Deploy / Load Test / etc..
- Manual approval can be defined at any stage (except source pull)
CodePipeline Artifacts
- Each pipeline stage can create artifacts
- Artifacts are stored in S3 and passed on to the next stage
- Basically: each stage creates artifacts and can output them for the next stage to use

CodePipeline Troubleshooting
- CodePipeline state changes happen in AWS CloudWatch Events which can in turn create SNS notifications
- Ex: you can create events for failed pipelines
- Ex: you can create events for cancelled stages
- If CodePipeline fails a stage, your pipeline stops and you can get info in the console
- AWS CloudTrail can be used to audit AWS API calls
- If pipeline can’t perform an action (e.g., can’t deploy to Elastic Beanstalk), make sure the IAM service role for the pipeline has enough permissions (i.e., policy is incorrect or incomplete)
CodeBuild
- Fully managed build service
- Alternative to build tool like Jenkins
- Continuous scaling (no servers to manage or provision – no build queue)
- As you have build requests coming in, CodeBuild goes ahead and builds for you – no waiting
- You pay per time it takes to complete the build
- Leverages Docker under the hood for reproducible build
- Possibility to extend capabilities leveraging our own Docker images
- Secure: integration with KMS for encryption of build artifacts, IAM for build permissions, and VPC for network security, CloudTrail for API calls logging
- Can source code from different places (e.g., GitHub, CodeCommit, CodePipeline, S3, etc..)
- Build instructions can be defined in code (in the buildspec.yml file)
- CodeBuild logs are sent to S3 & AWS CloudWatch logs (this is comething you have to configure.. but the idea is that once the build is complete the underlying container goes away and all you have left to debug the build is the logs)
- Use CloudWatch Alarms to detect failed builds and trigger notifications
- Can also leverage SNS notifications, CloudWatch Events, and AWS Lambda

CodeBuild BuildSpec
- buildspec.yml file must be defined at the root of your source code directory
- In buildspec.yml you can define build environment parameters:
- Either as plaintext variables, or
- Using secure secrets via AWS SSM Parameter store
- Build phases (allows us to specify commands to run in each phase):
- Install: install dependencies you need for the build
- Pre build: final commands to execute just before build starts
- Build: actual build commands
- Post build: finishing touches (e.g., zip output artifact)
- Artifacts: what to upload to S3 (encrypted with KMS)
- Cache: files to cache (usually dependencies) to S3 for future build speedup
CodeBuild Local Build
- In case you need to troubleshoot beyond logs
- You can run CodeBuild locally on your desktop (after installing Docker)
- For this you will need to leverage the CodeBuild Agent
CodeBuild in VPC
- By default your CodeBuild containers are launched outside your VPC
- Therefore by default it cannot access resources in a VPC
- You can specify a VPC configuration:
- VPC ID
- Subnet IDs
- Security Group IDs
- Then your build can access resources in your VPC
- Use cases: if you want to run integration tests using CodeBuild, query data, internal load balancers
CodeDeploy
- Use when you want to deploy your application automatically to many EC2 instances
- The EC2 instances are not managed by Elastic Beanstalk
- There are other ways to do this using tools like Ansible, Terraform, Chef, Puppet, etc..
- Each EC2 Machine (or on premise machine) must be running the CodeDeploy Agent
- The agent is continuously polling AWS CodeDeploy for work to do
- CodeDeploy sends appspec.yml file
- Application is pulled from GitHub or S3
- EC2 will run the deployment instructions
- CodeDeploy Agent will report of success / failure of deployment on the instance

CodeDeploy Other
- EC2 instances are grouped by deployment group (dev / test / prod)
- CodeDeploy can be chained into CodePipeline and use artifacts from there
- CodeDeploy can re-use existing setup tools, works with any application, auto scaling integration
- Note: Blue / Green deployments only works with EC2 instances (does not work with on premise)
- Support for AWS Lambda deployments
- CodeDeploy only deploys applications – it does not provision any resources
CodeDeploy Primary Components
- Application: unique name
- Compute platform: EC2 / On-Premise or Lambda
- Deployment configuration: deployment rules for success / failures
- EC2 / On-Premise: you can specify the min number of healthy instances for the deployment
- AWS Lambda: specify how traffic is routed to your updated Lambda functions
- Deployment group: group of tagged instances (allows to deploy gradually)
- Deployment type: in-place deployment or blue / green
- IAM instance profile: need to give EC2 permissions to pull from S3 / GitHub
- Application Revision: application code + appspec.yml file
- Service role: role for CodeDeploy to perform what it needs
- Target revision: target deployment application version
CodeDeploy AppSpec
- File section: how to source and copy from S3 / GitHub to filesystem
- Hooks: set of instructions to do to deploy the new version. The order is:
- ApplicationStop
- DownloadBundle
- BeforeInstall
- AfterInstall
- ApplicationStart
- ValidateService (really important – kind of like a health check to see if deploy was successful)
AWS CodeDeploy Deployment Config
- Configs:
- One at a time: one instance at a time, if one instance fails, then the deployment stops
- Half at a time: 50%
- All at once: quick so good for dev (but can cause downtime)
- Custom
- Failures:
- Instances stay in a “failed state”
- New deployments will first be deployed to failed state instances
- To rollback: redeploy old deployments or enable automated rollback for failures
- Deployment Targets:
- Set of EC2 instances with tags (when we deploy we specify to what instances based on the tags they have attached)
- Or we can deploy directly to an ASG
- Or we can have a mix of ASG / Tags
- We can also use a customization in scripts with
DEPLOYMENT_GROUP_NAMEenvironment variable to control deployment based on environment
CodeDeploy for EC2 and ASG
For EC2:
- Define how to deploy the application using appspec.yml and a deployment strategy
- Can use hooks to verify the deployment after each deployment phase
For ASG:
- In place updates:
- updates current existing EC2 instances
- instances newly created by an ASG will also get automated deployments
- Blue / green deployment:
- A new auto-scaling group is created (settings are copied)
- Choose how long to keep old instances
- Must be using an ELB
- After new ASG is created ALB points to new ASG and old one is taken down
CodeDeploy – roll backs
- You can specify automated rollback options
- Roll back when deployment fails
- Roll back with alarm thresholds are met
- You can also disable roll backs
- If a roll back happens, CodeDeploy redeploys the last known good revision as a new deployment (will get a new version id)
CodeStar
- CodeStar in an integrated solution that regroups: GitHub, CodeCommit, CodeBuild, CodeDeploy, CloudFormation, CodePipeline, CloudWatch
- Helps quickly create CI/CD ready projects for EC2, Lambda, Beanstalk
- Issue tracking integration with JIRA / GitHub Issues
- Ability to integrate with AWS Cloud9
- Pay only for underlying resources
CloudFormation
- CloudFormation (CF) enables infrastructure as code on AWS
- It allows us to outline our AWS infrastructure in a declaritive way using CF templates written in yaml or JSON format
- For example we can write a template provision:
- A security group
- Some EC2 instances using this security group
- An Elastic IP for these EC2 instances
- An S3 bucket
- And a load balancer in front of these machines
- CF creates provisions all of these resources for us in the right order with the exact configuration we specified
Benefits of CloudFormation
- Infrastructure as Code
- Our infra is reproducible – we can easily take it down and bring it back up with no manual work
- Since infra is easily taken down and brough back up, we can implement saving strategy in development environments by scheduling automatic deletion of templates at, for instance, 5 PM and recreated at 8 AM
- Each resource within the CF stack is tagged with an identifier so we can easily track its cost
- Since CF template is declarative we just need to specify the resource we need there is no need to figure out order and orchesration – AWS will do all of this for us
- We can have as many CD stacks as we want, thus, allowing us to modularize our templates (separation of concerns principle). For instance we can have separate stacks for creating:
- VPC
- Network
- Application
How CloudFormation Works
- Templates have to be uploaded in S3 and then referenced from CF
- To update a template we cannot edit previous ones – we must upload a new one (CF will figure out the template change set and update accordingly)
- Stacks are identified by a name
- Deleting a stack deletes every single artifact that was created by CF
Deploying CloudFormation templates
- Manual option using CF Designer in AWS Console
- Automated way:
- First build template(s) (in YAML or JSON format)
- Use the AWS CLI to deploy the templates
CloudFormation Building Blocks
- Resources: your AWS resouces declared in the template (MANDATORY section of every CF template)
- Parameters: the dynamic inputs for your template
- Mappings: the static variables for your template
- Outputs: references to what has been created
- Conditionals: list of conditions to perform resource creation
- Metadata
Teplate helpers:
- References
- Functions
CloudFormation Resource
- Resources are the core of your CF template and they are MANDATORY
- Resources sections contains all the different AWS components that will be created and configures as part of this remplate
- Resources are declared and can reference each other
- AWS figures out creation, updates, and deleteion for us
- Resource types identifiers are of the form:
AWS::aws-product-name::data-type-name
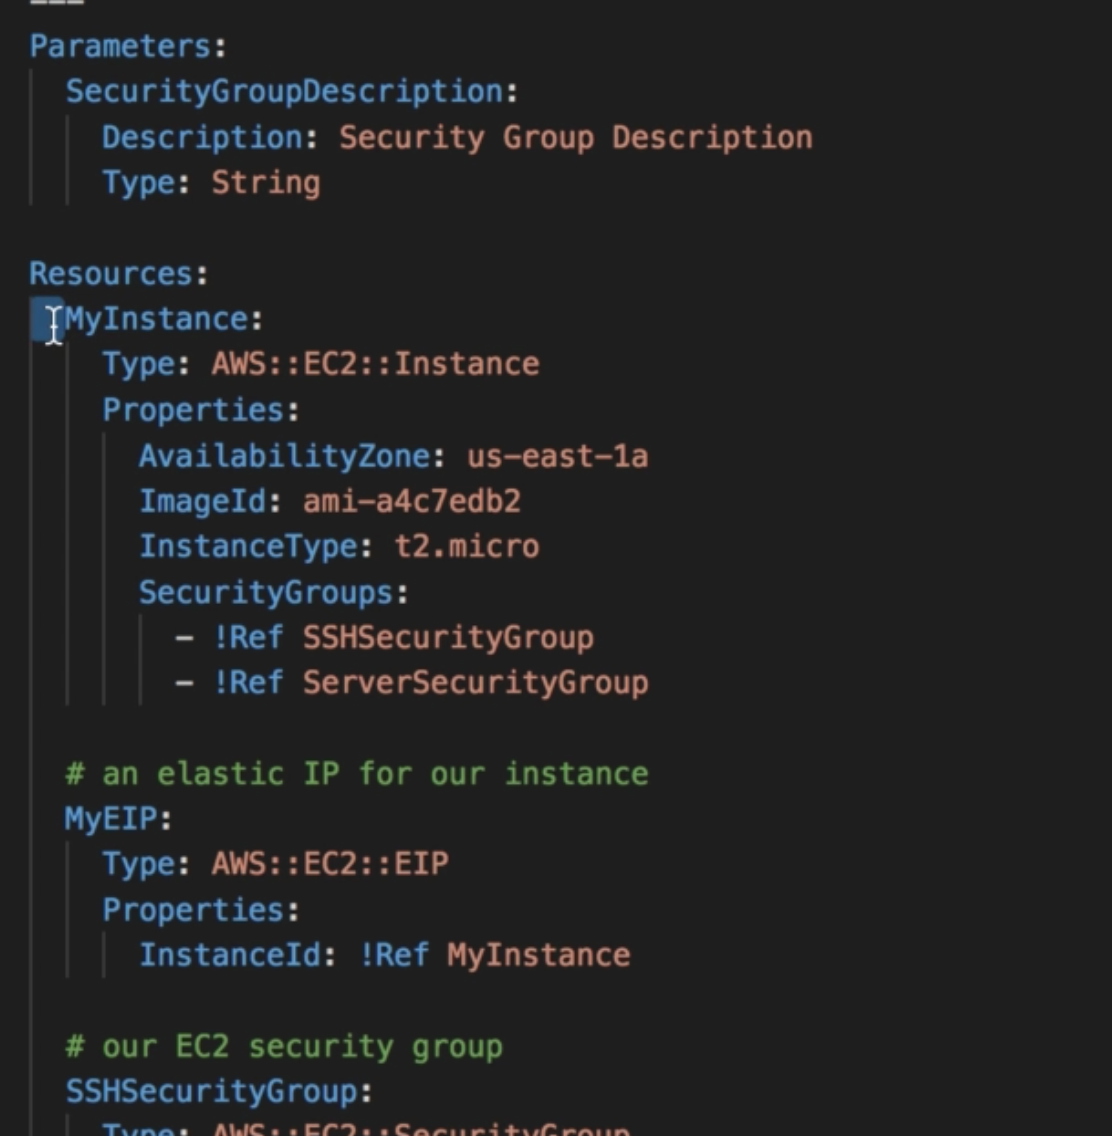
CloudFormation Parameters
- Parameters are a way to provide inputs to our CF templates
- They are important for making our CF templates generic and reusable
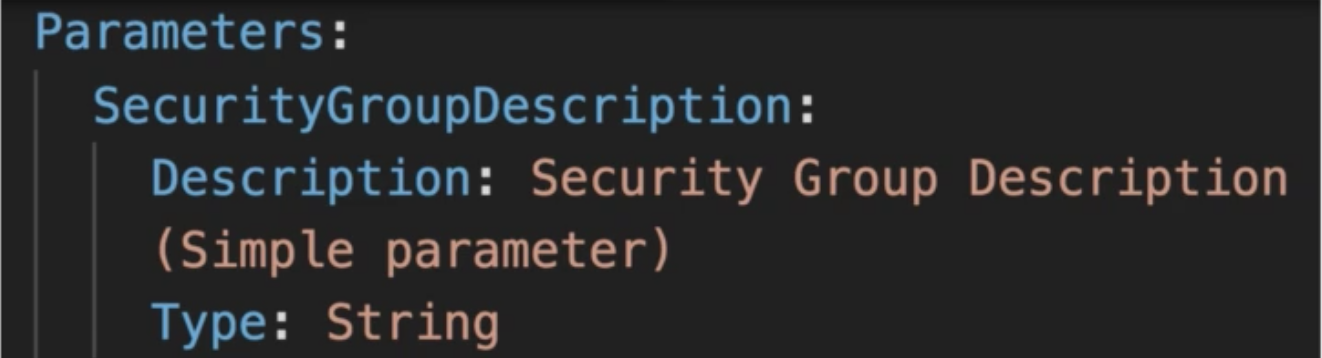
## Parameter Settings
Parameters can be controlled by these values:
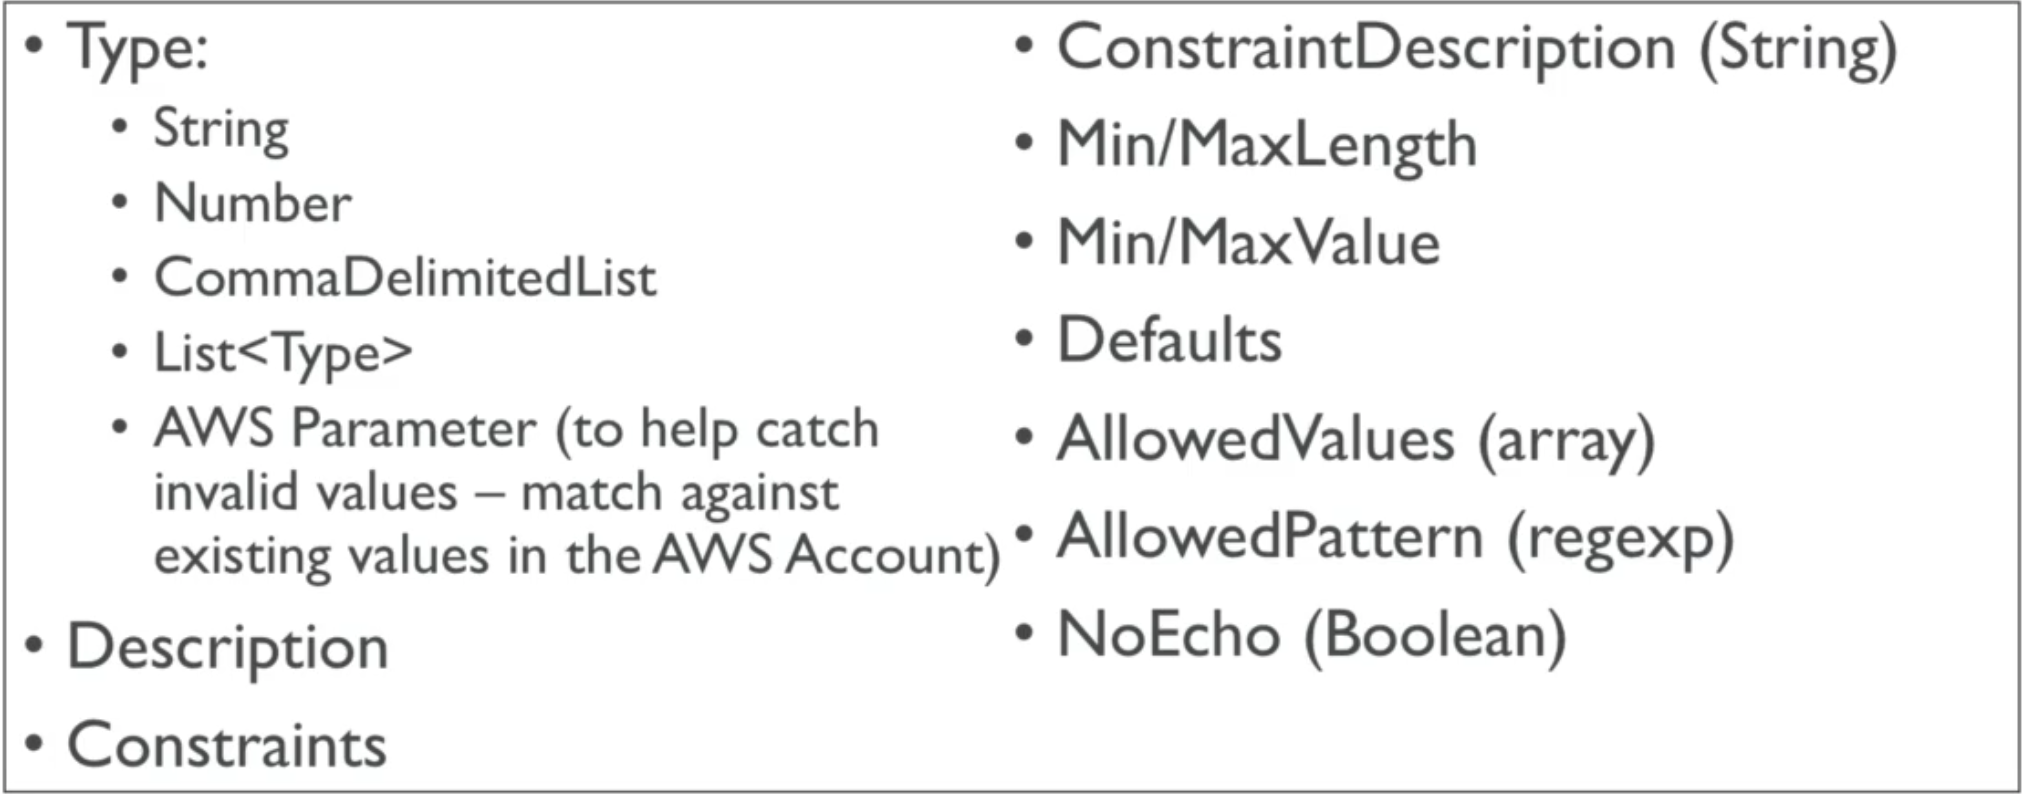
To reference a parameter or a resource use the Fn::Ref intrinsic function (shorthand in YAML is !Ref).
CloudFormation Pseudo Parameters
AWS CF offers pseudo parameters in any CF template – essentially values that are exposed by AWS that we can use in our template. They are:
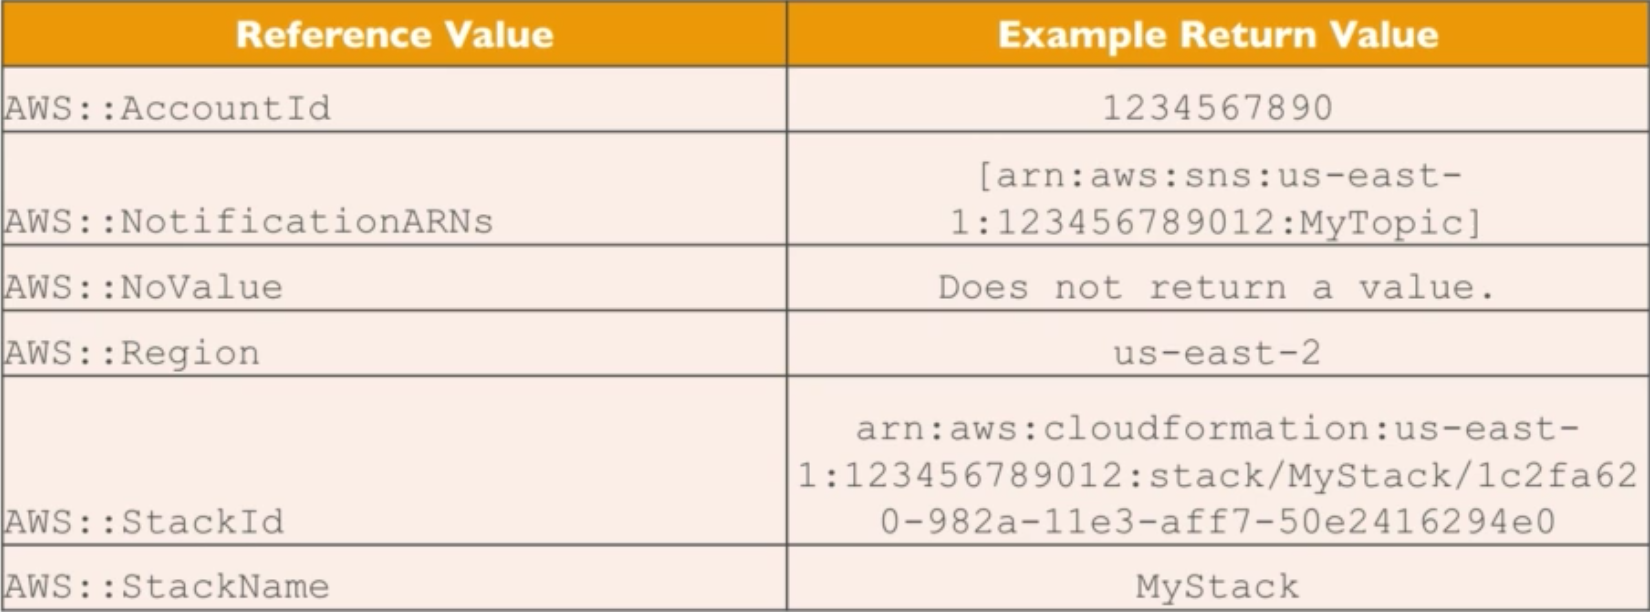
CloudFormation Mappings
Mappings are fixed variables in your CloudFormation template. Example:
!()[]
Accessing Mapping Values
- We use
Fn::FindInMapto return a named value from a specific key - In YAML file we can use
!shortcut instead ofFn::so:!FindInMap [ MapName, TopLevelKey, SecondLevelKey ]
For example, we can have a map and get the specific AMI id for an EC2 instance based on the AWS Region which the template is running in:

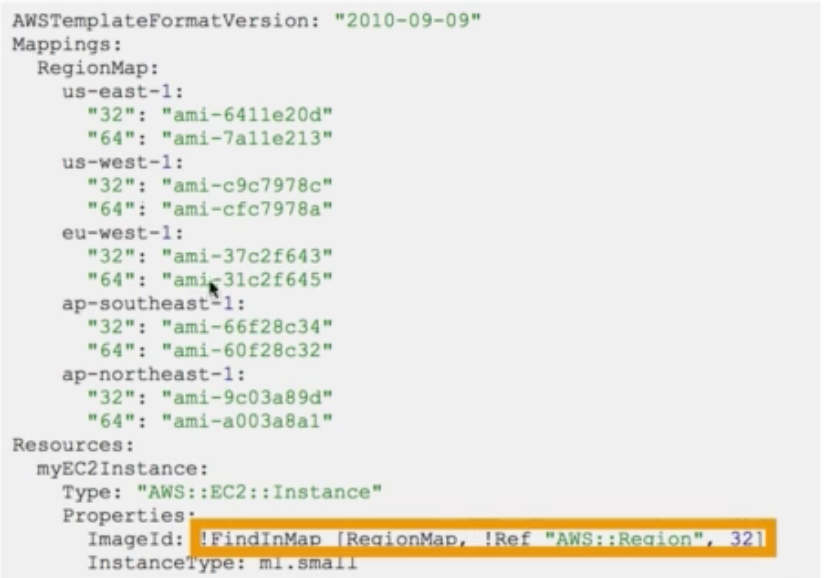
CloudFormation Outputs
- The Outputs section declares optional outputs that we can import into other stacks (if we export them first!)
- They are useful for modularizing our templates and for separation of concernts. For example, we can have a CF template that build the network infrastructure and outputs variables such as VPC ID and Subnet IDs
- Note: you CANNOT delete a CF stack if its outputs are being referenced by another CF stack
For example we can have a CF template that outputs a security group (note the output section has !Ref which point to the actual secuirty group resource in the template):
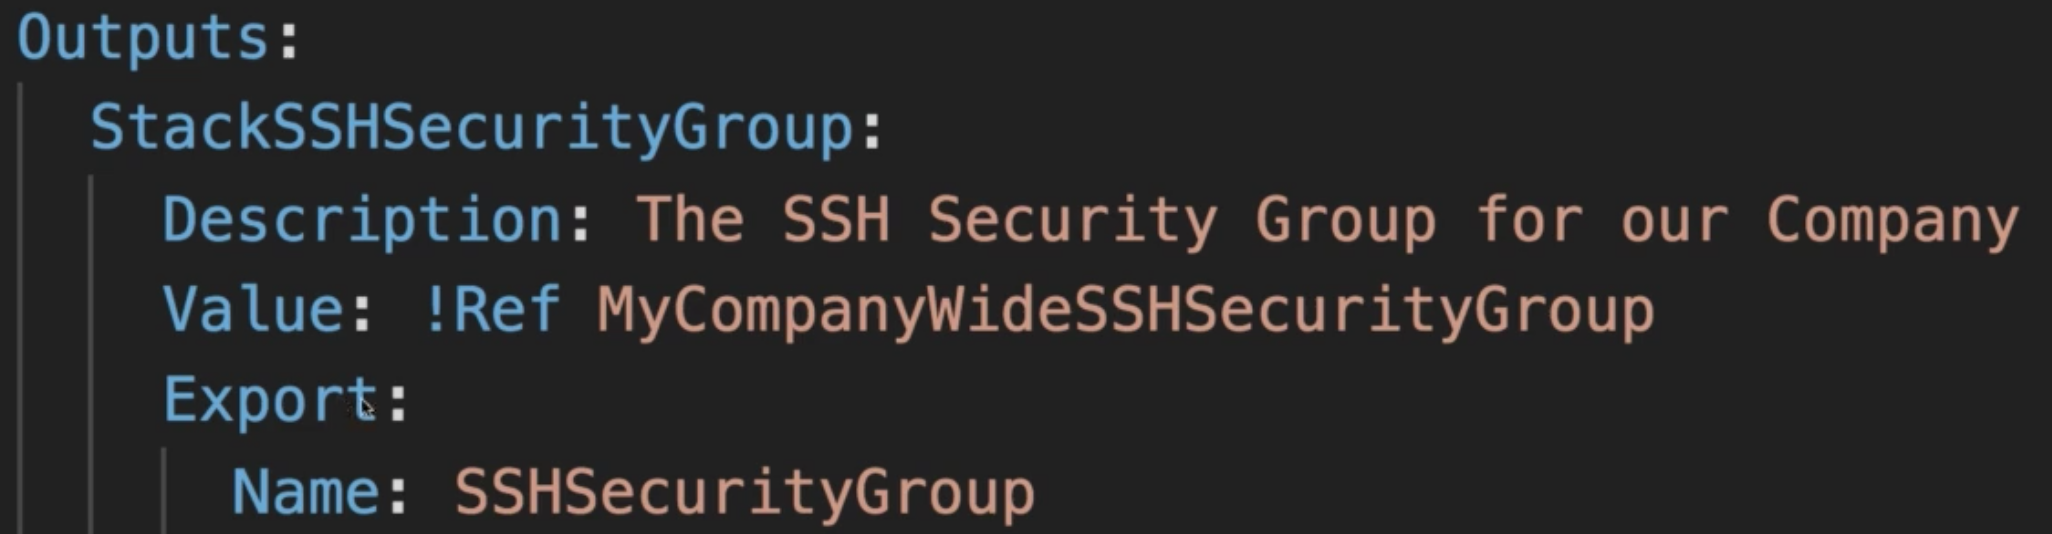
CloudFormation Imports
Having the output from above, we can create a second CF template that leverages the security group. For example, we can use Fn::ImportValue or (if using YAML) just !ImportValue to import that security group:
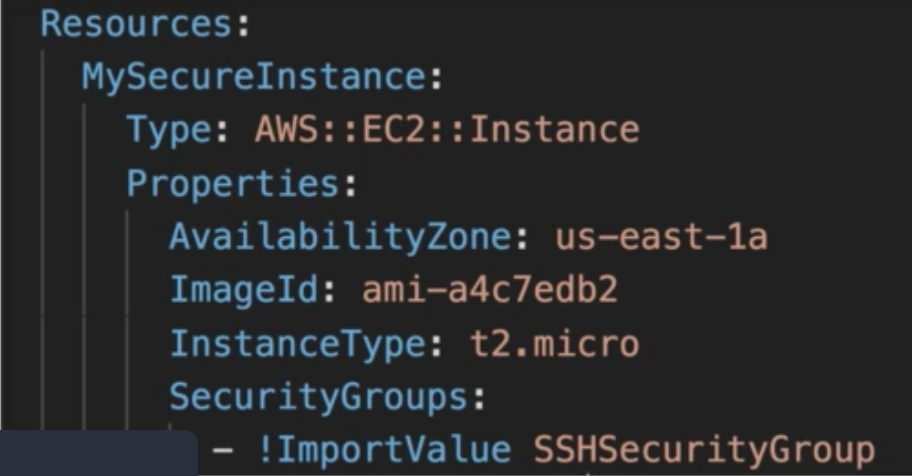
CloudFormation Conditions
- Conditions are used to control the creation of resources or outputs based on a condition
- Common conditions in CF templates are based on:
- Environment type (e.g., dev, prod, qa)
- AWS Region
- Parameter values
- Each condition can reference another condition, parameter value or mapping

Using a Condition
Conditions can be applies to resources / output / etc..
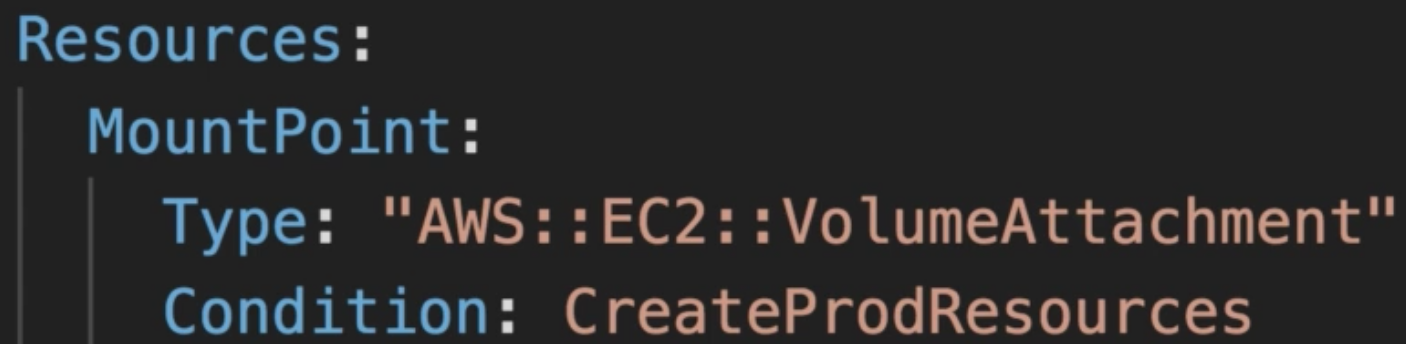
CloudFormation Intrinsic Functions
Fn::Ref
- The
Fn::Reffunction can be leveraged to reference:- Parameters: returns the value of the parameter
- Resources: returns the ID of the underlying resource (e.g., EC2 ID)
- Shorthand in YAML is
!Ref
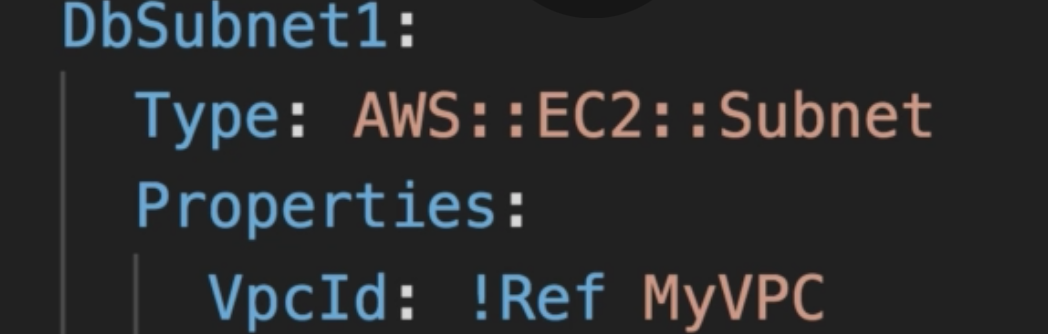
Fn::GetAtt
- Attributes are attached to any resource you create
- Check out the documentation to see what attributes are available for specific resources
For example, below we can get the AZ of our EC2 instance resource by using !GetAtt EC2Instance.AvailabilityZone:

Fn::FindInMap Accessing Mapping Values
- We use
Fn::FindInMapto return a named value from a specific key - In YAML file we can use
!shortcut instead ofFn::so:!FindInMap [ MapName, TopLevelKey, SecondLevelKey ]
For example, we can have a map and get the specific AMI id for an EC2 instance based on the AWS Region which the template is running in:
Fn::ImportValue
- Import values that are exported at outputs in other templates
- For this we use
Fn::ImportValueor (if using YAML) just!ImportValue
Fn::Join
Join values with a delimeter: !Join [ delimeter, [ comma-delimeter list of values ] ]
Ex: !Join [ ":", [ a, b, c ] ] creates “a:b:c”
Fn::Sub
The intrinsic function Fn::Sub substitutes variables in an input string with values that you specify.
The following example uses a mapping to substitute the ${Domain} variable with the resulting value from the Ref function.
{ "Fn::Sub": [ "www.${Domain}", { "Domain": {"Ref" : "RootDomainName" }} ]}
or using YAML:
Name: !Sub
  - www.${Domain}
  - { Domain: !Ref RootDomainName }
Condition Functions
Conditions can use any of the following:
Fn::AndFn::EqualsFn::IfFn::NotFn::Or
CloudFormation Rollbacks
- If Stack Creation Fails:
- Default: everything rolls back (i.e., gets deleted). We can look at the log
- Option to disable rollback and troubleshoot what happened
- Stack Update Fails:
- The stack automatically rolls back to the previous known working state
- Ability to see in the log what happened and error messages
CloudFormation ChangeSets, NestedStacks, and StackSet
ChangeSet
- When you update a stack, AWS CF basically computes a change set (i.e., difference) between the old stack and the new one
- Once change set is created, you can view it, and execute it – this will update your stack
Nested stacks
- Nested stacks are part of other stacks
- They allow you to isolate repeated patterns / common components in separate stacks and call them from other stacks
- Example:
- Load Balancer configuration that is re-used
- Security Group that is re-used
- Nested stacks are considered best practice
- To update a nested stack, always update the parent (root stack)
Cross vs Nested Stacks
- Cross Stacks
- Usually used in cases where stacks have different lifecycles (i.e., logically they are used for different tasks)
- Use Outputs Export to export from one stack and Fn::ImportValue to import resource in another
- When you need to pass export values to many stacks (e.g., VPC Id, RDS Id, etc..)
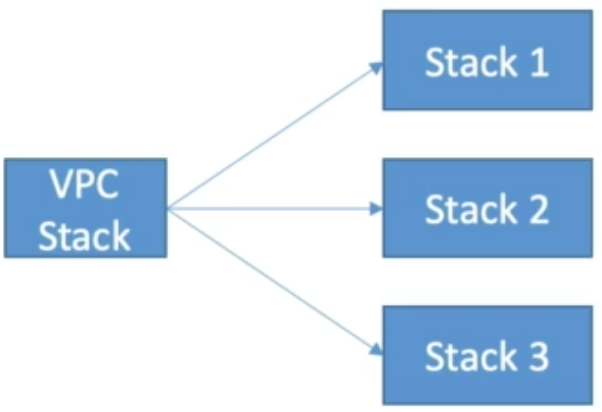
- Nested Stacks
- Helpful when components must be re-used
- For nested stacks primary use case is for reuse of modular components, like a template of a resource you use in lots of stacks to save copy pasting and updating the stacks independently
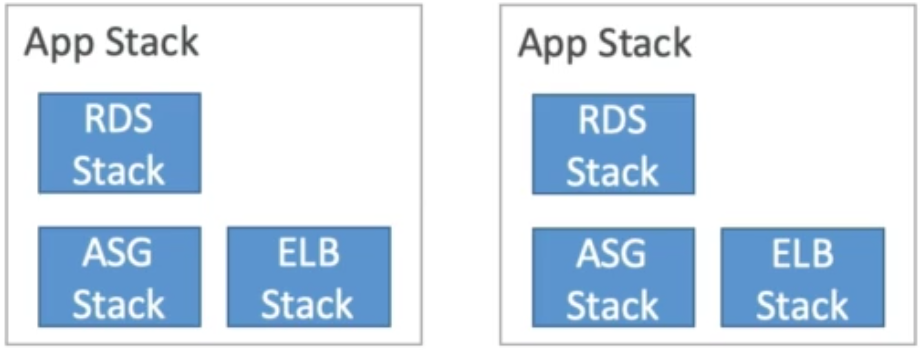
AWS CloudWatch, X-Ray, and CloudTrail
AWS CloudWatch Overview
- AWS CloudWatch exposes:
- Metrics: to collect and track key metrics
- Logs: to collect, monitor, analyze, and store log files
- Events: to send notifications when certain events happen in AWS
- Alarms: to react in real-time to metrics / events
- AWS X-Ray:
- Troubleshooting application performance and errors
- Distributed tracing of microservices
- AWS CloudTrail:
- Internal monitoring of API calls being made
- Audit changes to AWS Resources by your users
AWS CloudWatch Metrics
- Difference AWS service hosts expose different metrics. A metric is a variable that we can opt to monitor for a given AWS service (e.g., EC2 host exposes metrics like CPUUtilization, NetworkIn, NetworkOut, etc..)
- Metrics belong to namespaces
- Dimension is an attribute of a metric (e.g., EC2 instance id, environment, etc..)
- We can have up to
10dimensions per metric - Metrics can have timestamps
- We can create CloudWatch dashboards of metrics
AWS CloudWatch EC2 Detailed Monitoring
- EC2 instance metrics send metrics “every
5minutes” - With detailed monitoring enabled (for a cost) you can get data “every
1minute” - Detailed monitoring is useful in cases when you have a CloudWatch Alarm based on a metric and want it to go in alarm state more promptly (i.e.,
1min lag vs5min allows us to react quicker) to trigger your ASG to scale in or out - Note: EC2 Memory (i.e., RAM) usage is not a default metric provided by AWS, so if you are interested in it, then you will need to push it to CloudWatch from inside the instance as a custom metric
Side note:
- Detailed Monitoring is an EC2 feature that allows the default, EC2 host-reported metrics at a
1minute interval instead of the default 5 minute interval - High-Resolution Metrics are always custom metrics, which can be published as frequently as a
1second interval - See
AWS CloudWatch Custom Metrics
- Possibility to define and send your own custom metrics to CloudWatch (e.g., EC2 host RAM usage)
- Ability to use dimensions (attributes) to segment metrics
- Instance.id
- Environment.name
- Metric resolution:
- Standard:
1minute - High Resolution: up to
1second (API call parameter to enable high resolution is called StorageResolution) – higher cost
- Standard:
- To send custom metric data to CloudWatch use the PutMetricData API call
- Use exponential back off in case of throttle errors
AWS CloudWatch Alarms
- Alarms are used to trigger notifications for metrics
- Alarms can be configured to control Auto Scaling, EC2 Actions, and send events to SNS (which can be further used to send emails, texts, etc..)
- Various options (we can perform many customizations such as sampling, % max, % min, etc..)
- Alarm States:
- OK (not doing anything)
- INSUFFICIENT_DATA (not enough data to determine if alarm is in OK or ALARM state)
- ALARM (when alarm theshold is being passed)
- Period:
- Length of time in seconds to evaluate the metric
- High resolution custom metrics: can only choose
10seconds or30seconds
AWS CloudWatch Logs
- Applications can send logs to CloudWatch using the SDK
- CloudWatch can collect logs from:
- Elastic Beanstalk: collection of logs from application
- ECS: collection of logs from containers
- AWS Lambda: collection of function logs
- VPC Flow Logs: VPC specific logs
- API Gateway
- CloudTrail
- CloudWatch log agents (for example, we can install a CloudWatch log agent on EC2 machines or even on-premise servers to synch local logs to CloudWatch – note that proper IAM permissions are required)
- Route53: log DNS queries
- CloudWatch logs can go to:
- Batch exporter to S3 for retrieval
- Stream to ElasticSearch cluster for further analysis
- Logs storage architecture:
- Log groups: arbitray name, usually representing the application name
- Log stream: instances within application / log files / individual container logs for each app instance running in an ECS cluster (e.g., for an application using CodeBuild, we would have a log group for the application and for each build there would be a separate log stream)
- Can define log expiration policy (e.g., never expire, expire after
30days, etc..) - Using the AWS CLI we can tail CloudWatch logs
- Again, to send logs to CloudWatch the application or the agent will need to have the correct IAM permissions
- Security: encryption of logs using KMS at the group level
CloudWatch Logs for EC2
- By default, no logs from your EC2 instance will go to CloudWatch
- You need to run a CloudWatch agent on EC2 to push the log files you want
- Make sure IAM permissions are correct
- The CloudWatch agent can be setup to run on on-premise instance too
CloudWatch Logs Agent & Unified Agent
- CloudWatch Logs Agent:
- Old version of the agent
- Can only send to CloudWatch Logs
- CloudWatch Unified Agent:
- Can send logs to CloudWatch logs and also can collect additional system-level metrics such as RAM, processes, etc..
- Can have centralized configuration for all of our agents using SSM Parameter Store
CloudWatch Unified Agent – Sending Logs & Metrics
- Collected directly on your Linux server / EC2 instance
- CPU (active, guest, idle, system, user, steal)
- Disk metrics (free, used, total), Disk IO (writes, reads, bytes, iops)
- RAM (free, inactive, used, total, cached)
- Netstat (number of TCP and UDP connections, net packets, bytes)
- Processes (total, dead, blocked, idle, running, sleep)
- Swap Space (free, percent used)
- Reminder: out of the box metrics for EC2 are disk, CPU, network (all high level) – if you need to collect more specific metrics think CloudWatch Unified Agent
CloudWatch Logs Metric Filter
- CloudWatch Logs can use filter expressions
- For example, find a log with a specific IP inside a log stream
- Or count the occurences of “ERROR” in your logs
- Metric filters can be used to trigger alarms
- Note: after you create a filter it does not retroactively filter data. In other words, filters only publish the metric data point for events that happen after the filter was created
CloudWatch Events
- To use CloudWatch events we have to define rules
- A rule watches for specific types of events. When a matching occurs, the event is routed to the targets associated with the rule. A rule can be associated with one or more targets
- When creating a rule we have to define sources and targets:
- Source is either an event pattern (i.e., some AWS service and event type) or a schedule (i.e., cron job)
- Target can be various different AWS services: Lambda functions, SQS/SNS/Kinesis messages
- CloudWatch Events create a small JSON document to give information about the change
AWS EventBridge
- EventBridge is the next evolution of CloudWatch Events
- Similar to CloudWatch we have to define rules
- Default event bus: for events generated by AWS services (i.e., same thing as what CloudWatch Events already provides to us)
- Partner event bus: for events from SaaS service or applications (i.e., increased variety of possible event sources)
- Custom event buses: we can have our own applications be a source and have other applications react to these events (targets) (this is the big difference between EventBridge and CloudWatch Events)
AWS EventBridge Schema Registry
- EventBridge can analyze the events in your bus and infer the schema
- The Schema Registry allows you to generate code for your application that will know in advance how data is structured in the event bus
- Schemas can be versioned
AWS EventBridge vs CloudWatch Events
- EventBridge builds upon and extends CloudWatch Events
- It uses the same service API and endpoint and the same underlying service infrastructure as CloudWatch Events
- EventBridge exposes additional capabilities for events based on custom sources and targets beyond only AWS services (e.g., your own applications, SaaS apps)
- EventBridge also has the concept of a schema registry
- Over time the CloudWatch Events name will be replaced with EventBridge
AWS X-Ray
- Provides visual analysis across out entire application
- X-Ray allows us to visually trace all calls being made, latency of each call, errors, service name, etc.. which makes debugging and understanding issues much easier for microservices based & distributed application architectures
- Troubleshooting becomes easier (e.g., finding painpoints / bottlenecks)
- Because of visual aspect, allows us to understand dependencies in a microservices architecture
- Allows us to answer questions such as: “are we meeting SLA?” such as application latency (SLA: Service Level Argeement)

X-Ray Compatibility
- AWS Lambda
- Elastic Beanstalk
- ECS
- ELB
- API Gateway
- EC2 Instances or any on-premise application server
AWS X-Ray Leverages Tracing
- Tracing is an end to end way to follow a “request”
- Each component dealing with the request adds its own “trace”
- Tracing is made of segments (+ sub segments)
- Annotations can be added to traces to provide extra-information
- Ability to trace:
- Every request
- Sample request (e.g., trace only a certain percentage of requests or some rate per minute)
- X-Ray Security:
- IAM for authorization
- KMS for encryption at rest
AWS X-Ray – How to Enable It ?
- In your code you will have to import the AWS X-Ray SDK
- Very little code modification is needed
- The application SDK will then capture:
- Calls to AWS services being made
- HTTP / HTTPS requests
- Database calls (MySQL, PostgreSQL, DynamoDB)
- Queue calls (SQS)
- Install the X-Ray Daemon or enable X-Ray AWS Integration
- X-Ray daemon works as a low level UDP packet interceptor
- AWS Lambda / other AWS services already run the X-Ray daemon for you
- Each application must have the IAM rights to write data to X-Ray

AWS X-Ray Troubleshooting
- If X-Ray is not working on EC2
- Ensure the EC2 IAM Role has the proper permissions
- Ensure the EC2 instance if running the X-Ray Daemon
- To enable on AWS Lambda:
- Ensure it has an IAM execution role with the proper policy (AWS X-RayWriteOnlyAccess)
- Ensure that X-Ray is imported and configured in the code
X-Ray Instrumentation in your code
- Instrumentation means the measure of a product’s performance, diagnose errors, and to write trace information
- To instrument your application code, you use the X-Ray SDK
- You can modify your application code to customize and annotate the data that the SDK sends to X-Ray using interceptors, filters, handlers, and middleware
X-Ray Concepts
- Segments: each application / service will send them
- Subsegments: if you need more details in your segment
- Trace: segments collected together to form an end-to-end trace
- Sampling: decrease the amount of requests sent to X-Ray, reduce cost
- Annotations: Key Value pairs used to index traces and use with filters
- Metadata: Key Value pairs, not indexed, not used for searching
- The X-Ray daemon / agent has a config to send traces cross account. For this, you need to make sure the IAM permissions are correct
X-Ray Sampling Rules
- With sampling rules, you control the amount of data that you record (the more data you record the more you pay)
- You can modify sampling rules w/o changing your code
- By default, the X-Ray SDK records the first request each second and five percent of any additional requests
- The amount of requests that are captured before only a percentage is captured is called the reservoir
- The rate at which additional requests is captured beyond the resorvoir is reffered to as the rate
- You can create your own rules with the reservoir and rate as custom values
X-Ray Write API (used by the X-Ray daemon)
The AWSXrayWriteOnlyAccess is a managed IAM policy that the daemon needs to have in order to be able to perform all the required writes it needs to do.

X-Ray Read API (used by X-Ray daemon)

X-Ray with Elastic Beanstalk
- AWS Elastic Beanstalk platforms include the X-Ray daemon
- You can run the daemon by setting an option in the Elastic Beanstalk console or with a configuration file (in
.ebextensions/xray-daemon.config) - Make sure to assogm the correct IAM permissions for your instance role so that the X-Ray daemon can function correctly
- Make sure your application code is instrumented with the X-Ray SDK
- Note: the X-Ray daemon is not provided for multicontainer Docker
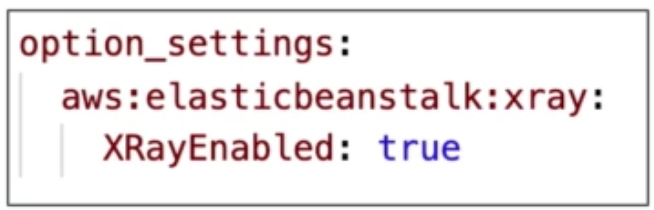
X-Ray & ECS – Integration Options
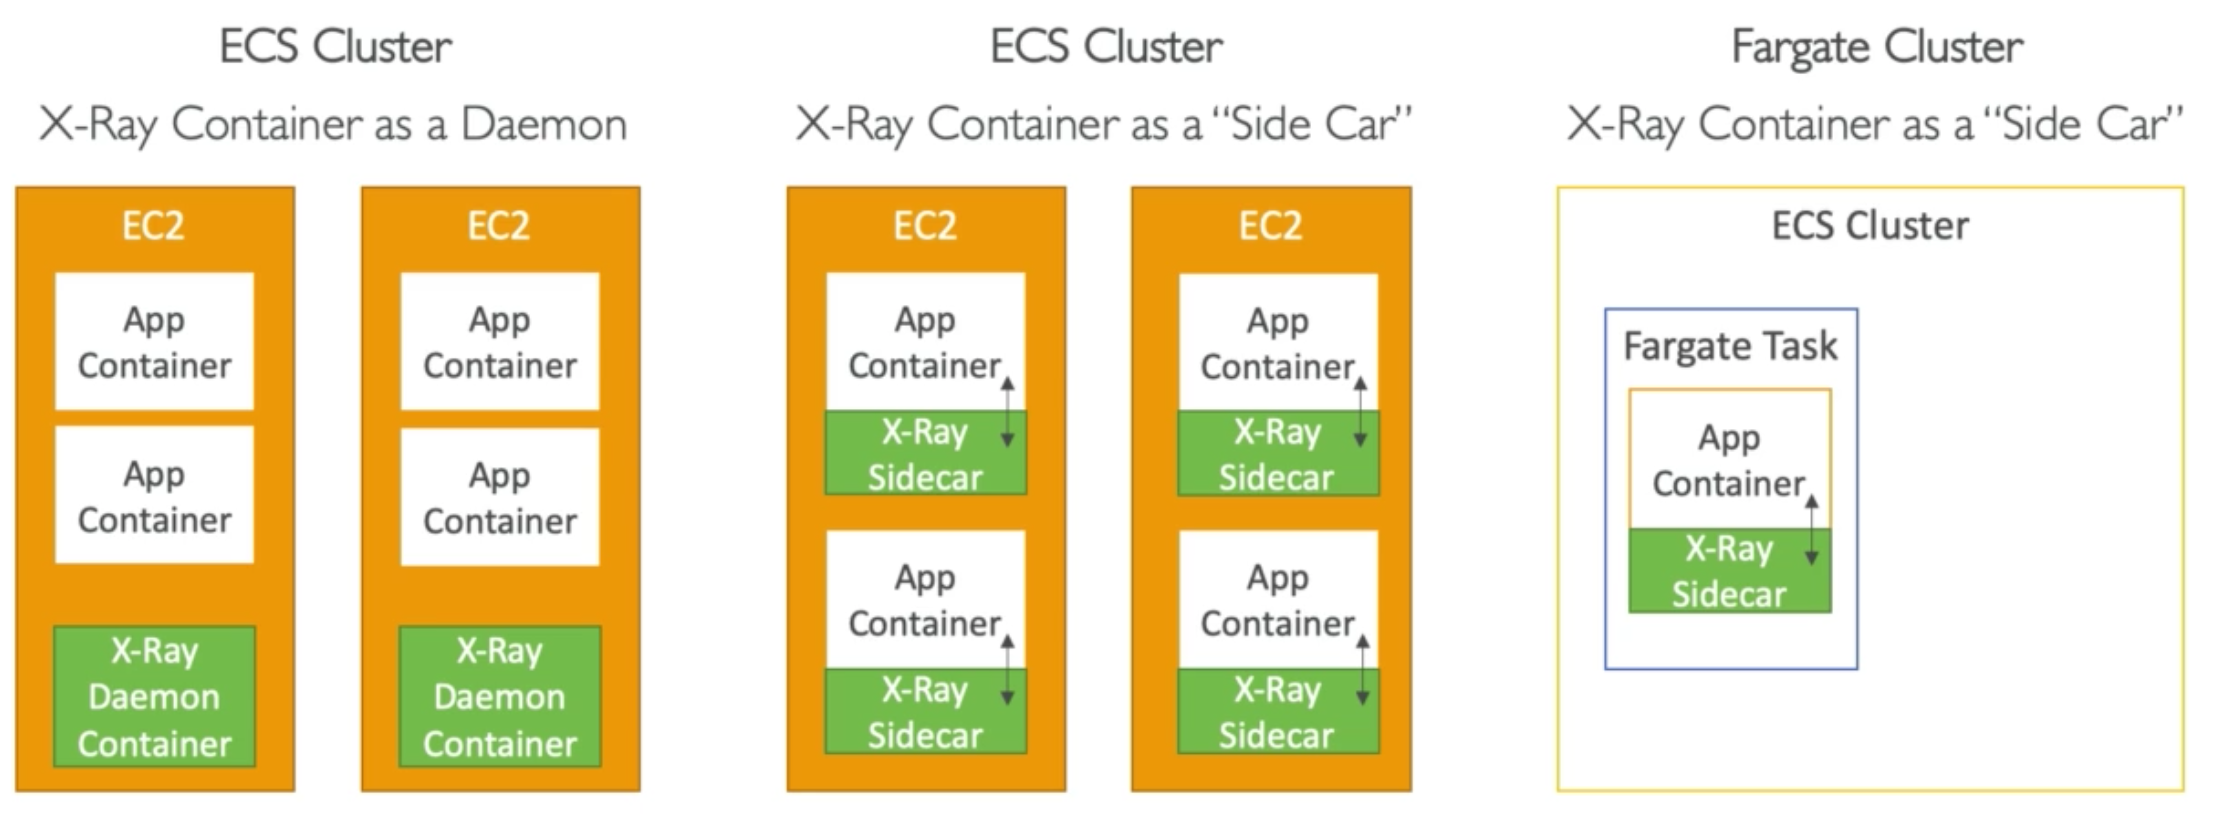
ECS + X-Ray: Example Task Definition with Side Car Pattern
Take away:
- Map container port of the
xray-daemontask to2000with protocol as UDP - Then set an environment variable in the task defining our actual application called
AWS_XRAY_DAEMON_ADDRESSwith a value ofxray-daemon:2000and create a link between them two using thelinkssection (from a networking standpoint)

AWS CloudTrail
- Provides governance, compliance and audit for your AWS account
- Enabled by default
- Get a history of events / API calls made within your AWS account by:
- Console
- SDK
- CLI
- AWS Services
- Can put logs from CloudTrail into CloudWatch logs
- If a resource is deleted in AWS, look into CloudTrail first
CloudTrail vs CloudWatch vs X-Ray
- CloudTrail:
- Audit API calls made by users / services / AWS console
- Useful to detect unauthorized calls or root cause of changes
- CloudWatch:
- CloudWatch Metrics for monitoring difference service metrics (some are exposed by AWS by default or we can send custom metrics)
- CloudWatch Logs for storing application logs
- CloudWatch Alarms to send notifications in case of unexpected metrics
- X-Ray:
- Automated Trace Analysis & Central Service Map Visualization tool
- Request tracking across distributed systems
- Identify latency, errors, bottlenecks
AWS Integrations and Messaging: SQS, SNS, and Kinesis
Introduction to Messaging
- When we have a distributed application architecture using microservices, inevitably, they will need to communicate with each other
- In this case, there are two patterns of communications where (generally) one is better than the other
Pattern 1: Synchronous communication. In other words, there is point to point interaction directly between the applications themselves. We would call this a coupled system and generally frown upon it. E.g., in the example below the buying service would have to communicate directly with the shipping service to tell it what was just bought
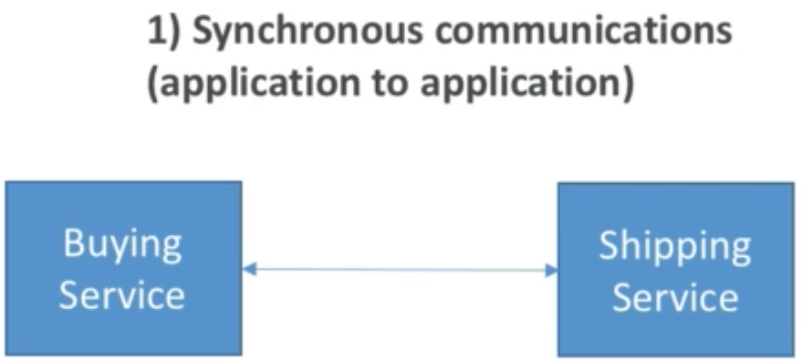
Pattern 2: Asynchronous communication. In this case the applications are not directly tied to each other through implementation. Instead, there is a buffer between them (e.g., some queue like SQS or a pub sub system like SNS) which can be used a middle layer for communication. In the buying service and shipping service example from above, the buying service would post an event to this queue indicating that an item was bought and the shipping service would pick this event up from the queue and process it. There are many benefits to this approach but the biggest two are (1) less point to point integrations and (2) system handles much better in cases where we may be experiencing spikes in load. For instance, if a lot of people are buying things (e.g., some holiday) then the shipping service is not overwhelmed with requests from the buying service. Instead requests pile up in the queue and the shipping service picks up one by one and processes as usual. Such design also opens up possibilities for introducing things like AWS CloudWatch metrics to track the queue size as well as a AWS CloudWatch alarm to trigger an ASG when a certain threshhold is surpassed so that additional shipping service consumers can be spun up to handle the increase in load and then scaled down when queue size goes back to below theshhold. Such designs we call decoupled systems because each component is not tied to any other component and even if the buying service goes down the shipping service could still operate.
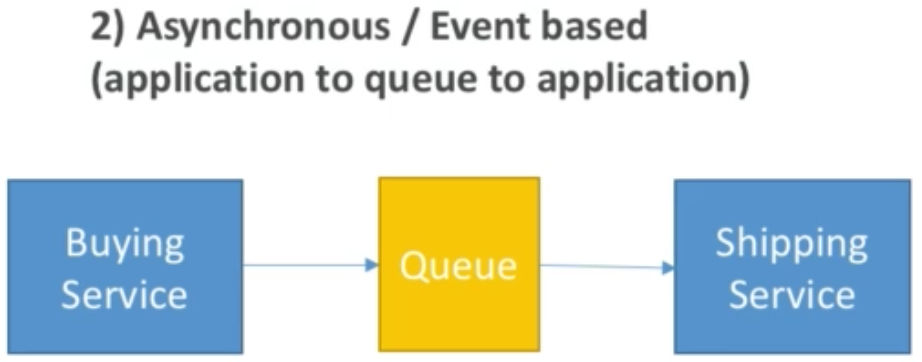
AWS SQS – Standard Queue Service
- Fully managed, used to decouple applications
- Attributes:
- Unlimited throughput (i.e., unlimited number of messages in queue)
- Default retention of messages is
4days, maximum is14days - Low latency (less than
10ms on publish and receive) - Limitation of 256KB per message sent
- Can have duplicate messages (at least once delivery beaviour)
- Can have out of order messages (best effort ordering) – there is an option in SWS to avoid this issue
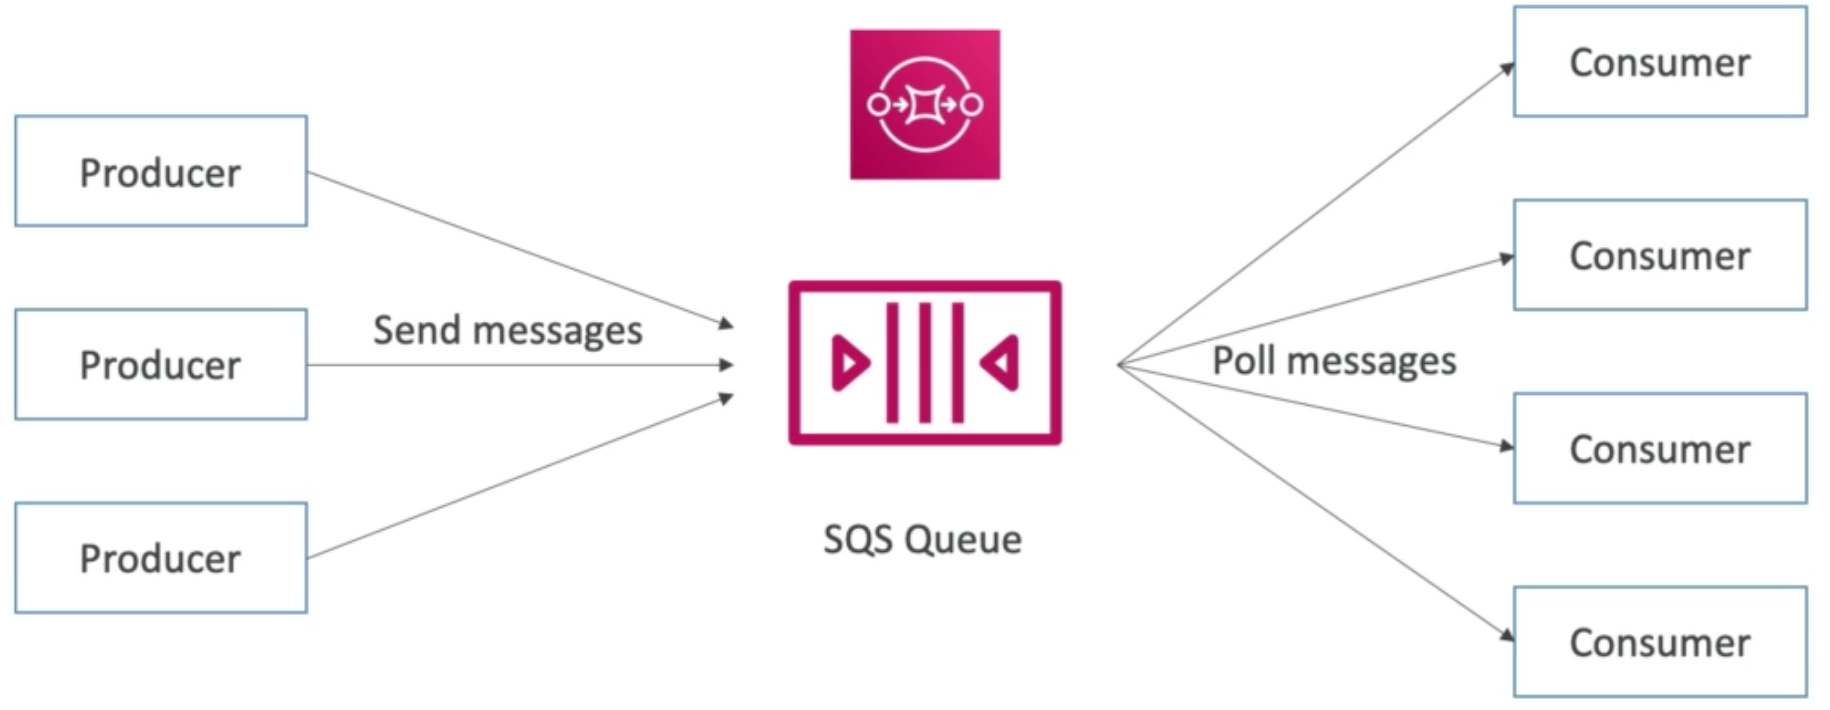
SQS Producing Messages
- Produced to SQS using the SDK (SendMessage API)
- The message is persisted in SQS until a consumer deletes it
- Message retention deafult is
4days can be set up to14days
SQS Consuming Messages
- Consumers can be running on EC2 instances, AWS Lambda, on-premise servers
- Poll SQS for messages (we can receive up to
10messages at a time) - After processing the message, the consumer must delete the message using the DeleteMessage API – this guarantees that no other consumer will see this message and therefore the message processing is complete

SQS Consumer Parallel Processing with Multiple EC2 instances

SQS with Auto Scaling Group
In this example with a SQS queue and a group or EC2 instances in an ASG that poll the SQS queue and process messages in parallel. One of the default CloudWatch Metrics exposed to us by AWS for SQS is the queue length (ApproximateNumberOfMessages). We could set up a CloudWatch Alarm with our ASG such that whenever the queue length goes over a certain threshold the instance count in our ASG is scaled out by some amount – thus allowing us to process messages at a higher throughput.
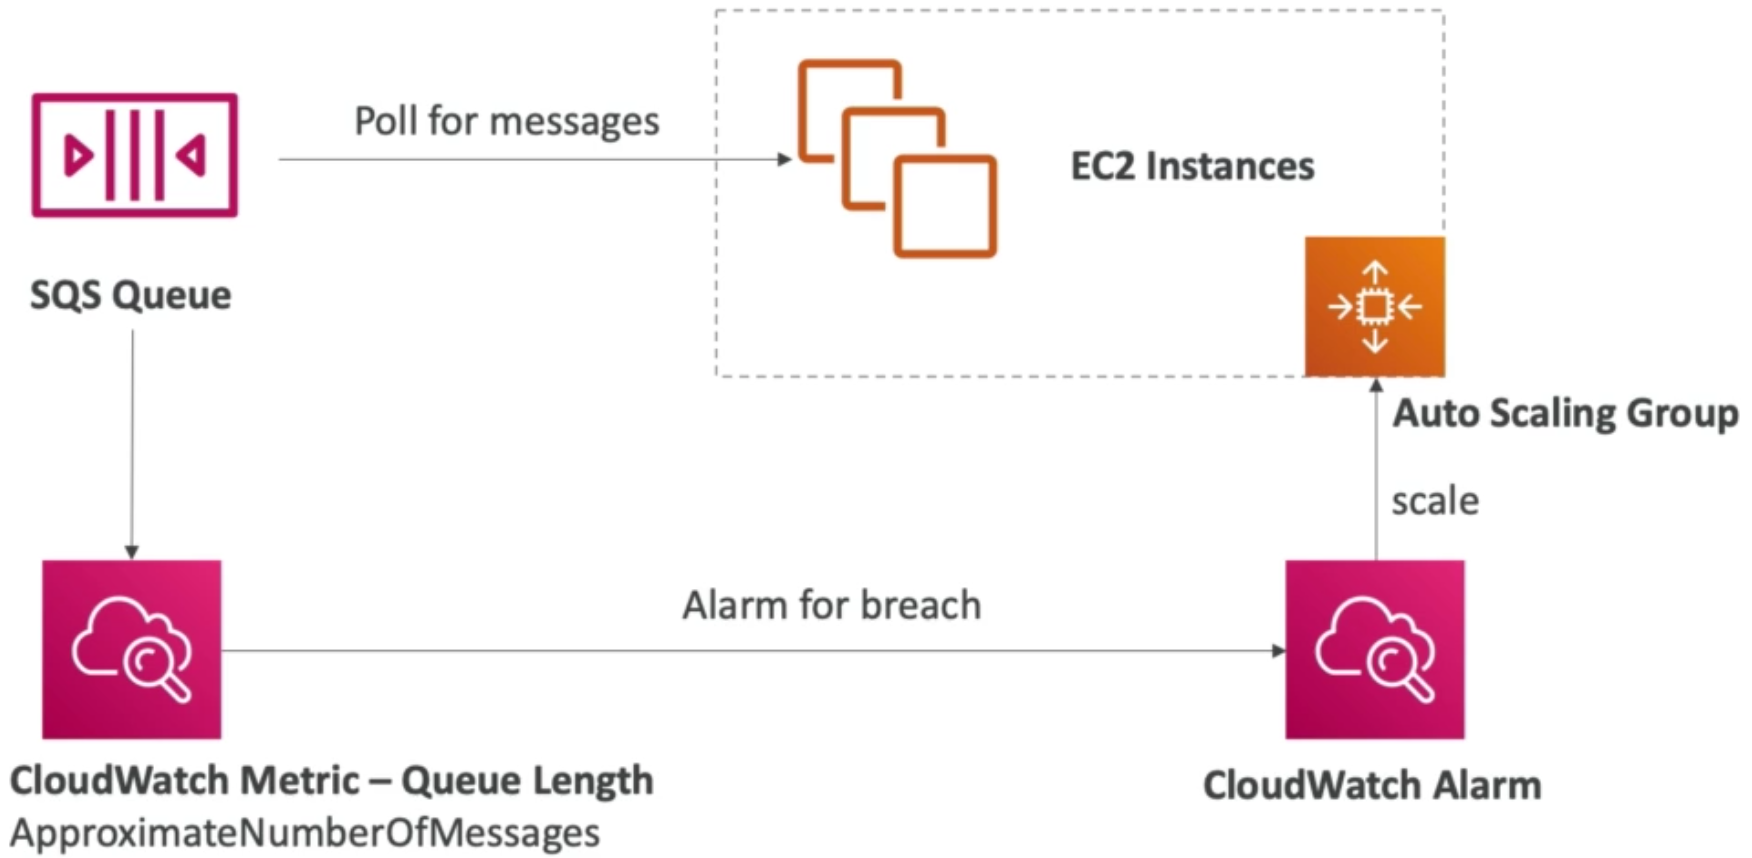
SQS To Decouple Application Tiers
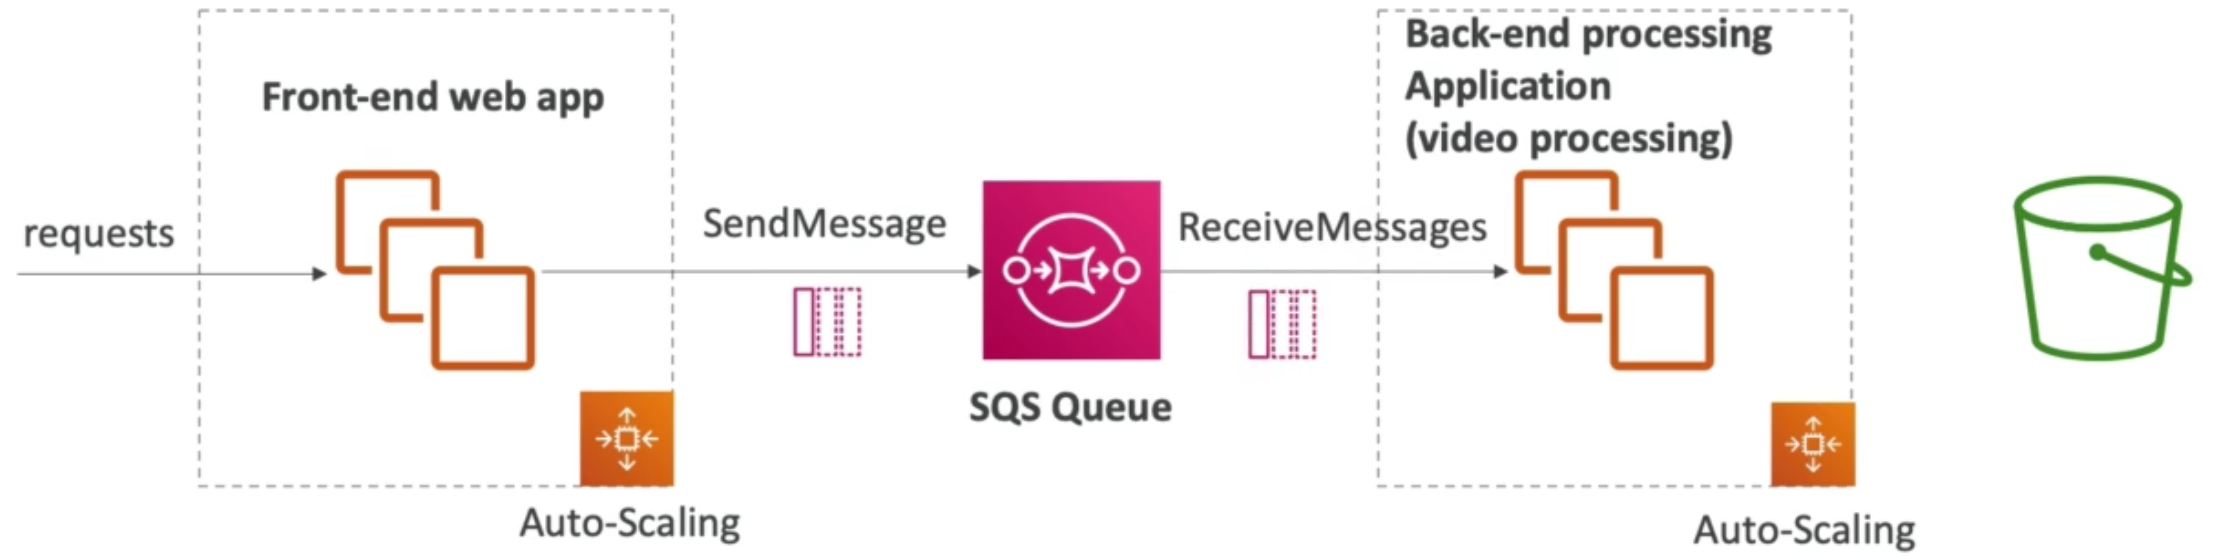
SQS Security
- Encryption:
- In-flight encryption using HTTPS API
- At-rest encryption using KMS keys
- Client-side encryption for the client want to perform encryption / decryption themselves
SQS Access Control:
- Either through IAM policies, or
- By using access policies (similar to S3 buckets)
- Useful for cross account access to SQS queues
- Useful for allowing other services (SNS, S3) to write to an SNS queue
What is the difference between the two ?
IAM policies vs. S3 bucket policies
IAM policies specify what actions are allowed or denied on what AWS resources (e.g. allow ec2:TerminateInstance on the EC2 instance with instance_id=i-8b3620ec). You attach IAM policies to IAM users, groups, or roles, which are then subject to the permissions you’ve defined. In other words, IAM policies define what a principal can do in your AWS environment.
S3 bucket policies (applies to SQS as well), on the other hand, are attached only to S3 buckets. S3 bucket policies specify what actions are allowed or denied for which principals on the bucket that the bucket policy is attached to (e.g. allow user Alice to PUT but not DELETE objects in the bucket). S3 bucket policies are a type of access control list, or ACL (here I mean “ACL” in the generic sense, not to be confused with S3 ACLs, which is a separate S3 feature discussed later in this post).
Note: You attach S3 bucket policies at the bucket level (i.e. you can’t attach a bucket policy to an S3 object), but the permissions specified in the bucket policy apply to all the objects in the bucket.
IAM policies and S3 bucket policies are both used for access control and they’re both written in JSON using the AWS access policy language, so they can be confused.
Read more here.
SQS Message Visibility Timeout
- After a message is polled by a consumer it temporarily becomes invisible to other consumers
- By default, the message visibility timeout is
30seconds - That means the consumer has
30seconds to process the message before it is again marked as visible to other consumers and, thus, might be processed again by some other consumer who is polling the queue - If a consumer knows that it will take longer to process a message in can use the ChangeMessageVisibility API call to get more time. Note that if visibility timeout is high (hours) and consumer crashes, then it will take a lot of time before the timeout expires and the message has a chance to be re-processed again. On the other hand, if we set visibility timeout too low, we may get duplicate processing
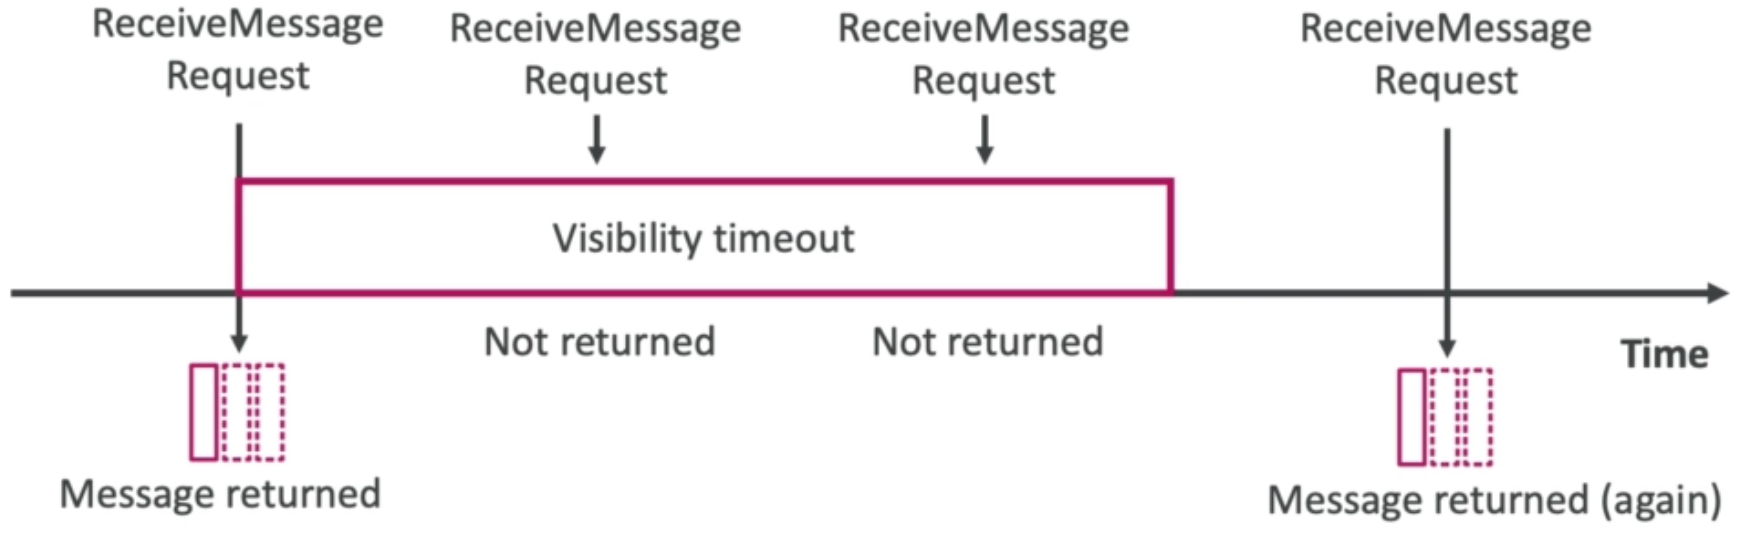
SQS Dead Letter Queues
If a consumer fails to process a message within the visibility timeout the message goes back to the queue. Observe that this can be come an infinite loop if the consumer fails to process the message in the given time if something is wrong with the message itself. In such cases we need to set a threshold for how many times a message can go back into the queue after the visibility timeout expires.
After the MaximumReceives threshold is exceeded, the message goes into the dead letter queue (DLQ).
Note: make sure to process the messages in the DLQ before they expire (good to set retention periof of 14 days in the DLQ)
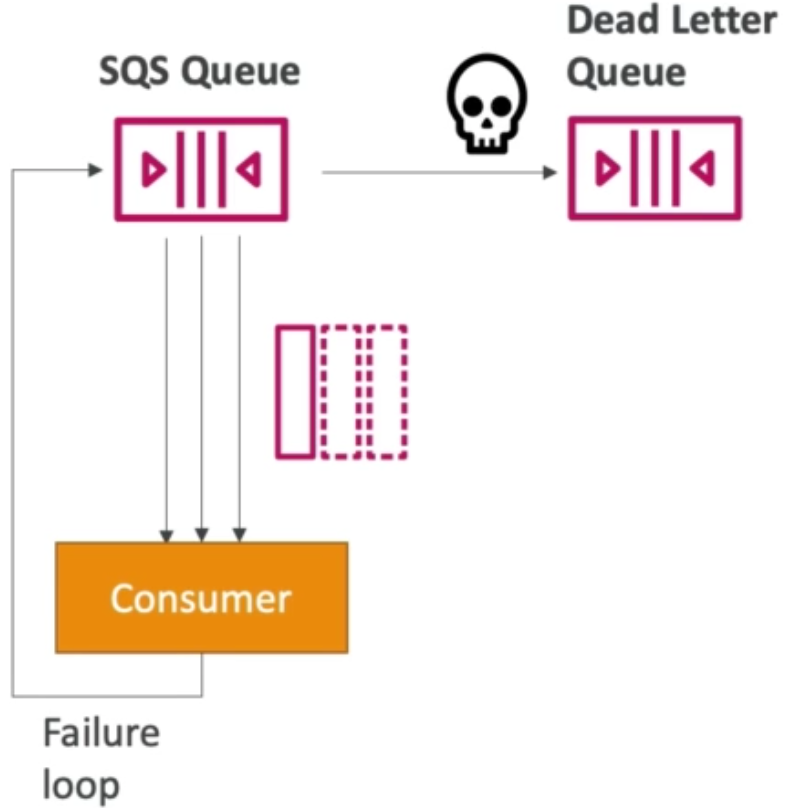
SQS Delay Queues
- This is a configuration that allows us to introduce an artificial delay so that there is a lag between when the message is written into the queue and when it actuall becomes visible to consumers
- The delay can be configured up to
15minuted. Default is0seconds - Can override the default on send using the DelaySeconds parameter
SQS – Long Polling
- When a consumer requests messages from the queue it can optionally “wait” for messages to arrive if there are none already in the queue
- This is called long polling
- Long polling decreases the number of API calls made to SQS thereby increasing the efficiency of your application
- The wait time can be between
1second to20seconds - Long polling is preferable to short polling
- Can be enabled at the queue level or at the API level using WaitTimeSeconds
SQS Extended Client
- Message size limit is
256KBin SQS, so how do we send larger messages ? - For Java clients, we can use the SQS Entended Client library
Alternatively, we can cnofigure the producer to send a small metadata message (instead of the large file) to SQS which point to the large file on S3. The consumer consumes this message and knows exactly where to pick up the message from S3.
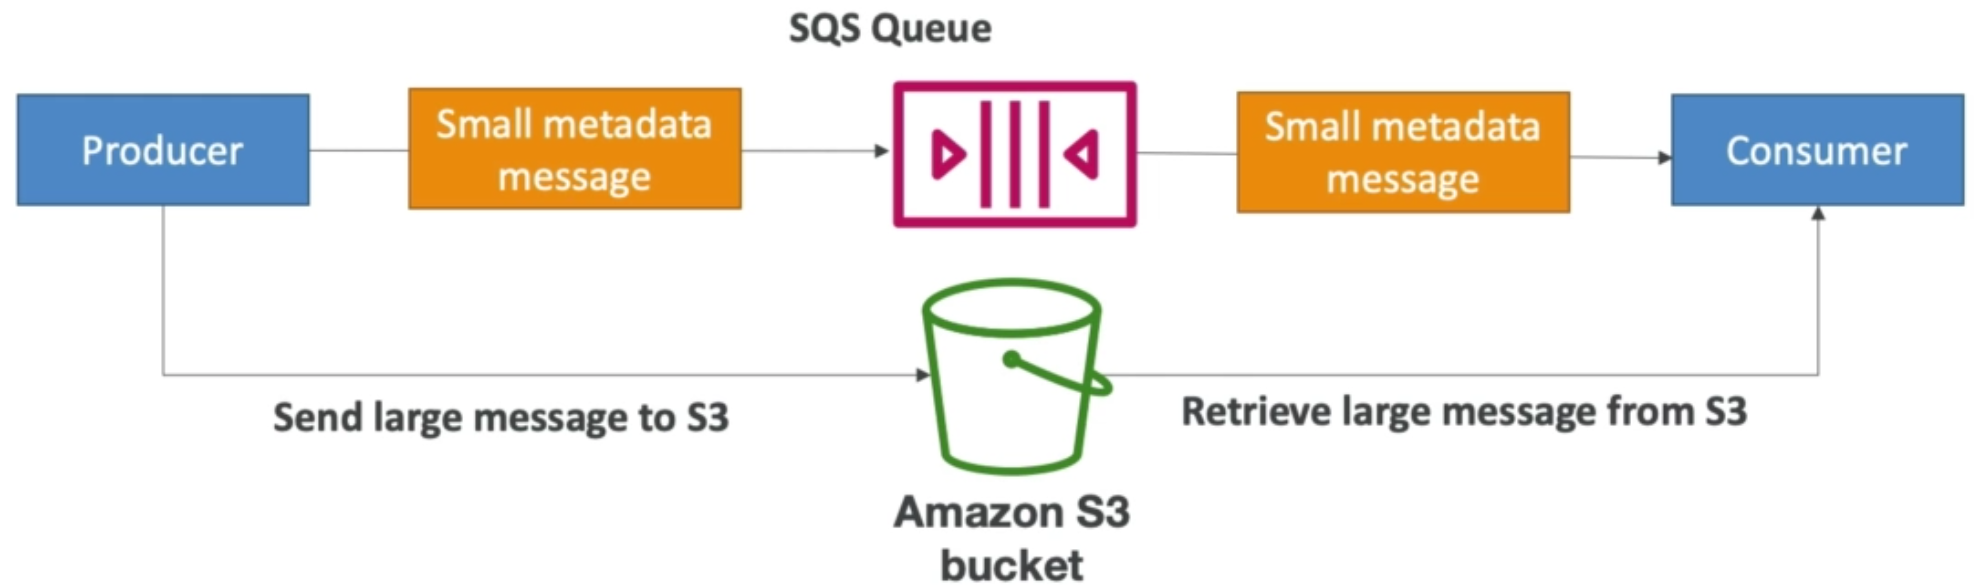
SQS – Must Know API
- CreateQueue (e.g., we can set MessageRetentionPeriod), DeleteQueue (explicit delete for each record)
- PurgeQueue: delete all the message in the queue
- SendMessage (DelaySeconds), ReceiveMessage, DeleteMessage
- ReceiveMessageWaitTimeSeconds: for using with long polling (i.e., how much we are willing to wait)
- ChangeMessageVisibility: change the message visibility timeout
- Batch APIs for SendMessage, DeleteMessage, ChangeMessageVisibility (all of which help decrease out cost since we are reducing back and forth)
SQS FIFO Queues
- FIFO: First In First Out (i.e., consumer will consume messages in order based on when they where published into the queue)
- In FIFO mode, we have limited throughput:
300msg/s without batching and3000msg/s with batching - Exactly once send capability is available (by removing duplicates) – but we have to provide additional information (a deduplication ID used to identify duplicate message published during deduplication interval) for this to work when publishing a message
- Note: queue name has to end with “.fifo” for FIFO capability to be enabled

SQS FIFO – Deduplication
- De-duplication interval is
5minutes (meaning that if you send the same message twice in that same interval, then the second message will be refused) - Two de-duplication methods:
- Content based deduplication: will do a SHA-256 hash of the message body
- Deduplication ID – if another message is published with this deduplication ID then it is considered a duplicate
SQS FIFO – Message Grouping
- For FIFO property to work with SQS, the producer will need to specify the same value of MessageGroupID in an SQS FIFO queue. If you don’t specify a group ID, messages will still be consumed in FIFO style but we will only be able to have one consumer
- You can only have one consumer per MessageGroupID
- To get ordering at the level of a subset of messages, specify different values for MessageGroupID
- Messages that share the same MessageGroupID will be in order within that group
- Each Group ID can have a different consumer but only one consumer per group ID

AWS SNS
- A Pub / Sub service that allows consumers to “subscribe” to a topic and producers to “publish” to a topic. Consumers who are subscribed to a topic, automatically receive the message when a new one is published without having to poll the topic
This is different from SQS in that:
- Multiple consumers can consume the same data by “subscribing”
- Subscribers(s) do not poll the topic, instead the publisher is the one who notifies the subscriber(s) with new available data
- All subscribers to the topic will get the messages
- Up to 10 million subscribers per topic
- 100,000 topic limit
- Subscribers can be:
- SQS
- HTTP / HTTPS
- Lambda
- Emails
- SMS messages
- Mobile notifications
SNS Integrates with a lot of AWS services
- Many AWS services can send data directly to SNS for notifications
- CloudWatch (for alarms)
- Auto Scaling Groups notifications
- Amazon S3 (on bucket events)
- CloudFormation (upon state changes => failed to build, etc..)
- And more..
SNS – How to Publish
- Topic Publish (using the SDK)
- Create a topic
- Create a subscription (or many)
- Publish to the topic
- Direct Publish (for mobile apps SDK)
- Create a platform application
- Create a platform endpoint
- Publish to the platform endpoint
- Works with Google GCM, Apple APNS, Amazon ADM
SNS + SQS: Fan Out
- Push once in SNS topic receive in all SQS queues that are subscribed to that topic
- Fully decoupled design & no data loss
- This design leverages mechanism of SQS to add data persistence and delayed processing on top of the pub sub feature of SNS
- Make sure your SQS queue access policy allows for SNS to write to the topics
- Note: SNS cannot send messages to SQS FIFO queues (AWS limitation)
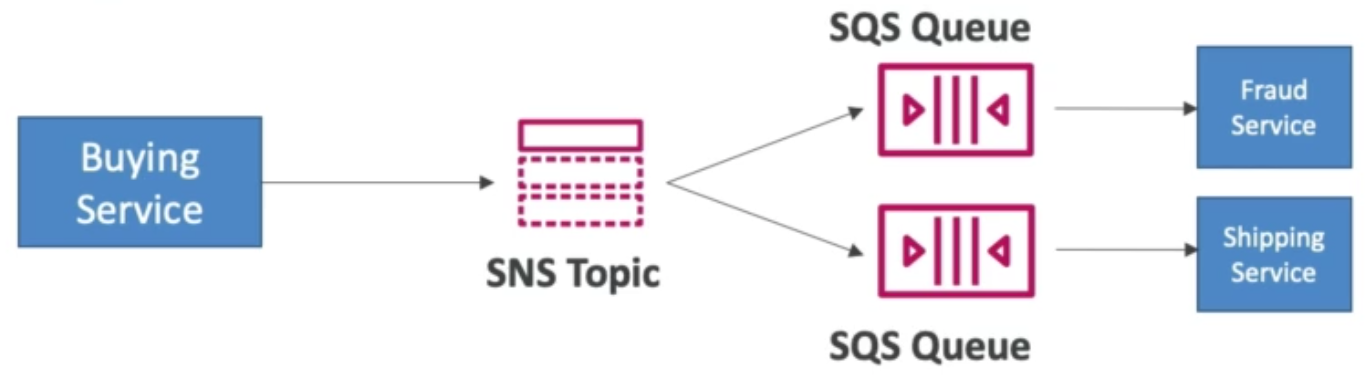
S3 Event Fan Out Example Use Case
- For the same event type in S3 (e.g., object create) and prefix (e.g.,
/images) we can only have one S3 Event rule - If you want to send the same S3 event to many SQS queues, use fan out
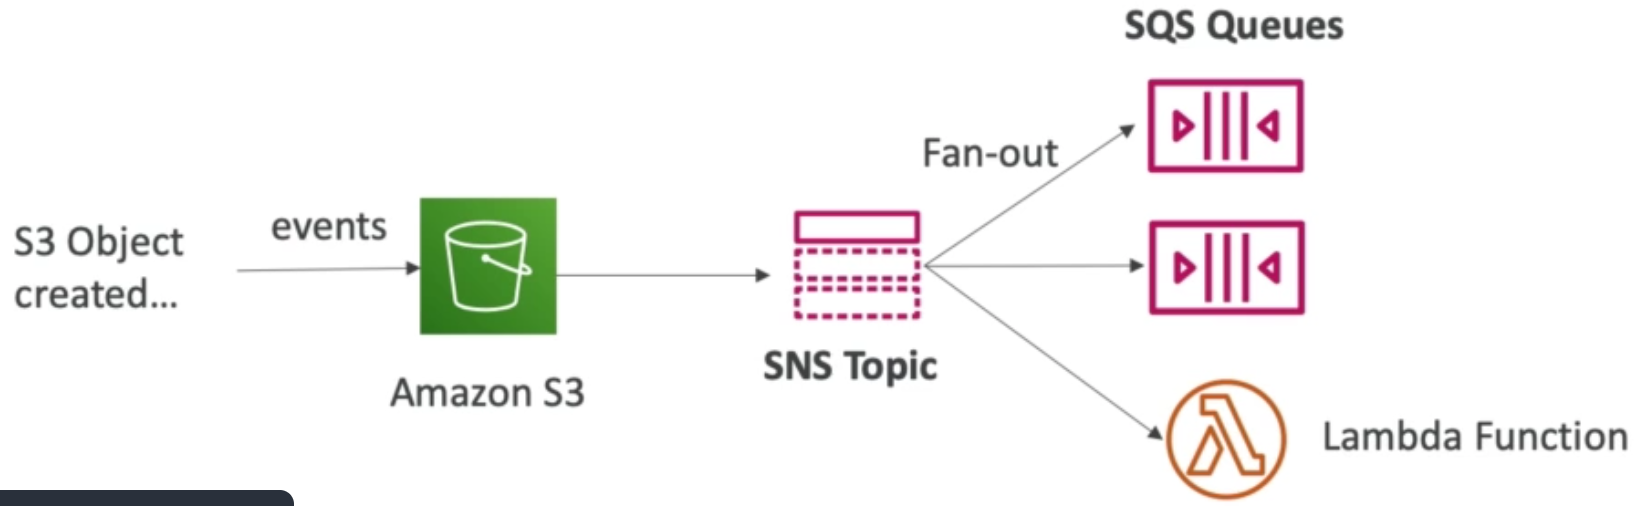
AWS Kinesis
- Kinesis is a managed alternative to Apache Kafka
- Great for application logs, metrics, IoT, clickstreams.. (i.e., real time big data)
- Great for streaming processing frameworks (Spark, NiFi, etc..)
- Data is automatically replicated to
3AZs - Kinesis Streams: low latency streaming ingest at scale
- Kinesis Analysis: perform real-time analytics on streams using SQL
- Kinesis Firehose: load streams into S3, Redshift, ElasticSearch, etc..
- Good read: Apache Kafka vs AWS Kinesis
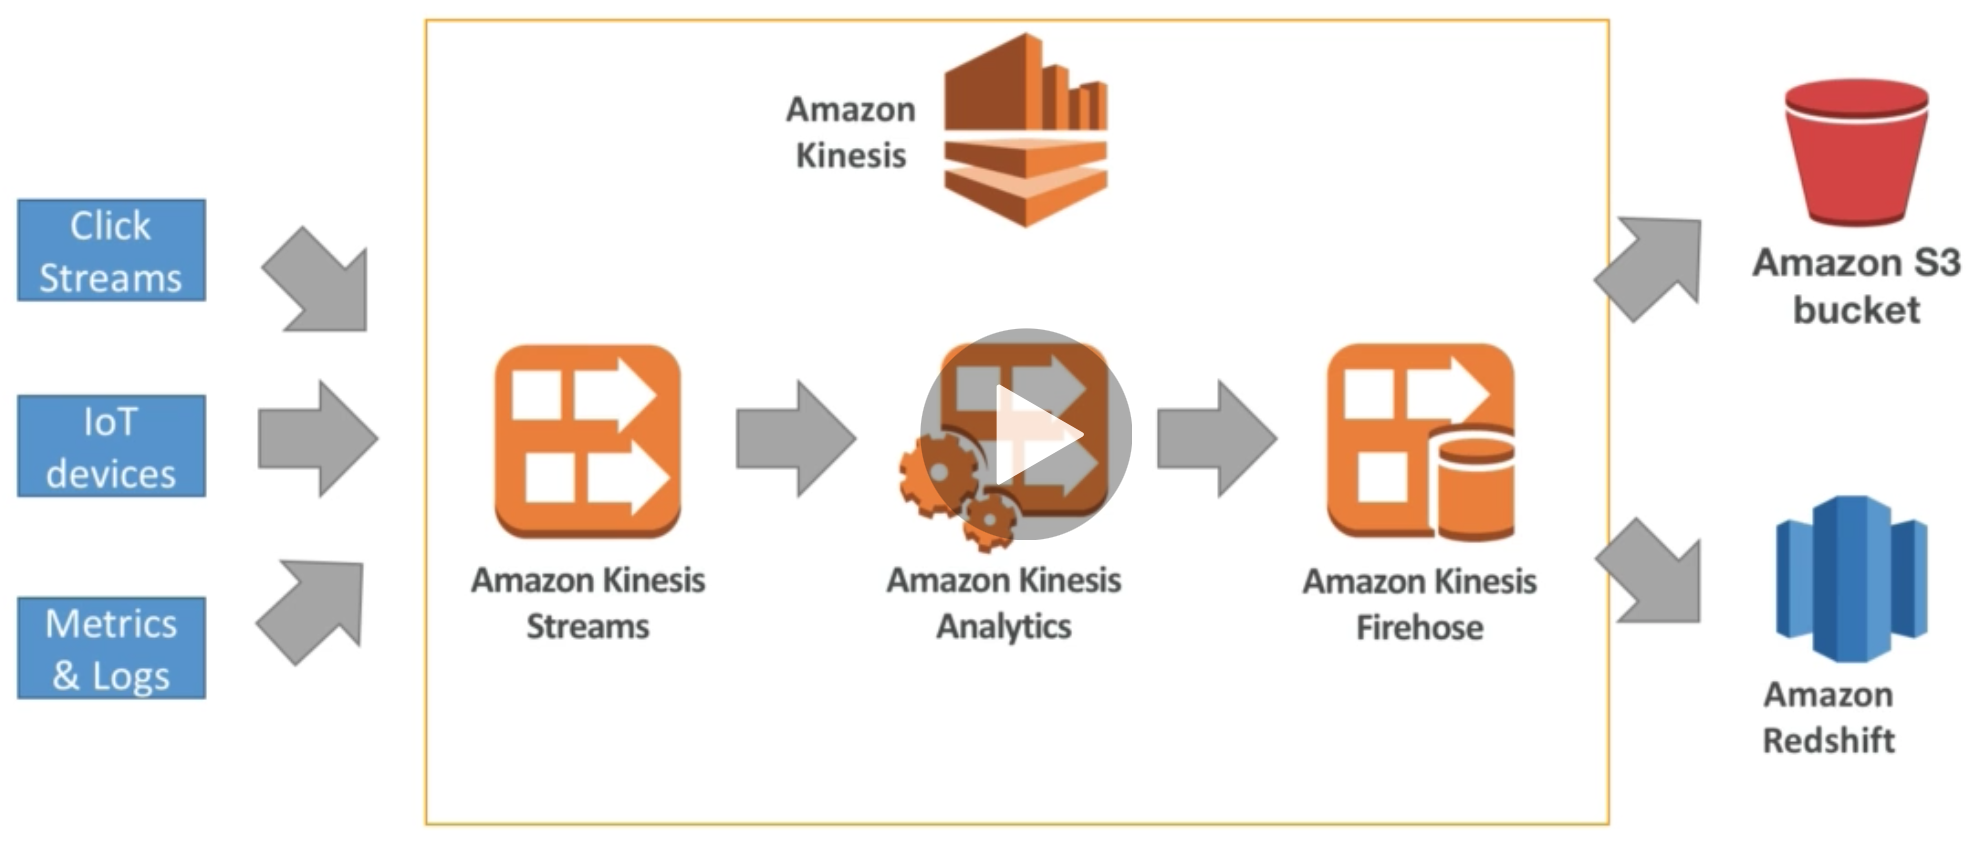
Kinesis Streams Overview
- Streams are divided into “shards” (i.e., partitions)
- If we want to scale our stream processing, we need more shards
- Data retenetion is
1day by default, but can go up to7days - Ability to reprocess / replay data (big difference compared to SQS where once the data is read succesfully it is deleted)
- Multiple applications can consume the same stream (before we achieved this using SNS + SQS fan out pattern)
- Real time processing with scale of throughput
- Once the data is inserted in Kinesis, it cannot be delete (immutability) – log based architecture (similar to Kafka)
Kinesis Streams Shards
- One stream is made of many shards (i.e., partitions)
- 1 MB/s or 1000 messages/s at write PER SHARD
- 2 MB/s at read PER SHARD
- Billing is per shard provisioned, can have as many shards as you want
- Batching available or per message calls
- The number of shards can evolve over time (resharding / merging)
- Records are ordered per shard

Kinesis Producer – Put records
- PutRecord API + Partition key that gets hashed
- Records with the same key go to the same partition (helps with ordering for a specific key)
- Messages sent get a “sequence number”
- Choose a partition key that is highly distributed to prevent hot partition issue. For example, pick a key that has high distribution across your data universe (e.g., user ID)
- Use batch write with PutRecords to reduce cost and increase throughput
- ProvisionThroughputExceeded exception is raised when we send / read more data than limit allows for the shard in question. If this happens, make sure you don’t have a hot shard in which case too much data is going to one partition only
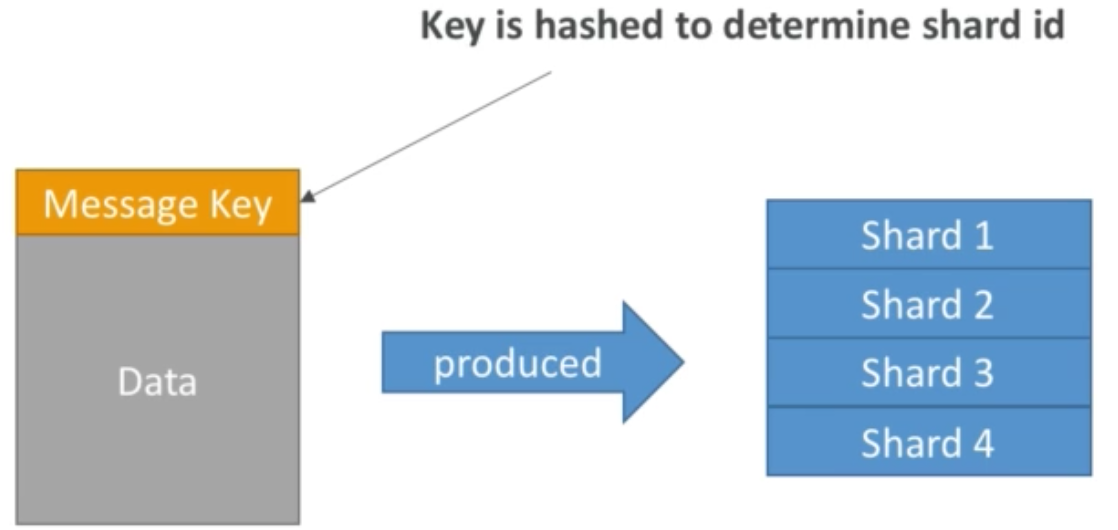
Kinesis Consumers
- Can use normal CLI
- Can use Kinesis Client Library (KCL)
- KCL uses DynamoDB to checkpoint offsets for each partition in a topic for a consumer
- KCL uses DynamoDB to track other workers and share the work amongst shards
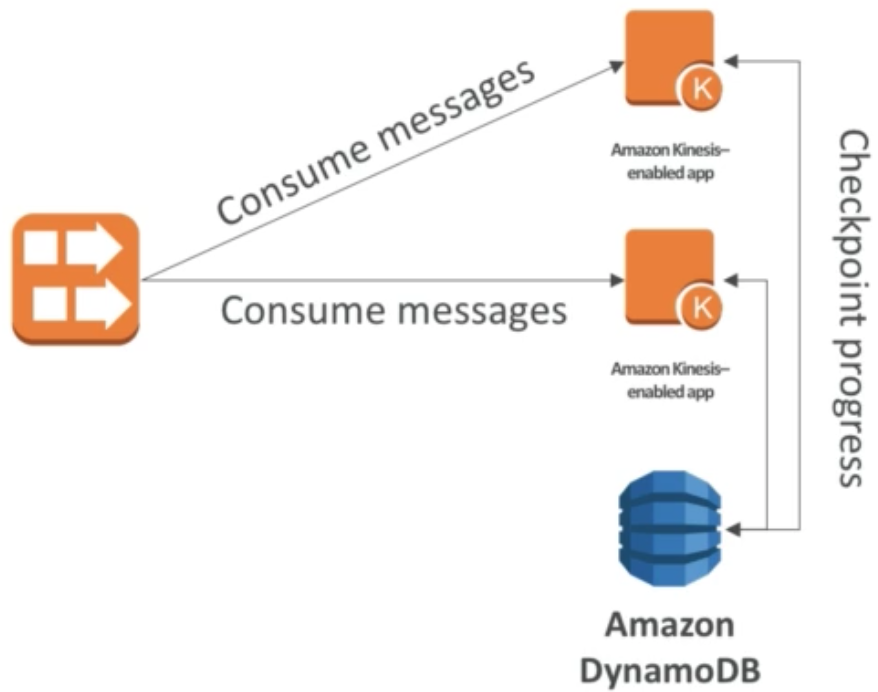
Kinesis KCL in Depth
- KCL is a Java library that helps read records from a Kinesis Stream with distributed applications sharing the read workload
- If we have
4shards but only two consumers then each consumer (i.e., KCL instance) will be load balanced to read from two shards - If we have
nshards, the maximum number of KCL instances we can have is alson - Rule: each shard can be read by only one KCL instance, but each KCL instance can read multiple shards
- Progress with respect to reading a topic for a given consumer group (which can be made up of numerous KCL instances) is checkpointed in DynamoDB (need IAM access)
- KCL can run on EC2 instances, Elastic Beanstalk, on premise applications
- Records are read in order at the shard level (but not necessarily across shards – same as Kafka ordering guarantee)
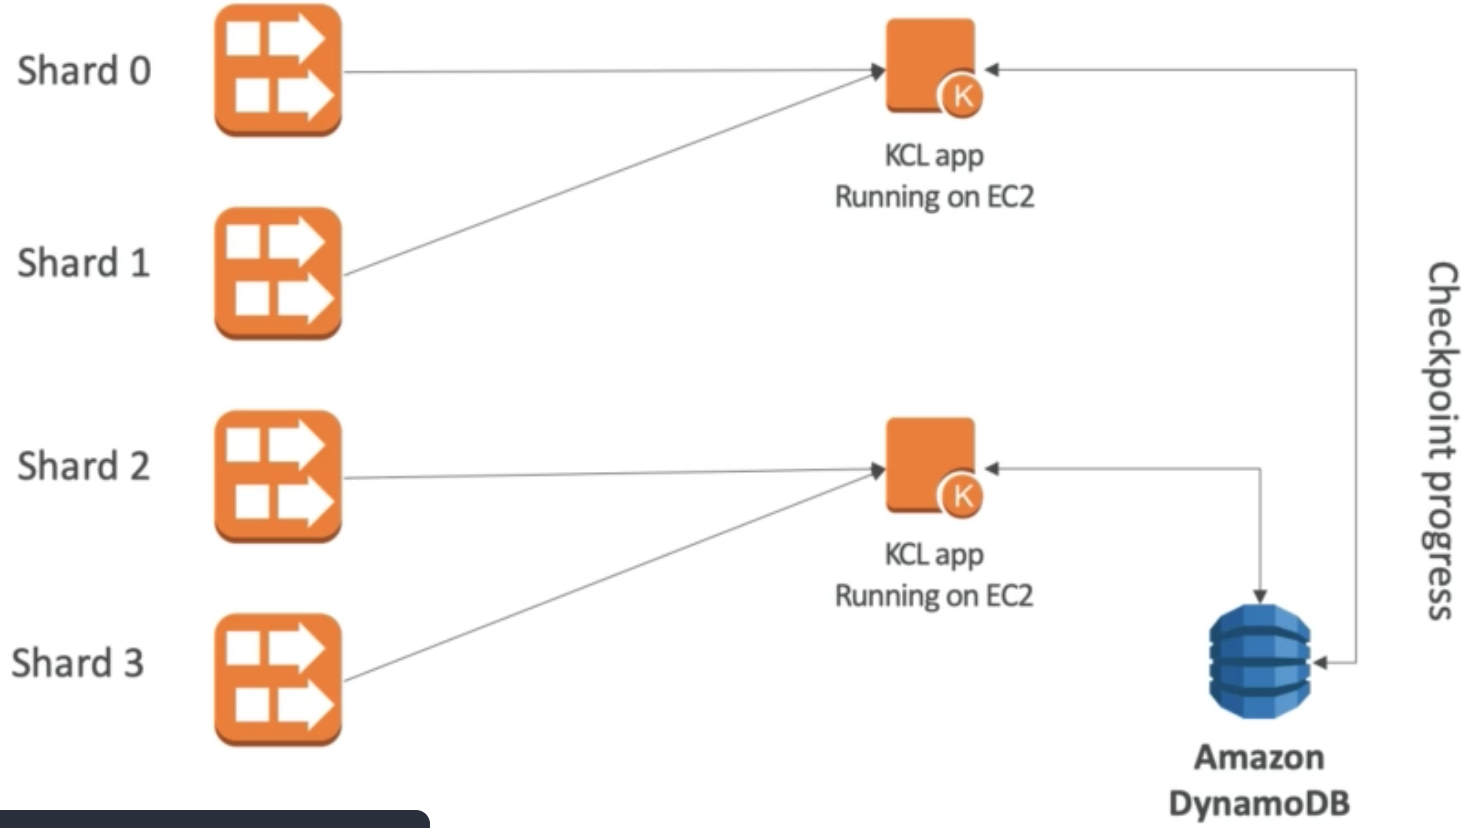
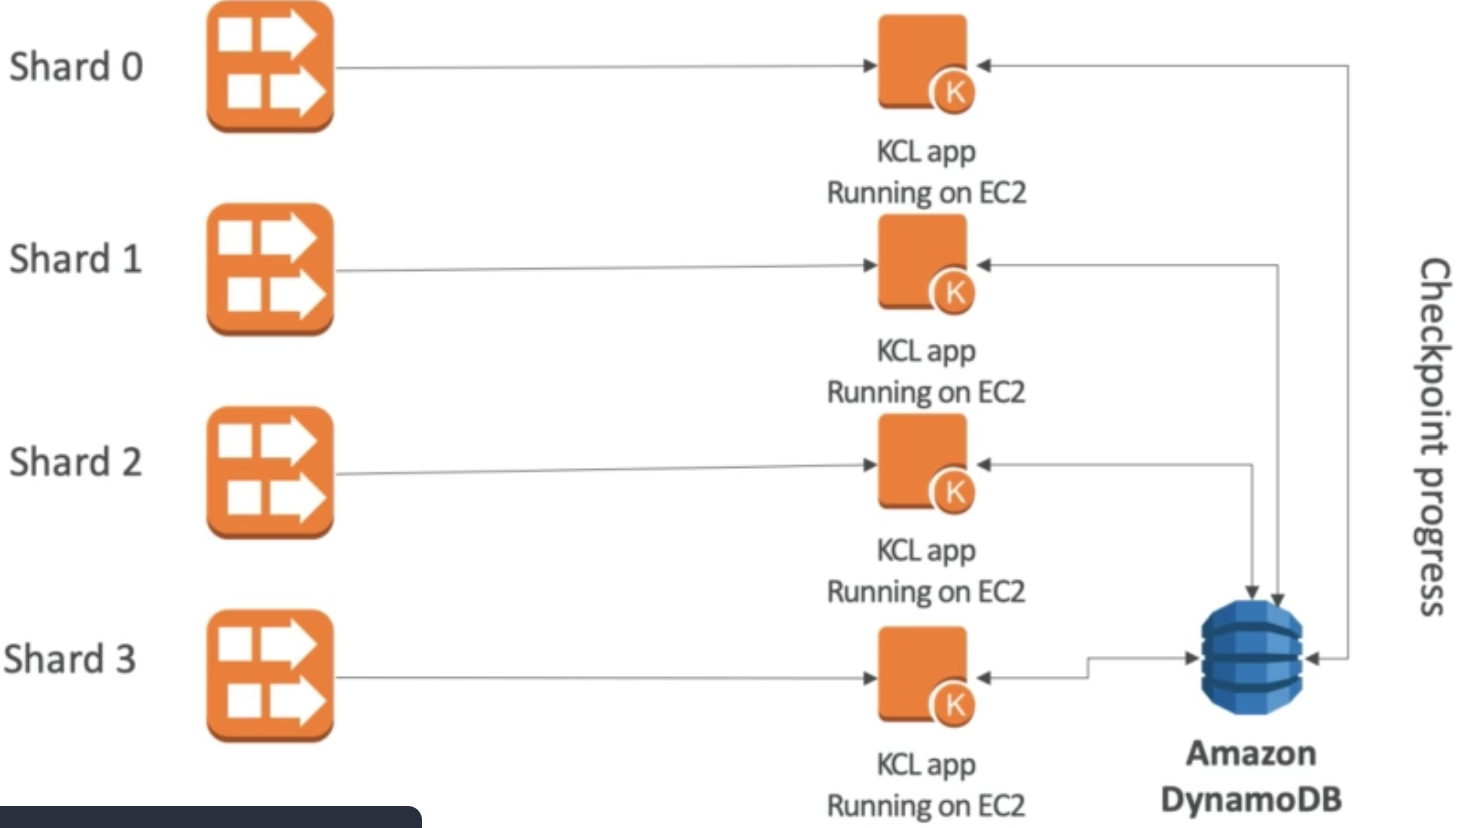
Kinesis Security
- Control access / authorization using IAM policies
- Encryption in flight using HTTPS
- Encryption at rest using KMS
- Possibility to encrypt / decrypt data client side
- VPC Endpoints available for Kinesis to access within VPC
Kinesis Analytics
- Perform real time analytics on Kinesis Streams using SQL
- Kinesis Data Analytics:
- Auto scaling
- Managed (no servers to provision)
- Continuous
- Pay for actual consumption rate
- Can create streams out of real time queries
Kinesis Firehose
- Fully Managed Service, no administration
- Near real time
- Load data into Redshift, S3, Splunk, ElasticSearch
- Automatic scaling
- Pay for amount of data going through Firehose
SQS vs SNS vs Kinesis
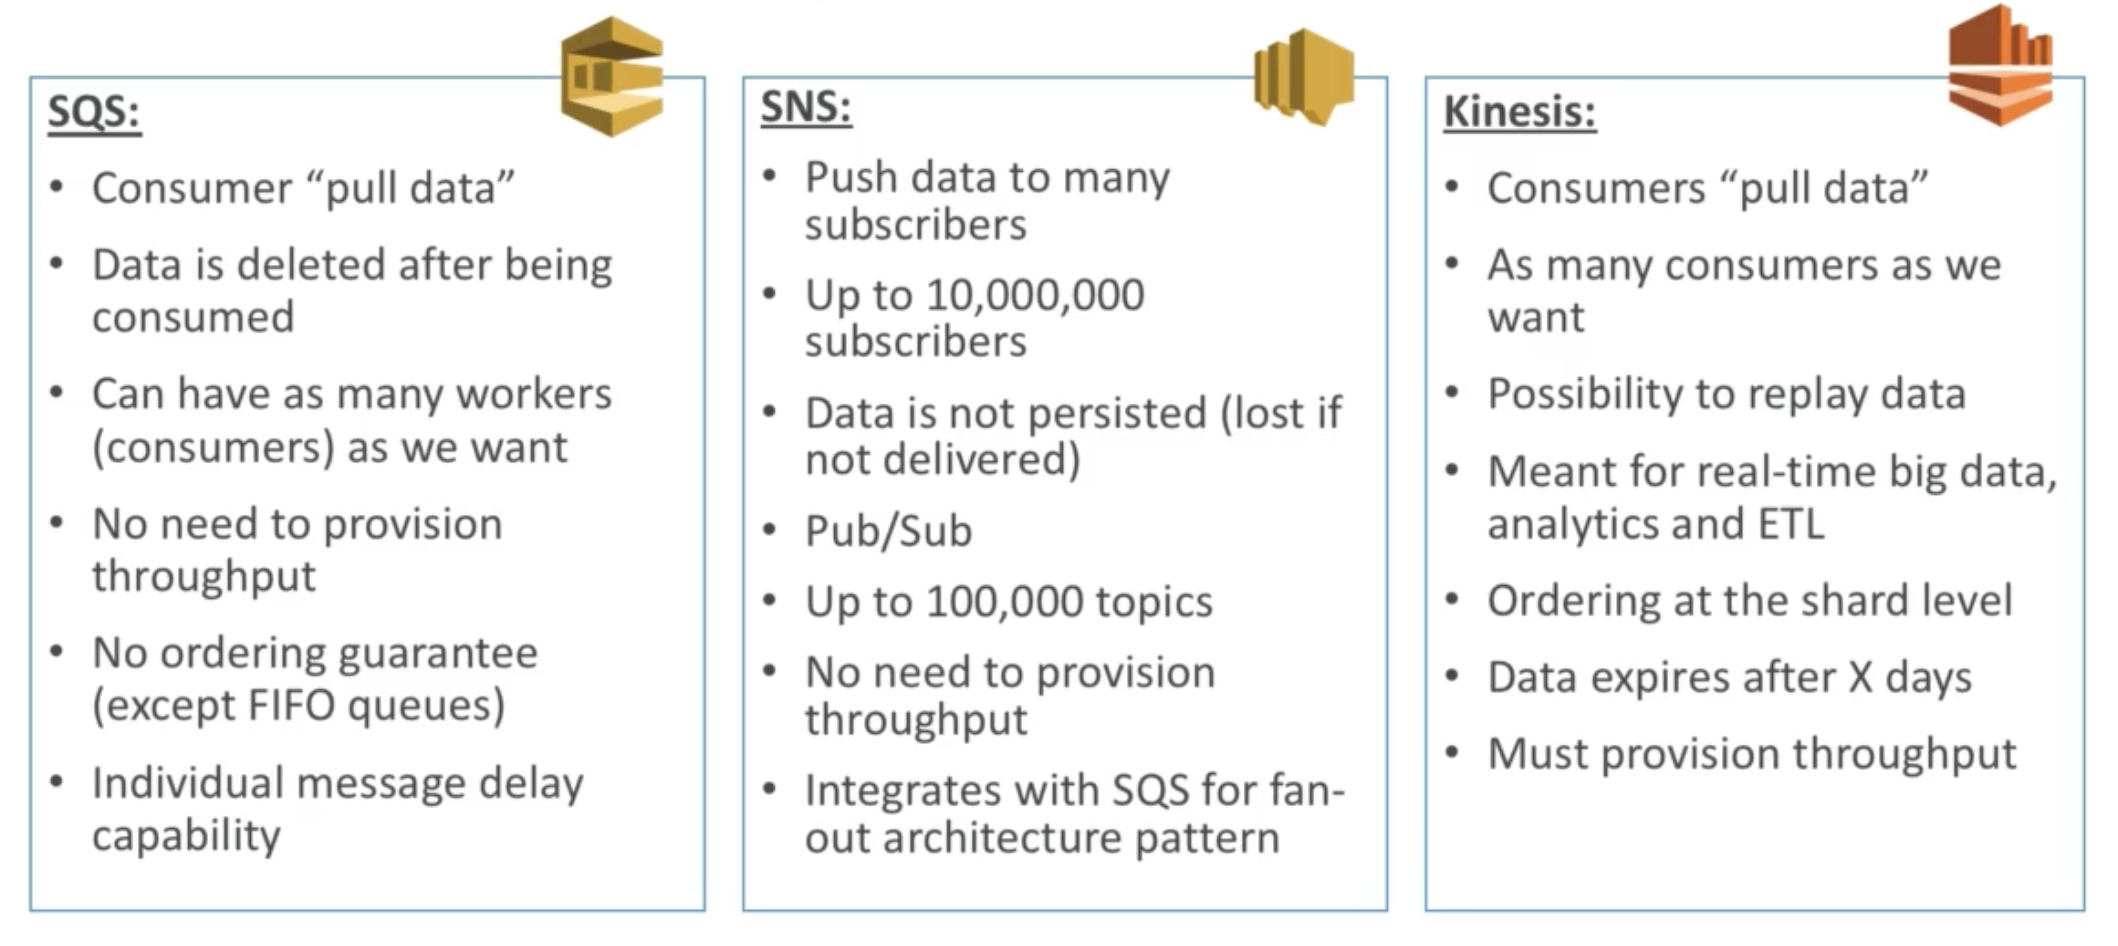
Data Ordering for Kinesis vs SQS FIFO

Ordering Data in Kinesis
- Kinesis topic can be split into numerous partitions / shards
- Ordering of data is based on record key
- The shard a record goes into is based on:
key % number of shards - Therefore each key goes into the same shard
Ordering Data into SQS
- For SQS standard, there is no ordering
- For SQS FIFO, if you don’t use a group ID, messages are consumed in the order they are sent with only one consumer
- If you want to scale the number of consumers and have messages grouped then you will need to give a group ID when you write a message (e.g., group id “a”, group id “b”). This allows us to have more consumers in total but still only one consumer per group id (note how this is different from Kafka and Kinesis where topic data is split into shards / partitions and we can have more than one consumer consuming because of these shards)
Example
AWS Lambda
- Serverless is a new paradigm in which developers don’t have to manage servers anymore
- Initially serverless was just FaaS (Function as a Service)
- These days serverless is more than just functions (includes managed databases, storage, messaging, etc..)
- Serverless does not mean there are no server, it means you are not the one who is managing them
Serverless services in AWS
- Lambda
- DynamoDB
- AWS Cognito
- API Gateway
- S3
- SNS & SQS
- Kinesis Data Firehose
- Aurora Serverless
- Step Functions
- Fargate
- etc..
AWS Lambda Overview
Why AWS Lambda
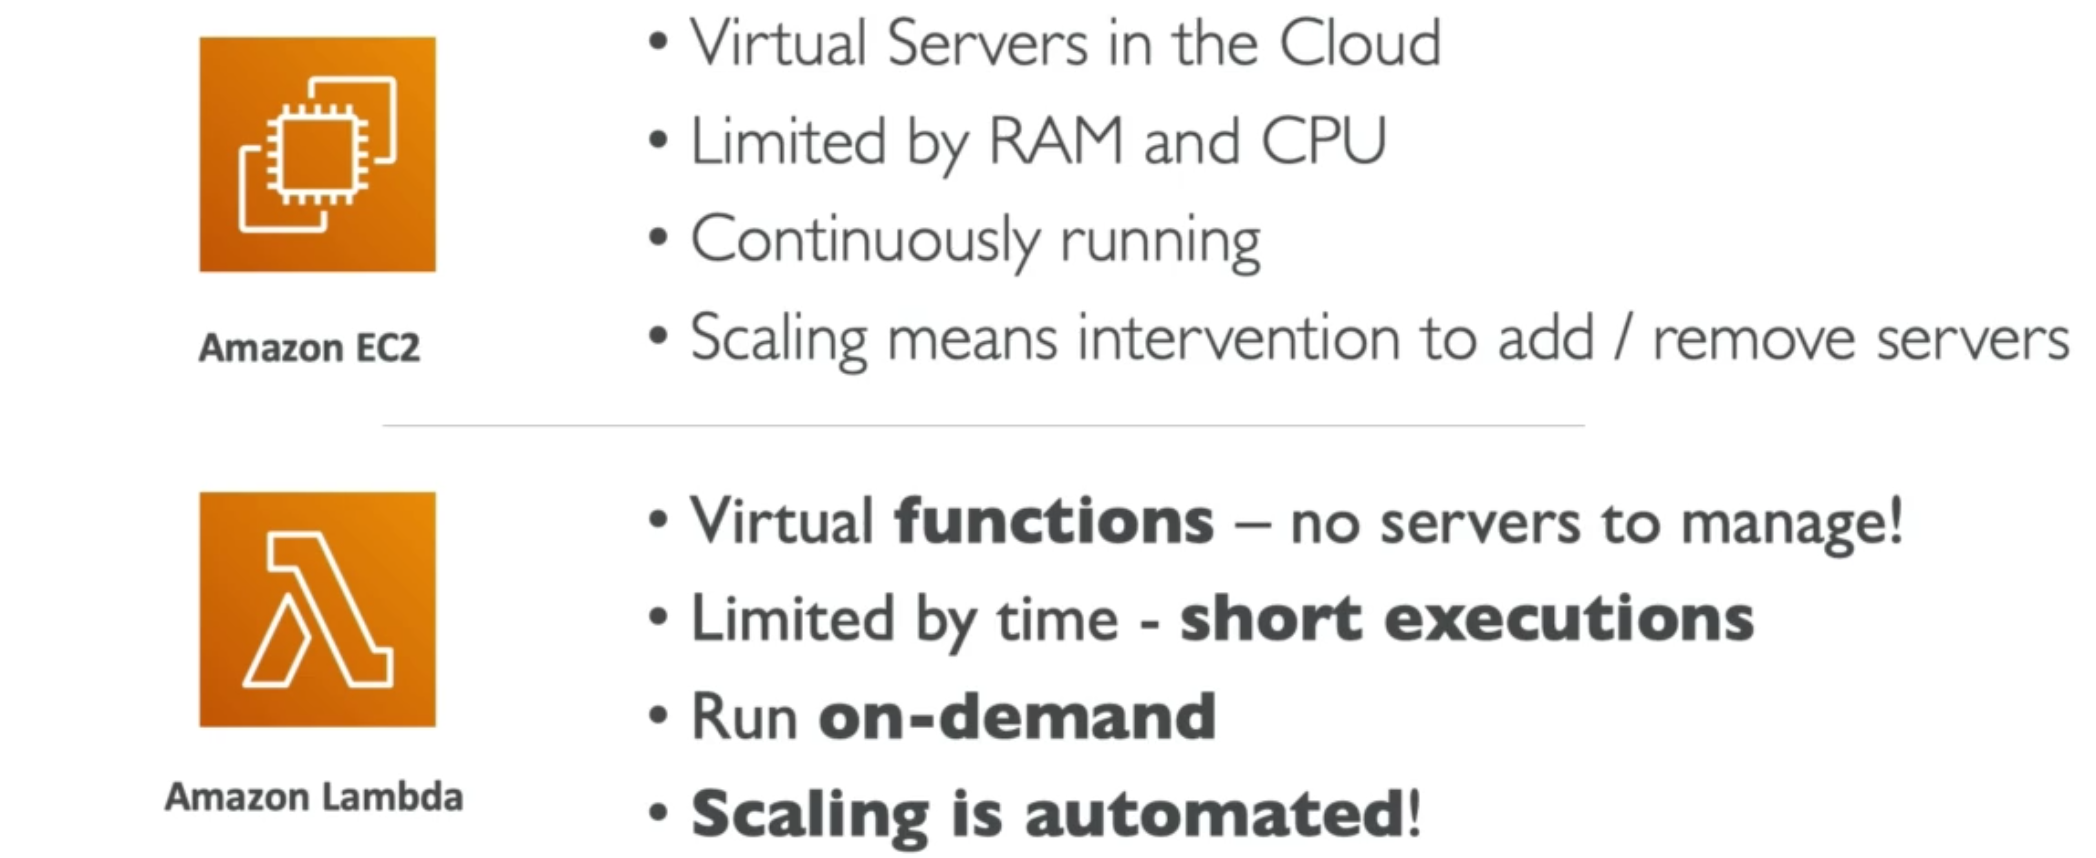
Note: Lambda maximum execution time is 15 minutes
Benefits of Lambda
- Pay per request and compute time
- Free tier of
1,000,000AWS Lambda requests and400,000GBs of compute time - Integrated with the whole AWS suite of services
- Easy monitoring through AWS CloudWatch
- Easy to get more resources (up to 3GM of RAM per function)
- Increasing RAM will also improve CPU and network – there is no way to increase CPU w/o also increasing RAM
- Important for exam: Docker is not for AWS Lambda it is for ECS / Fargate
AWS Lambda Main Integrations

AWS Lambda Example 1

AWS Lambda Example 2 (CRON Job)

Lambda Synchronous Invocations
- Synchronous invocations can be made from: CLI, SDK, via API Gateway or ALB
- We wait for the result
- Error handling must happend client side (retries, exponential backoff, etc..)
Lambda – Services that Are Invoked Synchronously
- User Invoked:
- Elastic Load Balancing
- Amazon API Gateway
- Amazon CloudFront (Lambda@Edge)
- Amazon S3 Batch
- Service Invoked:
- Amazon Cognito
- AWS Step Functions
- Other Services:
- Amazon Lex
- Amazon Alexa
- Amazon Kinesis Data Firehose
Lambda Integration with ALB
- To expose a Lambda function as an HTTP(S) endpoint we can use an Application Load Balancer (ALB) or API Gateway
- The Lambda function must be registered in a target group if we want to expose it with an ALB
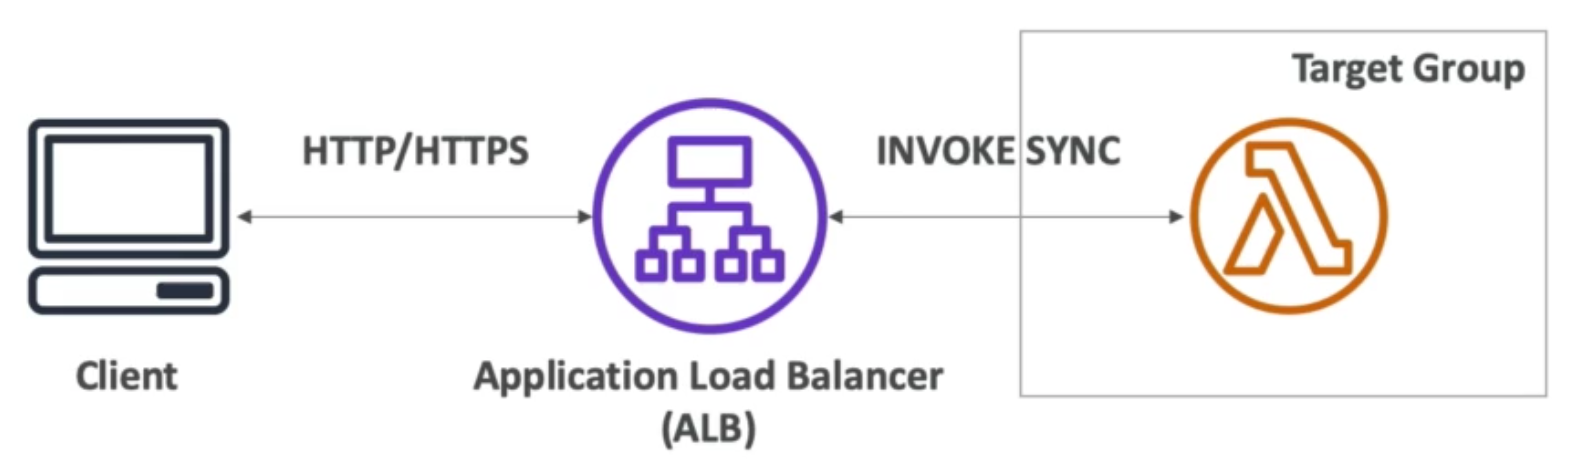
ALB HTTP Request Transformation to JSON
ALB transforms HTTP request before it sends it to Lambda. HTTP query string parameters, headers, and body (along with additional information) are passed down as a JSON object:
![]()
Response from Lambda Function
ALB Multi-Header Values
- ALB can support multi header values
- When you enable multi value headers, HTTP headers and query string parameters that are sent with multiple values are shown as arrays within the Lambda event and response object
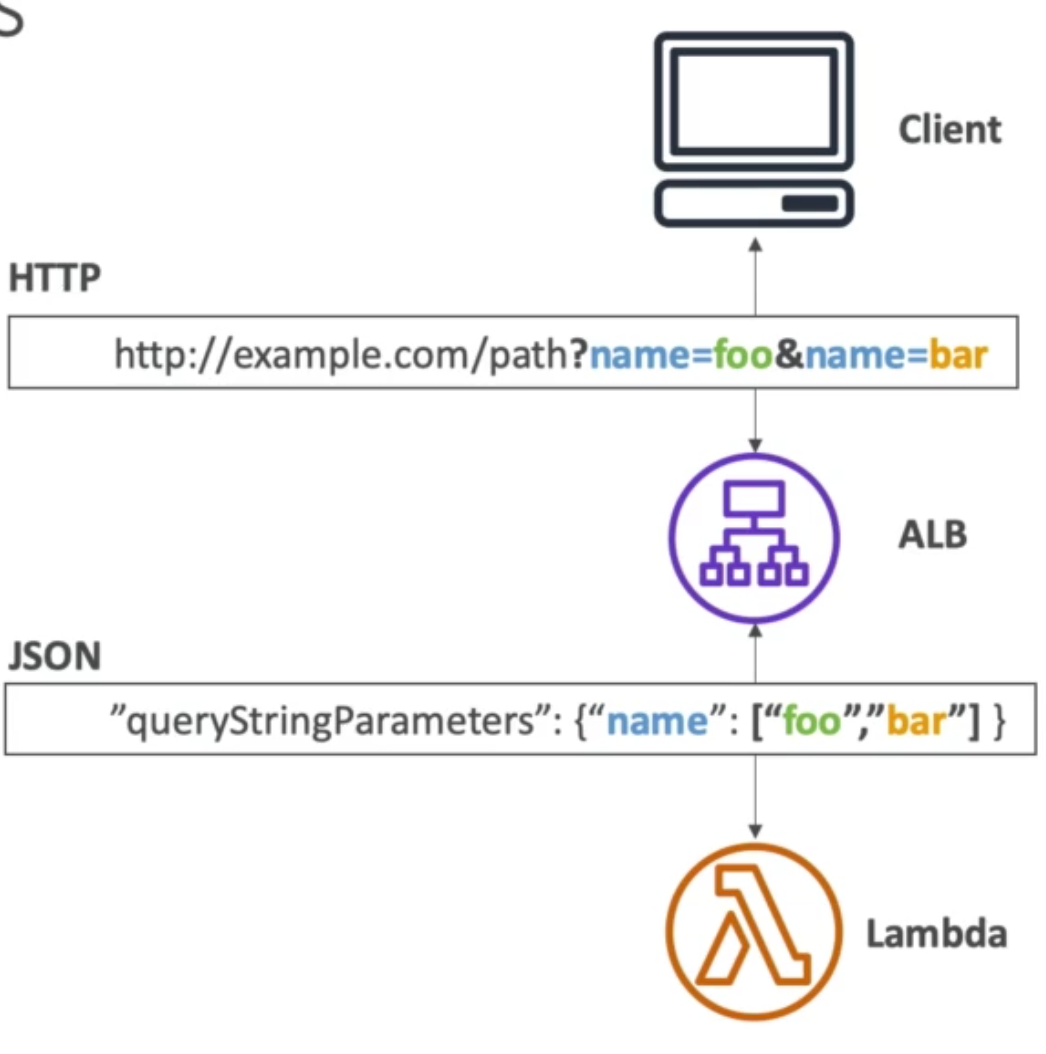
Lambda@Edge
- Lets say you deployed a CDN using CloudFront
- What if you wanted to run a global AWS Lambda alongside it? Maybe to implemente some request filtering before requests reach your application
- For this you can use Lambda@Edge. Namely, it allows you to deploy Lambda functions not in a specific region but in each region around the world alonside you CloudFront CDN (one of the many benefits is that you can customize the CDN content)
Lambda@Edge Explained
- You can use Lambda and CloudFront edge locations to change the CloudFront request and response. There are
2different ways to modify a request and2different way to modify a response.
To modify requests:
- After CloudFront receives a request from a viewer (i.e., the user) – called viewer request
- Before CloudFront forwards the request to the origin – origin request
To modify response:
- After CloudFront receives the response from the origin – origin response
- Before CloudFront forwards the response to the viewer – viewer response
What this implies is that we can generate a response to viewers without ever sending the reques to the origin by just using the viewer request and viewere response lambda functions.

Lambda@Edge Global Application

Lambda@Edge Use Cases
- Website Security and Privacy
- Dynamic Web Application at the Edge
- Search Engine Optimization
- Route across origins and Data Centers
- Bot Mitigation at the Edge
- Real time image transformation
- User Authentication and Authorization before they reach the origin
- User prioritization
- User tracking and analytics
Lambda Asynchronous Invocations
- When an asynchronous invocation is made to Lambda the events are placed in an Event Queue inside the Lambda service
- Lambda picks up requests from this queue and processes them
- Lambda attempts to retry on errors
3retries in total- Lambda waits
1minute after 1st failed retry, then2minutes after that (for 3rd retry)
- If retry fails after 3rd time, the event is lost unless we specifically define for it to go into a DLQ (dead letter queue) which can be either SNS or SQS. Note: you will need to give Lambda the correct IAM permissions for it to be able to write / invoke a call to SNS or SQS
- Note that because of the retry, it means your function might be invoked on the same data multiple times. As such make sure the processing is idempotetnt (i.e., having it run multiple times on the same data will not change the result / outcome)
- Asynchronous invocations allow you to speed up the processing if you don’t need to wait for the result (e.g., you need
1000files processed) - Some services are asynch by default so you have no choice
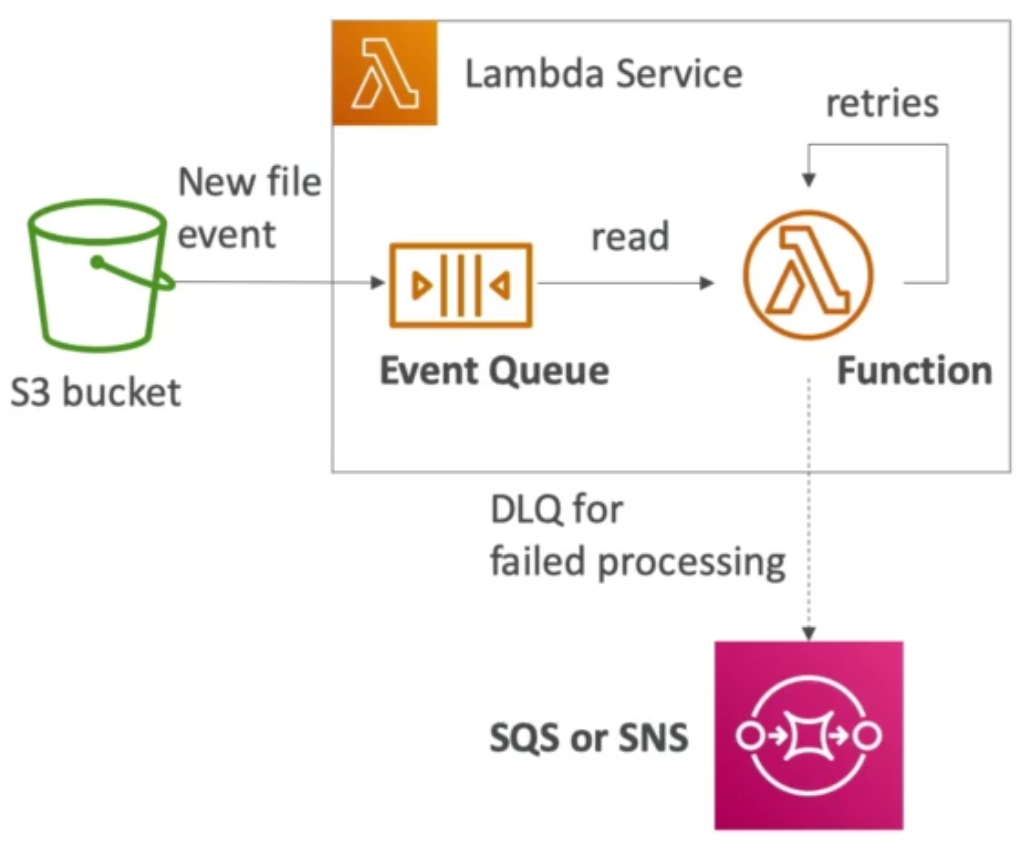
AWS Services Which Invoke Lambda Asynchronously
- S3
- SNS
- CloudWatch Events / EventBridge
- CodeCommit (CodeCommit trigger: new branch, new tag, new push)
- CodePipeline (invoke a Lambda function during the pipeline, Lambda must callback)
- CloudWatch logs
- Simple Email Service (SES)
- CloudFormation
CloudWatch Events / EventBridge
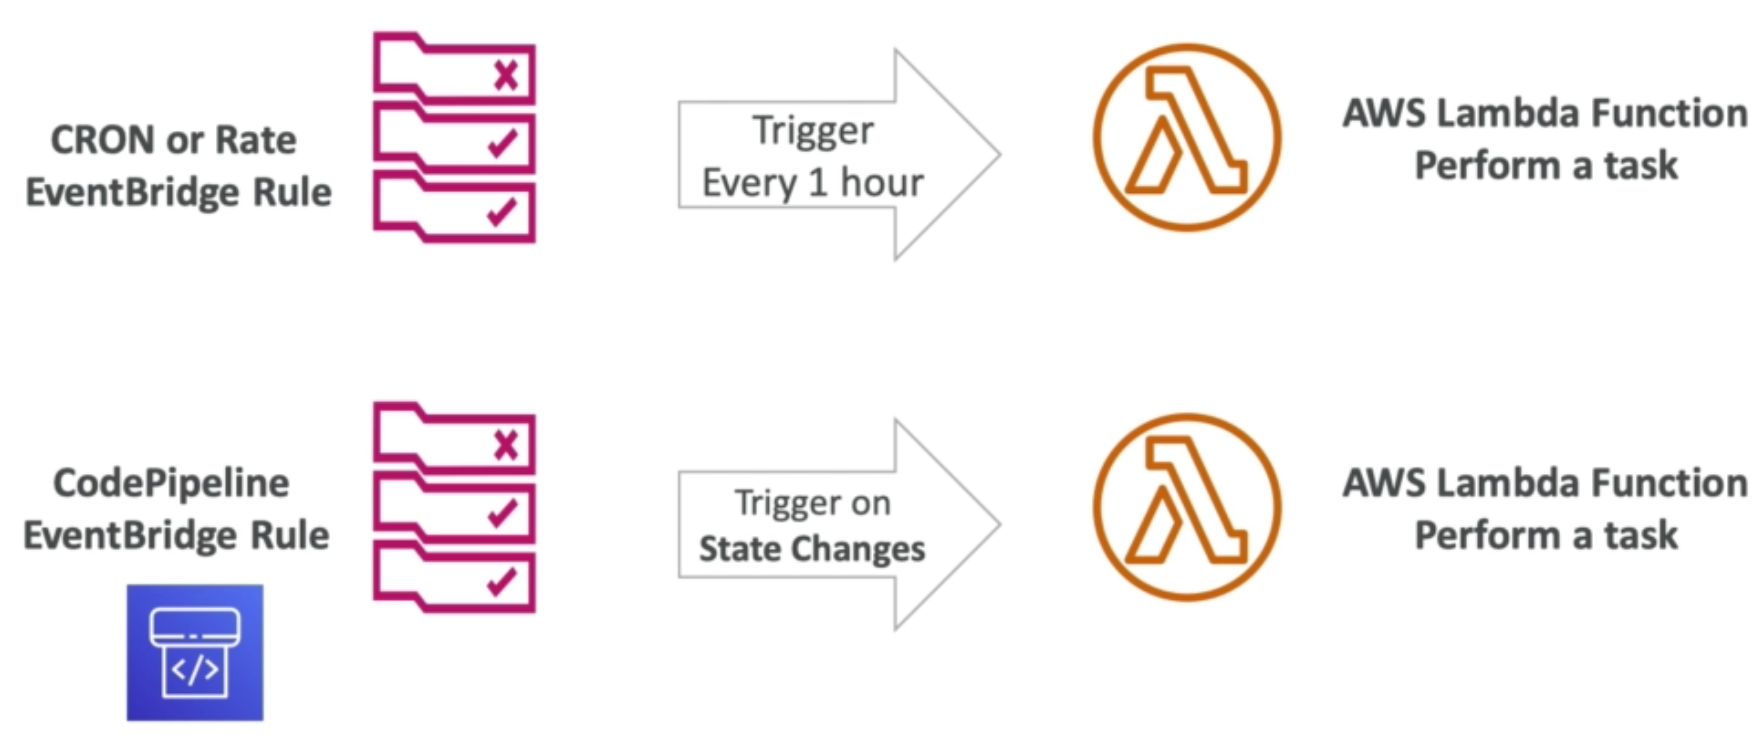
Lambda and S3 Event Notifications
- Sample S3 events that can trigger Lambda function:
S3:ObjectCreated,S3:ObjectRemoved,S3:ObjectRestore,S3:Replication, etc.. - Object name filtering possible (e.g.,
*.jpg) - Classic use case: generate thumbnails of images uploaded to S3
- S3 event notifications typically deliver to target in seconds but can sometimes take a minute or longer
- If two writes are made to a single non-versioned object at the same time, it is possible that only a single event notification will be sent
- If you want to ensure that an event notification is sent for every successful write, you can enable versioning on your bucket

Lambda Event Source Mapping
Applies to:
- Kinesis Data Streams
- SQS & SQS FIFO queue
- DynamoDB Streams
Common denominator for all of the above: Lambda needs to poll for records from these sources.
As such, the Lambda function is invoked synchronously.

Streams & Lambda (Kinesis & DynamoDB)
- An event source mapping creates an iterator for each shard and processes items in order
- Start with new items from the beggining of from timestamp
- Processed items are not removed from the stream (other consumers can read them)
- For low traffic scenarios, we can use a batch window mode to accumulate records before processing
- We can also set up Lambda to process multiple batches in parallel
- You can process multiple batches in parallel:
- Up to
10Lambda batche processors per shard (note that a Kinesis stream (equivalent to a Kafka topic) can have muliple shards) - In orderd processing is still guaranteed for each partition key. In other words, records with same key will go to same processor
- Up to

Streams & Lambda – Error Handling
- By default, if your function returns an error, the entire batch is reprocessed until the function succeeds, or the items in the batch expire
- To ensure in-order processing, processing for the affected shard is paused until the error is resolved
- You can configure the event source mapping to:
- Discard old events
- Restrict the number of retries
- Split the batch on error (to possibly fix Lambda timeout issue – remember Lambda will time out after
15minutes running)
- Discared events can go to a Destination

Lambda Event Source Mapping With SQS & SQS FIFO & DynamoDB
- Event Source Mapping will poll SQS (Long Polling)
- Specify batch size (1-10 messages)
- Recommended: set the queue visibility timeout to
6xthe timeout of the Lambda function - To use DLQ:
- Set-up on the SQS queue not Lambda (DLQ for Lambda is only for async invocations)
- Or use Lambda destinations for failures


Queues & Lambda
- Lambda also supports in-order processing for FIFO queues and scales up to the number of active message groups
- For standard queues, items are not necessarily processed in order
- Lambda scales up to process a standard queue as quickly as possible
- When an error occurs, batches are returned to the queue as individual items and might be processed in a different grouping than the original batch
- Lambda deletes items from the queue after they are processed successfully
- You can configure the source queue to send items to a dead letter queue if they can’t be processed
Lambda Event Mapper Scaling Summary
- Kinesis Data Streams & DynamoDB Streams
- One Lambda invocation per stream shard
- If you use parallelization, up to
10batches processed per shard simultaneously
- SQS Standard Queue:
- Lambda adds
60more instances per minute to scale up - Up to
1000batches of messages processed simultaneously
- Lambda adds
- SQS FIFO:
- Messages with the same GroupID will be processed in order
- The Lambda function scales to the number of active consumers
Lambda Invocation Types Summary
Three ways to invoke lambda:
- Synchronous
- Asynchronous
- Event Source Mapping (Also synchronous)
Lambda Destination
- Can configure to send a result to a destination
- For Asynchronous invocations: can define destinations for successful and failed events to:
- SQS
- SNS
- Lambda
- EventBridge Bus
- Note: AWS recommends you use destinations instead of DLQ as destinatios have more targets (but both can be used at same time)
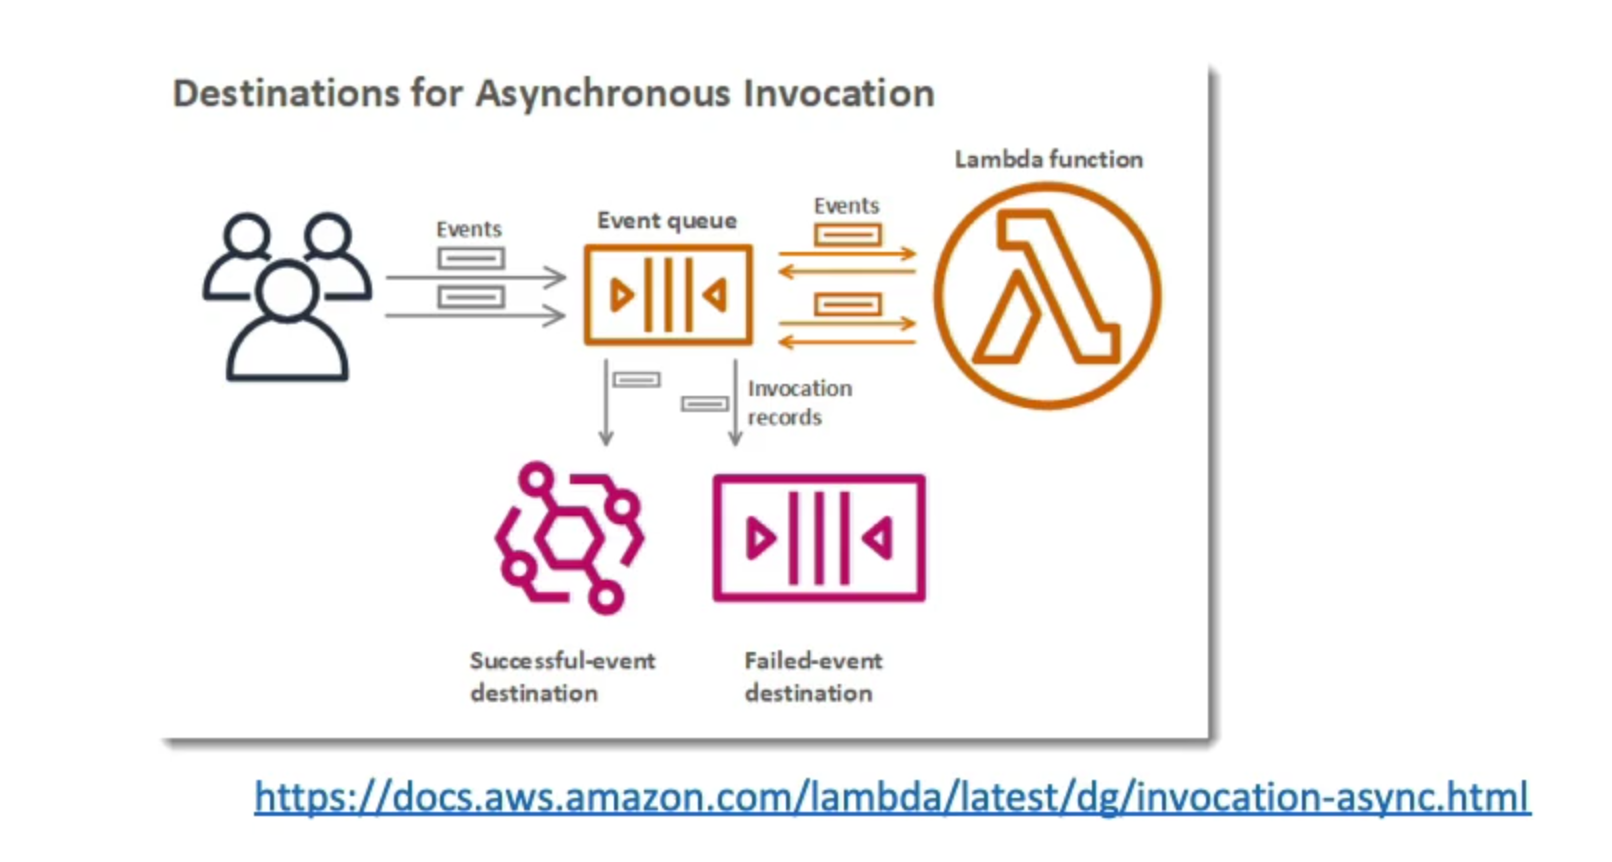
- For Event Source Mapping: for discarded event batches you can use SQS or SNS
https://www.trek10.com/blog/lambda-destinations-what-we-learned-the-hard-way
I guess that for synch Lambda invocations there is no destination since its synch and we wait to get the response. So if it failed we know that right away and can proceed accordingly (e.g., retry and so on). With asynch we fire and forget, so we don’t know if request failed. So that is why async invocations have built in retry and destinations, so we can be aware of things that failed and pick them up later if neccessary.
Good read on async vs event source mapping: https://stackoverflow.com/questions/61018416/number-of-retries-in-aws-lambda
Lambda Execution Role (IAM Role)
- Grants the Lambda function permissions to access AWS services / resources
- Sample managed policies for Lambda:
- AWSLambdaBasicExecutionRole – upload logs to CloudWatch
- AWSLambdaKinesisExecutionRole – read from Kinesis
- AWSLambdaDynamoDBExecutionRole – read from DynamoDB streams
- AWSLambdaSQSQueueExecutionRole – read from SQS
- AWSLambdaVPCAccessExecutionRole – deploy lambda function to VPC
- AWSXRayDaemonWriteAccess – upload trace data to X-Ray
- Note: when you use an event source mapping to invoke your function, Lambda uses the execution role to read event data
- Best practice: create one Lambda Execution Role per function
Side Info on Event Source Mapping
An event source mapping is an AWS Lambda resource that reads from an event source and invokes a Lambda function. You can use event source mappings to process items from a stream or queue in services that don’t invoke Lambda functions directly. Lambda provides event source mappings for the following services.
Services that Lambda reads events from:
- Amazon DynamoDB
- Amazon Kinesis
- Amazon MQ
- Amazon Managed Streaming for Apache Kafka
- self-managed Apache Kafka
- Amazon Simple Queue Service
An event source mapping uses permissions in the function’s execution role to read and manage items in the event source. Permissions, event structure, settings, and polling behavior vary by event source. For more information, see the linked topic for the service that you use as an event source.
Lambda Resource Based Policies
- To give other accounts and AWS services permission to use your Lambda resources
- Similar to S3 bucket policies for S3 bucket
- An IAM principla can access Lambda:
- If the IAM policy attached to the principal authorizes it (e.g., user access)
- OR if the resource-based policy authorizes it (e.g., service access)
- When an AWS service like S3 calls your Lambda function, the resource-based policy is what gives it access
Lambda Environment Variables
- Environment variable is a key value pair in String form
- Adjust the function behavior w/o updating the code
- Helpful to store secrets (encrypted by KMS)
- Env vars are available in our code
- Secrets can be encrypted either by Lambda service key or our own Customer Master Key (CMK)
Lambda Monitoring
- CloudWatch Logs:
- AWS Lambda execution logs are stored in CloudWatch Logs
- Make sure your AWS Lambda function has an execution role with an IAM policy that authorizes it to write to CloudWatch Logs (AWSLambdaBasicExecutionRole)
- CloudWatch Metrics:
- AWS Lambda metrics are displayed in AWS CloudWatch Metrics
- Metrics include: invocation count, concurrent executions, error count, success rates, throttles, async delivery failures, iterator age (for Kinesis & DynamoDB streams), etc..
Lambda Tracing with X-Ray
- Enable in Lambda configuration (Active Tracing)
- Runs the X-Ray daemon for you
- Need to instrument you code with AWS X-Ray SDK
- Ensure Lambda function has correct IAM Execution Role so that X-Ray daemon can write
- The managed policy is called AWSXRayDaemonWriteAccess
- Environment variables to communicate with X-Ray
- _X_AMZN_TRACE_ID: contains the tracing header
- AWS_XRAY_CONTENT_MISSING: by default
LOG_ERROR - AWS_XRAY_DAEMON_ADDRESS: the X-Ray Daemon
IP_ADDRESS:PORT
Lambda in VPC
- By default, your Lambda function is launched outside your own VPC (in an AWS-owned VPC)
- Therefore it cannot access resources in your VPC

Configure Lambda to Be Able to Call Services in Your VPC
- You must define the VPC ID, the Subnets, and the Security Groups
- Lambda will create an ENI (Elastic Network Interface) in your subnets and to do this it will need the role:
AWSLambdaVPCAccessExecutionRole - In figure below, for things to work (just like in EC2 instances) you will need to allow network access from Lambda Security Group
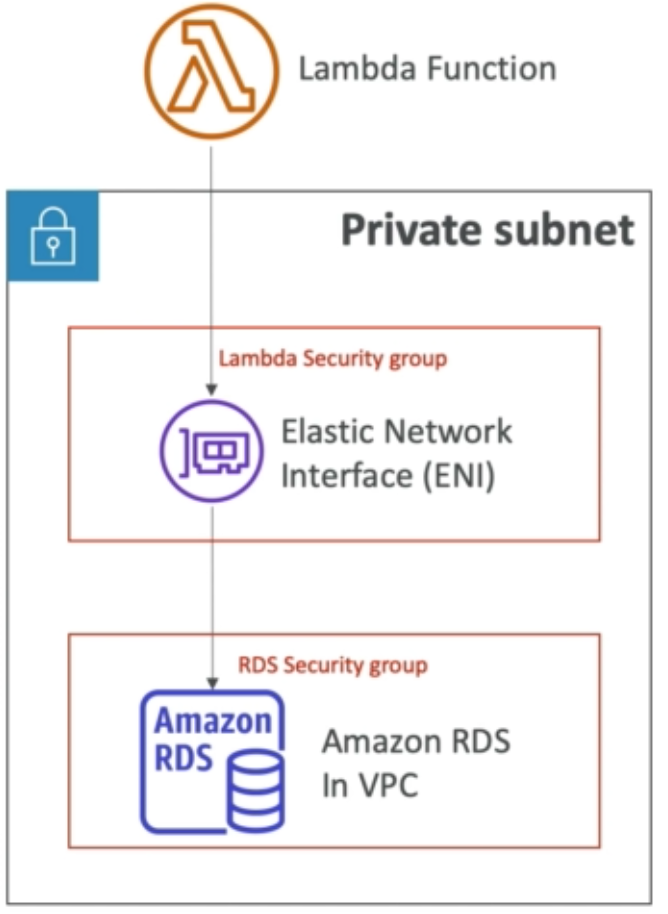
Lambda inside VPC with Internet Access
- Unlike EC2 instances which have internet access if they are in a public VPC, Lambda functions do not
- Deploying a Lambda function in a public subnet does not give it internet access or a public IP
- So what can we do? Well, we can deploy a Lambda function in a private subnet and give it internet access by routing outbound traffic to a using a NAT Gateway / Instance in a public subnet
- You can use VPC endpoints to privately access AWS services without a NAT (essentially, by using VPC endpoint all requests from one AWS service to another service will go through AWS private internet)
- **Note: Lambda CloudWatch logs works even without VPC endpoint or NAT Gateway

Lambda Function Performance
- RAM:
- Range from
128MBto3008MBin64MBincrements - The more RAM you add the more vCPU credits you get
- At
1,792MBa function has the equivalent of one full CPU - After
1,792MByou get more than one CPU and need to use multi-threading in your code to benefit from it
- Range from
- If your app is CPU bound increase RAM
- Timeout: default
3seconds, max is900seconds (15minutes)
Lambda Execution Context
- The execution context is a temporary runtime environment that initializes any external dependencies of your lambda code
- Great for db connections, HTTP clients, SDK clients
- The execution context is maintained for some time in anticipation of another Lambda function invocation
- The next function invocation can “re-use” the execution context and save time in initializing connection objects
- The execution context includes the
/tmpdirectory which is a space you can write files to which will be available across executions

Lambda Functions /tmp space
- If your Lambda function needs to download a big file to work, put it here
- If your Lambda needs disk space, use this
- Max size is
512MB - The directory content remains when the execution context is frozen, providing a transient cache that can be used for multiple invocations (helpful to checkpoint your work)
/tmpis guaranteed to be available during the execution of your Lambda function. Lambda will reuse your function when possible, and when it does, the content of /tmp will be preserved along with any processes you had running when you previously exited. However, Lambda doesn’t guarantee that a function invocation will be reused, so the contents of /tmp (along with the memory of any running processes) could disappear at any time. For more permanent storage use S3 or DynamoDB
Lambda Concurrency and Throttling
- Concurrency limit: up to
1000concurrent executions (per AWS Region per AWS account) - Can set a reserved concurrency at the function level (i.e., concurrent execution limit for some function)
- Each invocation over the concurrentcy limit will be throttled
- If sync invocation of Lambda function then it will return ThrottleError
429 - Is async invocation of Lambda function it will retry automatically and then eventually will go to DLQ (unless no longer throttled at some point during one of the retries)
- If sync invocation of Lambda function then it will return ThrottleError
- Open support ticket if you need higher limit
Lambda Concurrency Issue
If you don’t reserve (i.e., limit) concurrency, the following can happen:
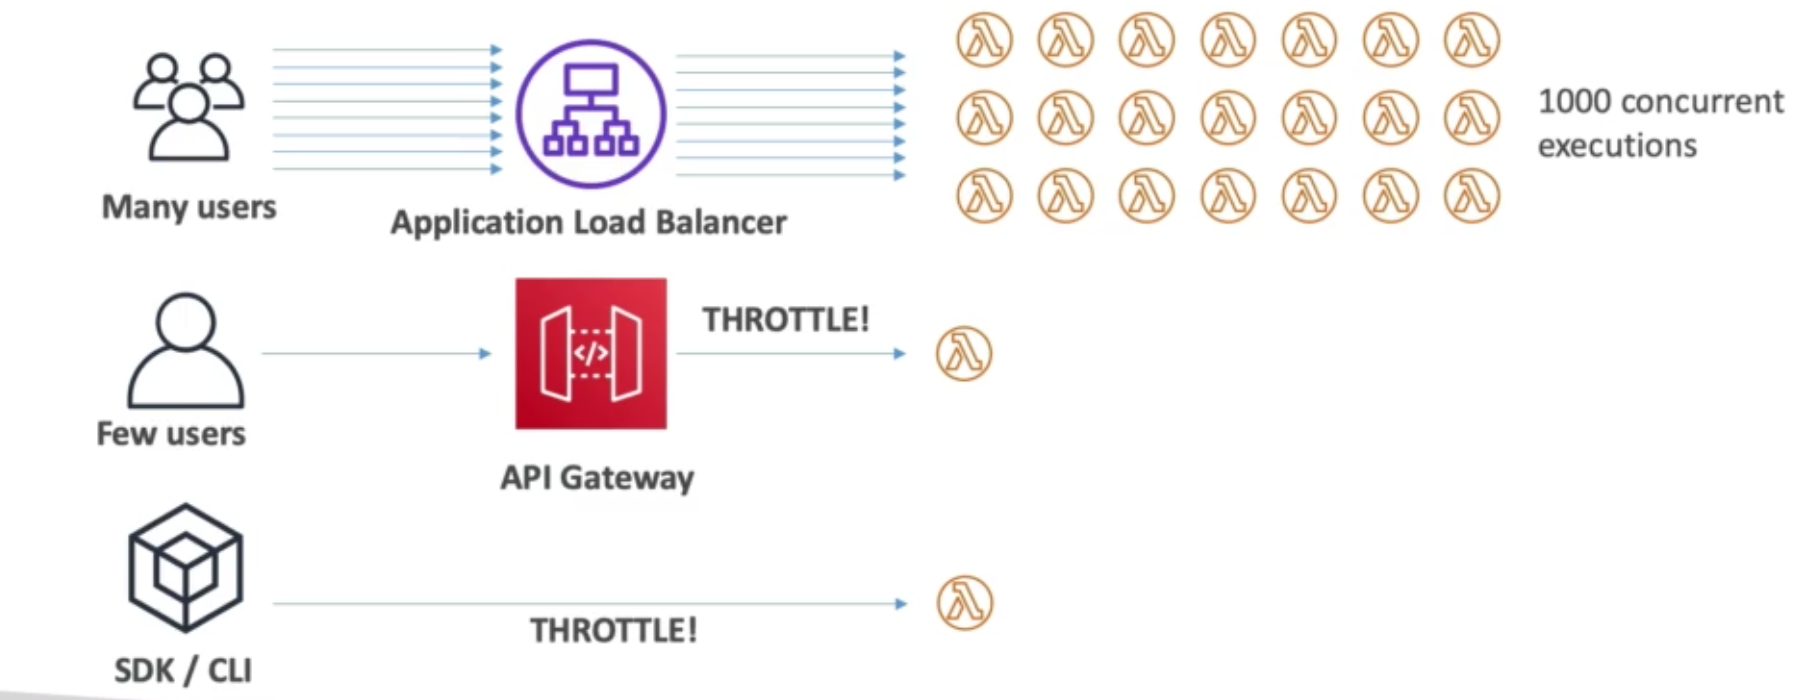
Concurrency and Async Invocations
- If the function does not have enough concurrency available to process all events, additional requests are throttled
- For throttling errors and system errors, Lambda returns the event to the event queue (remember all async invocations go into an internal Lambda service event queue) and attempts to run the function again for up to
6hours - The retry interval increases exponentially from
1second after the first attempt to a max of5minutes
Lambda Cold Starts & Provisioned Concurrency
- Cold Start:
- When a new lambda functions is called the code is loaded and code outside handler is executed
- If the initialization is large (code outside handler), for instance a lot of db connections, the process can be long
- First request served by new instances has higher latency than rest
- Provisioned Concurrency:
- Concurrency is allocated before the function is invoked (in advance) – proactive mode
- As such, the cold start issue is eliminated and all invocations have low latency
- Application Auto Scaling can manage concurrency (schedule or target utilization)
Lambda Function Dependecies
- If your Lambda function depends on external dependecies you will need ot install the packages alongside your code and zip it together
- Upload the zip to Lambda if less than
50MBelse toS3first - Native libraries work if they are compiled on Amazon Linux
Lambda and CloudFormation
- First option is to literally inline the function in the CloudFormation template
- Use the Code.ZipFile property
- The downside of inlining is that we cannot include function dependencies
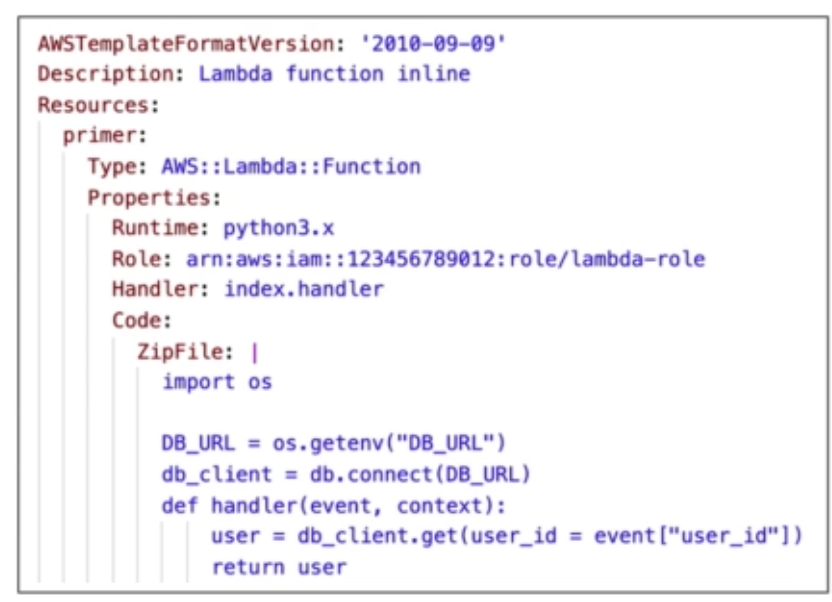
Lambda and CloudFormation using S3
- You can store the zipped Lambda code in S3
- You will have to refer to the S3 zip location in the CloudFormation template. Required info:
- S3Bucket
- S3Key: full path to zip
- S3ObjectVersion if versioned bucket
- If you update the code in S3 but don’t update S3Bucket, S3Key, and S3ObjectVersion, then CF won’t update your function
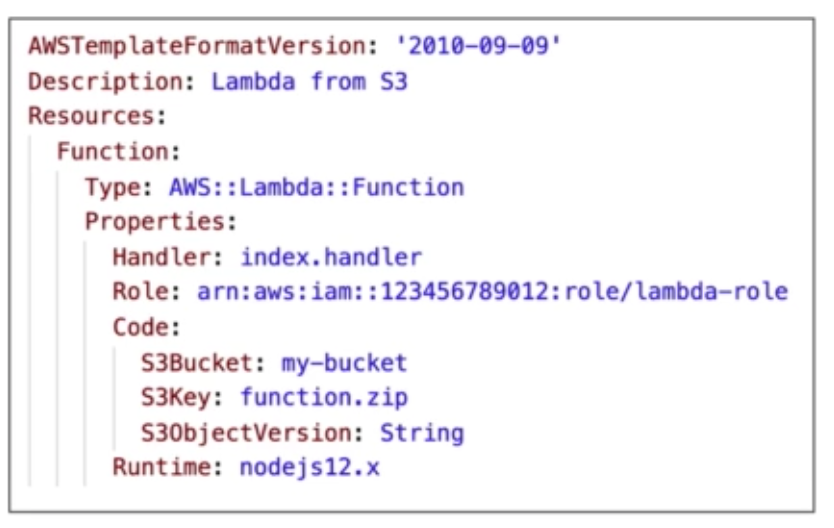
Lambda Layers
- We can use Lambda layers for custom runtimes not supported by Lambda as of now (e.g., C++, Rust)
- A more common use case is to use layers to package and externalize function dependencies so that we can re-use them without having ot package them with our function code every time (e.g., creating a lambda layer for the
flatten_jsonPython package)
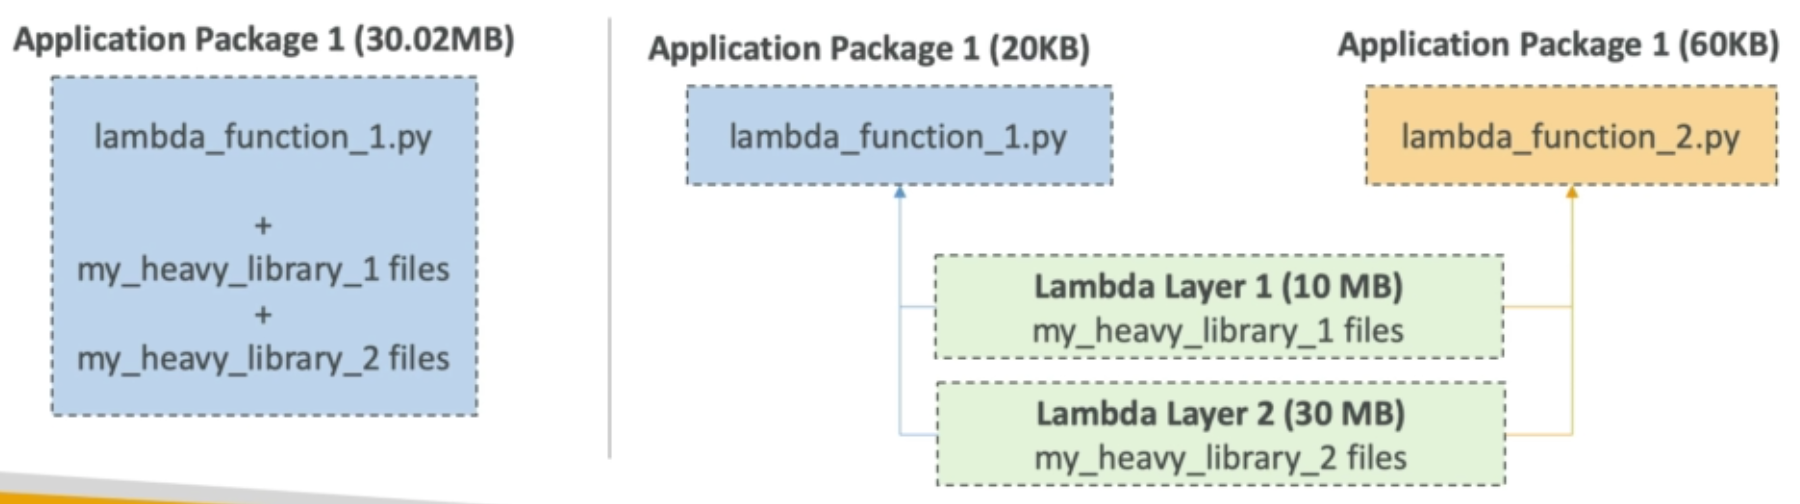
Lambda Versions
- When you work on a Lambda function we work on $LATEST
- When we are ready to publish a Lambda function, we create a new version
- Lambda function versions are immutable
- Versions have increasing version numbers (e.g., v1, v2, v3, etc..)
- Versions get their own ARN (Amazno Resource Number)
- Version = code + configuration (e.g., env vars) – nothing can be changed, again versions are immutable
- Each version of the lambda function can be accessed
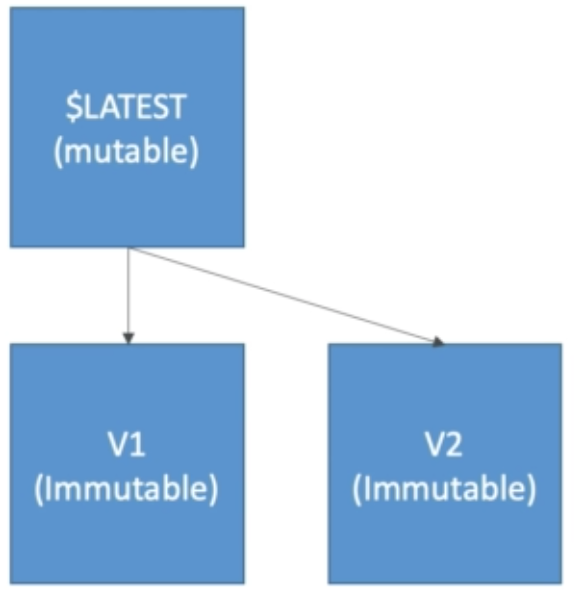
Lambda Aliases
- Aliases are “pointers” to lambda functions
- We can define a “dev”, “test”, “prod” aliases and have then point at different lambda versions
- Aliases are mutable
- Aliases enable Blue / Green deployment by assigning weights to lambda functions (e,g., configure PROD alias to point %5 traffic to v2 and %95 to v1)
- Aliases enable stable configuration our event triggers / destinations
- Aliases have their own ARNs
- Aliases cannot reference other aliases

Lambda & CodeDeploy
- CodeDeploy can help automate traffic shift for Lambda aliases during deploy
- Feature is integrated with AWS SAM framework
- Linear: grow traffic
Nminutes until 100%Linear10PercentEvery3MinutesLinear10PercentEvery10Minutes
- Canary: try
Xpercent then 100%Canary10Percent5MinutesCanary10Percent30Minutes
- AllAtOnce: immediate
- Can create Pre & Post Traffic hooks to check the health of a lambda function

Lambda Limits (per region)
- Execution:
- Memory allocation: 128 MB - 3008 MB (64 MB increments)
- Maximum execution time: 900 seconds (15 minutes)
- Max env variables (4KB)
- Disk capacity in the “function container” 512MB
- Up to 1000 concurrent executions per account per region
- Deployment:
- Lambda function deployment size (compressed zip) max size 50MB – for bigger need to use S3
- Size of uncompressed deployment (code + dependencies) is 250MB
- Can use /tmp directory to load other files at startup (assuming Lambda func is in same execution context as the last one that ran)
- Default quota value for all of a Lambda function’s environment variables is 4 KB
Lambda Best Practices
- Perform heavy-duty work outside of your function handle
- Connect to databases outside your function handler
- Initialize the AWS SDK outside your function handler
- Pull in dependencies or datasets outside of your function handler
- Use environment variables for:
- Database connection strings, S3 bucket, etc.. (don’t put these values in your code)
- Passwords, sensitive values.. (they can be encrypted using KMS)
- Minimize your deployment package size to irs runtime necessities
- Break down your function if need be
- Remember the AWS Lambda limits
- Use layers where necessary
- Avoid using recursive code – never have a Lambda function call itself
DynamoDB
Traditional Architecture

DynamoDB Overview
- Traditional applications leverage RDBMS databases
- RDBMS dbs use SQL query language
- SQL has strong requirements about how data should be modeled
- SQl allows joins, aggregations, computations, etc..
- Vertical scaling (means increasing hardware)
NoSQL databases
- NoSQL databases are non-relationsl databases & distributed
- Do not support join
- All data is present in one “row” or “document”
- No aggregations
- Scale horizontally
DynamoDB
- Managed, highly available, replication across 3 AZ
- NoSQL
- Scales to massive worklaods
- Integrates with IAM for security, authorization and administration
- Enables event driven programming with DynamoDB Streams
DynamoDB Basics
- Made of tables
- Each table has a primary key (decided once at creation)
- Each table can have infinite num of rows
- Maz size of one “row” or item is 400KB
- Data types:
- Scalar types: String, Number, Binary, Boolean, Null
- Document types: list, map
- Set types: String set, Number set, Binary set
DynamoDB Primary Keys (a.k.a., partition key)
- Option 1: partition key only (HASH)
- Partition key must be unique for each item
- Key must be diverse so data is well distributed
- Ex: user id would be a diverse key that is well distributed since only one used can have the same id

DynamoDB Primary Keys with Sort Key
- Option 2: partition key + sort key
- The combination of partition key + sort key must be unique for that row / record in the table
- Data is grouped by partition key
- Sort key is also often called range key
- We can use the sort key to sort by that attribute for a particular group of records which are grouped by their partition key

DynamoDB WCU & RCU – Throughput
- Table must have provisioned read and write capacity units (RCU and WCU)
- Read Capacity Units (RCU): defines throughput for reads
- Write Capacity Units (WCU): defines throughput for writes
- There is an option to setup auto scaling of the throughput to meet demand
- Throughput can be exceeded temporarily using burst credit
- If no more burst credit is available you will get
ProvisionedThroughputException - In case of
ProvisionedThroughputExceptionbest practice is to do exponential back-off retry
DynamoDB – Write Capacity Units
- One write capacity unit represents one write per seconds for an item up to 1 KB in size
- If the item size > 1KB then more WCU is required
Examples:

DynamoDB – Read Capacity Units
With reading from DynamoDB we have two options:
- Eventually consistent read: if we read just after we write it is possible that we will get the old (i.e., previous) value because of replication lag
- Strongly consistent read: if we read just after we write we will get the correct data
By default, DynamoDB uses eventually consistent reads, but GetItem, Query, and Scan provide a ConsistentRead parameter you can set to True
Note: setting ConsistentRead to True will impact your RCU
- A unit of read capacity represents one strongly consistent read per second (or two eventually consistent reads per second) for items as large as 4 KB
Example:

DynamoDB Partitions
- Data is divided into partitions
- Partition keys go through a hashing algorithm to know which partition to go to
- To compute total num of partitions:
- By capacity: (TOTAL RCU / 3000) + (TOTAL WCU / 1000)
- By size: Total size / 10 GB
- Total Partitions:
CEIL(MAX(Capacity, Size))
- WCU and RCU are spread evenly across partitions
- If we exceed RCU or WCU for table we will get
ProvisionedThroughputExceededException - Reasons:
- Hot key: one partition key is being read too many times
- Hot partition – a particular partition is being read too much (remember the total table RCU and WCU is spread evenly across partitions)
- Very large items (remember RCU and WCU depend on item size)
- Solutions:
- Exponential back-off when exception is encountered
- Choose a better partition key (i.e., primary key) for more distribution
- If purely an RCU issue, you may benefit from DynamoDB Accelerator (DAX) which is basically a cache to offload read burden from main DB
DynamoDB Basic APIs
Writing Data
- PutItem: write data to DynamoDB (create data or full replace) – consumes WCU
- UpdateItem: update data in DynamoDB (partial update of attributes) – possibility to use atomic counters and increase them
- Conditional Writes:
- Accept a write / update only if conditions are respected, otherwise reject
- Helps with concurrent access to items
- No performance impact
Deleting Data
- DeleteItem:
- Delete an individual row
- Ability to perform a coditional delete
- DeleteTable:
- Delete a whole table and all its items
- Much quicker deletetion than calling
DeleteItemon all items
Batching Writes
- BatchWriteItem:
- Up to 25 PutItem and / or DeleteItem in one call
- Up to 16 MB of data written
- Up to 400 KB of data per item
- Batching allows you to save in latency by reducing the number of API calls done against DynamoDB
- Operations are done in parallel for better efficiency
- It is possible for part of batch to fail in which case we have to retry the failed items (using exponential back-off)
Reading Data
- GetItem:
- Returns single item based on the primary key
- primary key = HASH or HASH-RANGE (partition key + sort key)
- Eventually consistent read by default
- Option to use strongly consistent reads (this implies more RCU and might take longer to complete the read in general)
- ProjectionExpression can be specified to include only certain attributes (note this removes what we don’t want at the source and returns to us only what we asked for thus also reducing latency)
- BatchGetItem:
- Up to 100 items
- Up to 16 MB of data
- Items are retrieved in parallel to minimize latency
- Query returns all of the items based on:
- PartitionKey value (must be = operator)
- Sort key value (=, <, <=, >, >=, between, begin) – optional
- FilterExpression to further filter (client side filtering)
- Returns:
- Up to 1 MB of data
- Or number of items specified in Limit
- Allows you to do pagination of results
-
Can query table, local secondary index, or global secondary index
- Scan scans the entire table and then fliter client side (most inefficient)
- Returns up to 1 MB of data – use pagination to keep on reading
- Consumes a lot of RCU
- Limit impact using Limit or reduce the size of the result and pause
- For faster performance use parallel scans:
- Multiple instances scan multiple partitions at the same time
- Increases the throughput and RCU consumed
- Could also use Limit here to lessen the impact of parallel scans
In summary (from AWS docs):
GetItem – Retrieves a single item from a table. This is the most efficient way to read a single item because it provides direct access to the physical location of the item. (DynamoDB also provides the BatchGetItem operation, allowing you to perform up to 100 GetItem calls in a single operation.)
Query – Retrieves all of the items that have a specific partition key. Within those items, you can apply a condition to the sort key and retrieve only a subset of the data. Query provides quick, efficient access to the partitions where the data is stored. (For more information, see Partitions and Data Distribution.)
Scan – Retrieves all of the items in the specified table. (This operation should not be used with large tables because it can consume large amounts of system resources.)
DynamoDB - LSI (Local Secondary Index)
Some applications only need to query data using the base table’s primary key. However, there might be situations where an alternative sort key would be helpful. To give your application a choice of sort keys, you can create one or more local secondary indexes on an Amazon DynamoDB table and issue Query or Scan requests against these indexes.
- Up to five LSIs per table
- The sort key consists of exactly one scalar attribute
- The attribute that you choose must be a scalar String, Number, or Binary
- LSI must be defined at table creation time
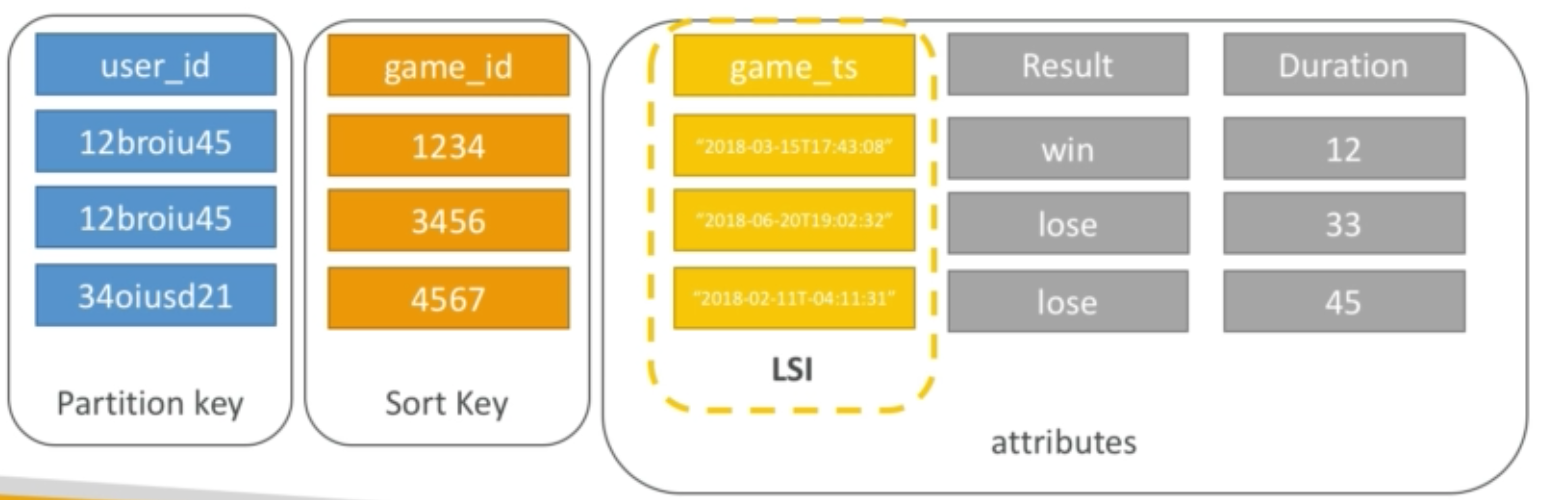
DynamoDB - GSI (Global Secondary Index)
- To speed up queries on non key attributes use a GSI
- GSI = partition key + optional sort key
- The index is a new table and we can project attributes on it
- The partition key and sort key of the original table are always projected (KEYS_ONLY)
- Can specify extra attributes to project (INCLUDE)
- Can use all attributes from main table (ALL)
- Must define RCU / WCU for the index
- We can add / modify GSI (since this will create a new table all toghether) but not LSI (LSIs have to be defines at table creation time)
DynamoDB Indexes and Throttling
- GSI:
- If the writes are throttled on the GSI then the main table will also be throttled even if the WCU on the main tables are fine
- Choose your GSI partition key carefully
- Seprate RCU and WCU from main table, assign your WCU capacity carefully
- LSI:
- Uses the WCU and RCU of the maintable
- No special throttling considerations
DynamoDB Concurrency (Optimistic Locking with Version Number)
Optimistic locking is a strategy to ensure that the client-side item that you are updating (or deleting) is the same as the item in Amazon DynamoDB. If you use this strategy, your database writes are protected from being overwritten by the writes of others, and vice versa.
With optimistic locking, each item has an attribute that acts as a version number. If you retrieve an item from a table, the application records the version number of that item. You can update the item, but only if the version number on the server side has not changed. If there is a version mismatch, it means that someone else has modified the item before you did. The update attempt fails, because you have a stale version of the item. If this happens, you simply try again by retrieving the item and then trying to update it. Optimistic locking prevents you from accidentally overwriting changes that were made by others. It also prevents others from accidentally overwriting your changes.
DynamoDB DAX
- DAX = DynamoDB Accelerator
- Cache for DynamoDB, no application reqrite required – enable with click of button
- Writes go through DAX to DynamoDB
- Allows for micro second latency for cached reads & queries
- Solves the hot key problem (i.e., case of too many reads)
- 5 minutes TTL for cache by default
- Up to 10 DAX nodes in the cluster
- Multi AZ (3 nodes min recommended for production)
- Secure (Encryption a rest with KMS, can deploy DAX cluster in VPC, IAM, anything that happens in DAX is tracked by CloudTrail)
DAX vs ElastiCache
Use DAX for simple cache for DynamoDB individual objects. If you store the same objects in ElastiCache and use that instead of DAX there is no real benefit and it just creates more work for you in terms of integration. That said, if you want to have control over what is cached then use ElastiCache.
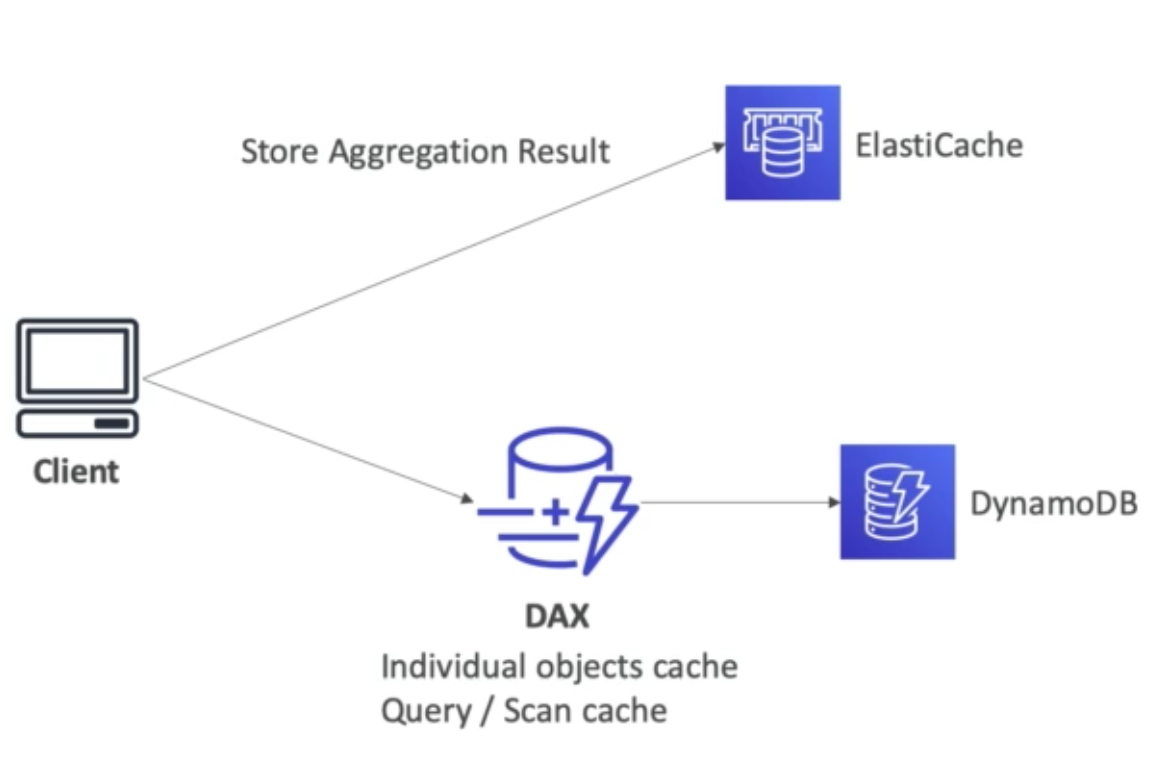
DynamoDB Streams
- Changes in DynamoDB (CRUD) can end up in DynamoDB Stream (think of streams as a change log or change data capture concept.. something changes in our DB and this emits an event in our stream)
- This stream can be read by Lambda & EC2 instance in real time and thus allows us to build things like:
- React to changes in real time
- Analytics
- Create derivative table / views
- Insert into ElasticSearch
- As such, we can use streams to implement cross region replication
- Streams data has 24 hour retention period
- We can choose the info that will be written to the stream when data in the main table is modified:
- KEYS_ONLY: only the key attributes
- NEW_IMAGE: the entire item, as it appears after it was modified
- OLD_IMAGE: the entire item, as it appeared before it was modified
- NEW_AND_OLD_IMAGES: the the new and the old images of the item
- DynamoDB streams are made of shards just like Kinesis Data Streams
- You don’t provision shards, AWS does it all
- Records are not retroactively populated in a stream after enabling it
DynamoDB Streams and Lambda
- You need to define an Event Source Mapping to read from a DynamoDB Stream
- You need to ensure the Lambda function has the appropriate permissions
- Once there is an Event Source Mapping your Lambda func will be invoked synchronously
DynamoDB TTL
- TTL = automatically delete an item after an expiry date / time
- TTL is provided at no extra cost, deletions do not use WCU or RCU
- TTL is a background task operated by the DynamoDB service itself
- Helps reduce storaage and manage table size over time
- TTL is enabled per row (you define a TTL column, and add a date time there)
- DynamoDB typically deletes expired items within 48 hours of expiration
- Deleted items due to TTL are also deleted in GSI / LSI
- DynamoDB Streams can be used to recover expired items
DynamoDB CLI
--projection-expression: attributes to receive (filter is done on DynamoDB side, we receive only what we asked for)--filter-expression: filter results (client side)
General CLI pagination options for DynamoDB and S3:
- Optimization:
--page-sizefull dataset is still received but each the API call itself is returning less data back to use (e.g., helps to avoid timeouts)
- Pagination:
--max-items: max num of results returned by the CLI (as part of result we also get aNextTokenwhich we can use in--starting-token)--starting-token: specify the last receivedNextTokento get the next set of results
DynamoDB Transactions
- Transaction = ability to perform CRUD operations at the same time or none at all
- Is is a all or nothing type of operation
- So DynamoDB write modes: standard, transactional
- DynamoDB read modes: eventual consistency, strong consitency, transactional
- Transactional reads and writes consume 2x more WCU and RCU
DynamoDB as Session State Cache VS Other Alternatives
Its common to use DynamoDB to store session state.
When to use ElastiCache?
ElastiCache is in memory, but DynamoDB is serverless. Both are key / value stores. If exam asks for in memory then it probably means ElastiCache. If it asks for auto scaling feature then it is probably DynamoDB.
When to use EFS ?
EFS must be attached to each EC2 instance as a network drive in order for us to be able to share session state across all of them. This has a down side because EFS cannot be integrated with other services (like Lambda) which DynamoDB can. Also, EFS is a file system whereas DynamoDB is a database.
Can we use EBS ?
Depends. With EBS it is a block storage than can only be used for local caching for one instance. No sharing capabilities for caching.
What about S3 ?
In general S3 is not meant for caching of small objects. Also S3 has higher latency.
DynamoDB Write Sharding (Voting Pattern)

DynamoDB Write Types
- Concurrent writes
- Conditional writes
- DynamoDB optionally supports conditional writes for write operations (PutItem, UpdateItem, DeleteItem). A conditional write succeeds only if the item attributes meet one or more expected conditions. Otherwise, it returns an error. For example, you might want a PutItem operation to succeed only if there is not already an item with the same primary key. Or you could prevent an UpdateItem operation from modifying an item if one of its attributes has a certain value. Conditional writes are helpful in cases where multiple users attempt to modify the same item.
- Atomic writes
- Atomic Counters is a numeric attribute that is incremented, unconditionally, without interfering with other write requests. You might use an atomic counter to track the number of visitors to a website
- Batch writes
- Batch operations (read and write) help reduce the number of network round trips from your application to DynamoDB. In addition, DynamoDB performs the individual read or write operations in parallel. Applications benefit from this parallelism without having to manage concurrency or threading.

DynamoDB Large Object Pattern
If we want to write a large data into DynamoDB beyond max size (400 KB) we can write a small metadata to DynamoDB that points to where the large object is in S3 and then pick it up from S3 by using the metadata.
DynamoDB Indexing S3 Objects Metadata
We can use DynamoDB to index S3 bucket object metadata. Then we can expose an API to allow us to search our S3 data efficiently.

DynamoDB Table Cleanup and Copying a DynamoDB Table
Some useful DynamoDB table operatinos to know about for the exam.

DynamoDB Security and Other Features
- Security:
- VPC Endpoints available to access DynamoDB w/o going through public internet (instead use AWS network)
- Access fully controlled by IAMN
- Encryption at rest using KMS
- Encryption in transit using SSL / TLS
- Backup and Restore feature available:
- Point in time restore like RDS
- No performance imapct
- Global Tables:
- Multi region, fully replicated, high performance
- Amazon DMS can be used to migrate to DynamoDb from Mongo OracleDB, MySQL, S3, etc..
API Gateway

- At the most basic level, API Gateway is one way to expose Lambda functions, HTTP backends, or AWS Services to the outside world. There is no infrastucture to manage. But there is much more to API Gateway than that (also we can expose Lambda funcs with ALB)
- Support for WebSocket Protocol
- Handles API versioning
- Handles difference API environments (e.g., dev, test, prod)
- Handle security (Authentication and Authorization)
- Create API keys, handle throttling
- Swagger / Open API spec to define APIs
- Transform and validate requests and responses
- Generate SDK and API specifications
- Cache API responses using build in cache
API Gateway – Integrations High Level
- Lambda functions
- Invoke Lambda func
- Easy way to expose REST API backed by Lambda
- HTTP
- Expose HTTP endpoints in the backend
- Example: internal HTTP API on premise, ALB, etc..
- Why do this with API Gateway? Well we can add rate limiting, caching, user authentications, API keys, etc..
- AWS Service
- Expose any AWS API through API Gateway
- Example: start an AWS Step Function workflow, post a message to SQS
API Gateway – Endpoint Types
- Edge Optimized (default): for global clients
- Requests are routed through the CloudFront Edge locations (improves latency)
- The API Gateway still lives only in one region
- Regional:
- For clients within same region
- Private:
- Can only be accesed from your VPC using an interface VPC endpoint (ENI)
- Can use a resource policy to define access
API Gateway – Deployment Stages
- Making changes in API Gateway does not mean they are effective right away
- You need to “deploy” these changes for them to take effect
- Changes are deployed to “Stages”
- Use any naming you want for stages
- Each stage has it own config params
- Stages can be rolled back to a previous version (stage deployment history is kept)
API Gateway – Stage Variables
- Stage variables are like env vars for API Gateway
- Use them to change often changing config values
- They can be used in:
- Lambda function ARN
- HTTP Endpoint
- Parameter mapping templates
- Use cases:
- Configure HTTP endpoints your stages talk to (dev, test, prod, etc..)
- Pass configuration params to AWS Lambda through mapping templates
API Gateway Stage Variables & Lambda Aliases
- We create a stage variable to indicate the corresponding Lambda alias
- Our API Gateway will automatically invoke the right Lambda function by passing the stage variable (which indicates the environment like DEV) into the Lambda function ARN which will, for instance, call the intended DEV alias lambda function
- So stage point to the alias and the alias points to the intended func
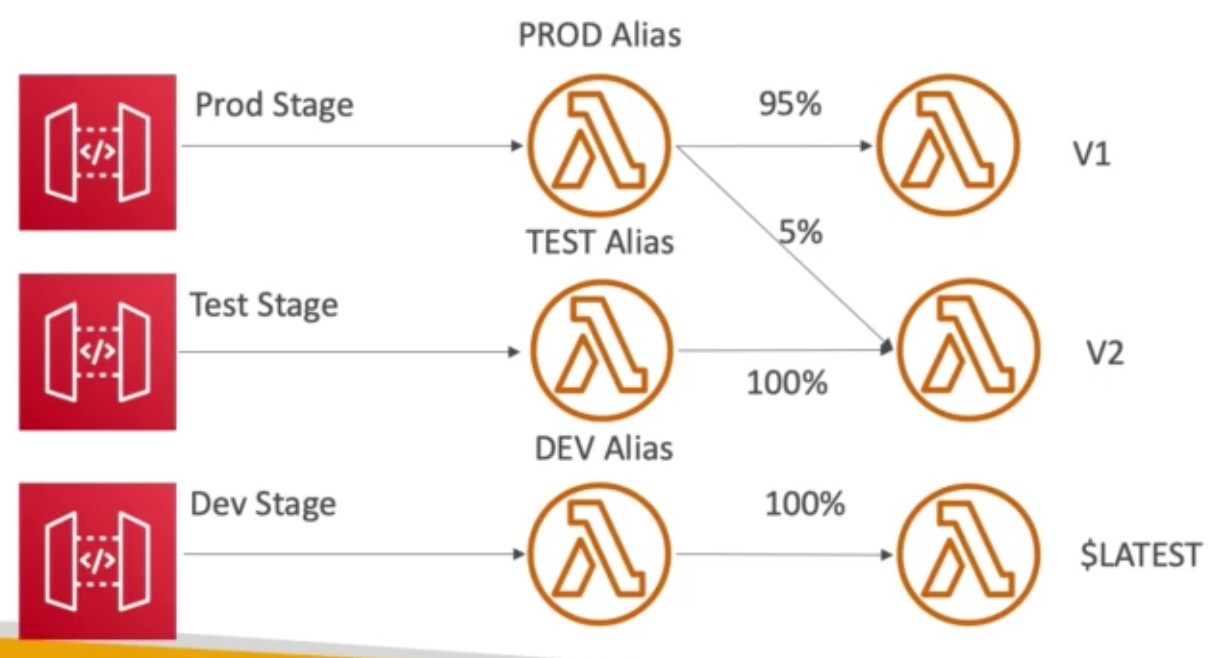
API Gateway – Canary Deployment
- Used to enable canary deployments for any stage (usually prod)
- Choose the percent of traffic the canary channel receives
- Metrics and logs are separate
- Possibility to override stage variable for canary
- This is blue / green deployment with AWS Lambda & API Gateway
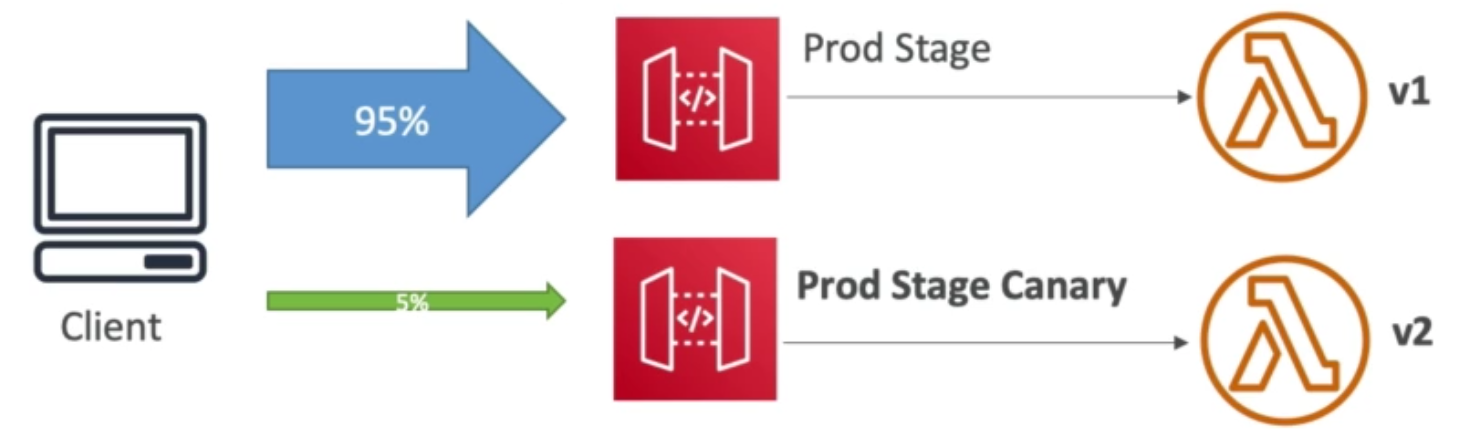
API Gateway – Integration Types
AWS: This type of integration lets an API expose AWS service actions. In AWS integration, you must configure both the integration request and integration response and set up necessary data mappings from the method request to the integration request, and from the integration response to the method response.
AWS_PROXY: This type of integration lets an API method be integrated with the Lambda function invocation action with a flexible, versatile, and streamlined integration setup. This integration relies on direct interactions between the client and the integrated Lambda function.
With this type of integration, also known as the Lambda proxy integration, you do not set the integration request or the integration response. API Gateway passes the incoming request from the client as the input to the backend Lambda function. The integrated Lambda function takes the input of this format and parses the input from all available sources, including request headers, URL path variables, query string parameters, and applicable body. The function returns the result following this output format.
This is the preferred integration type to call a Lambda function through API Gateway and is not applicable to any other AWS service actions, including Lambda actions other than the function-invoking action.

Proxy integration example request and response payloads:

HTTP: This type of integration lets an API expose HTTP endpoints in the backend. With the HTTP integration, also known as the HTTP custom integration, you must configure both the integration request and integration response. You must set up necessary data mappings from the method request to the integration request, and from the integration response to the method response.
HTTP_PROXY: The HTTP proxy integration allows a client to access the backend HTTP endpoints with a streamlined integration setup on single API method. You do not set the integration request or the integration response. API Gateway passes the incoming request from the client to the HTTP endpoint and passes the outgoing response from the HTTP endpoint to the client.
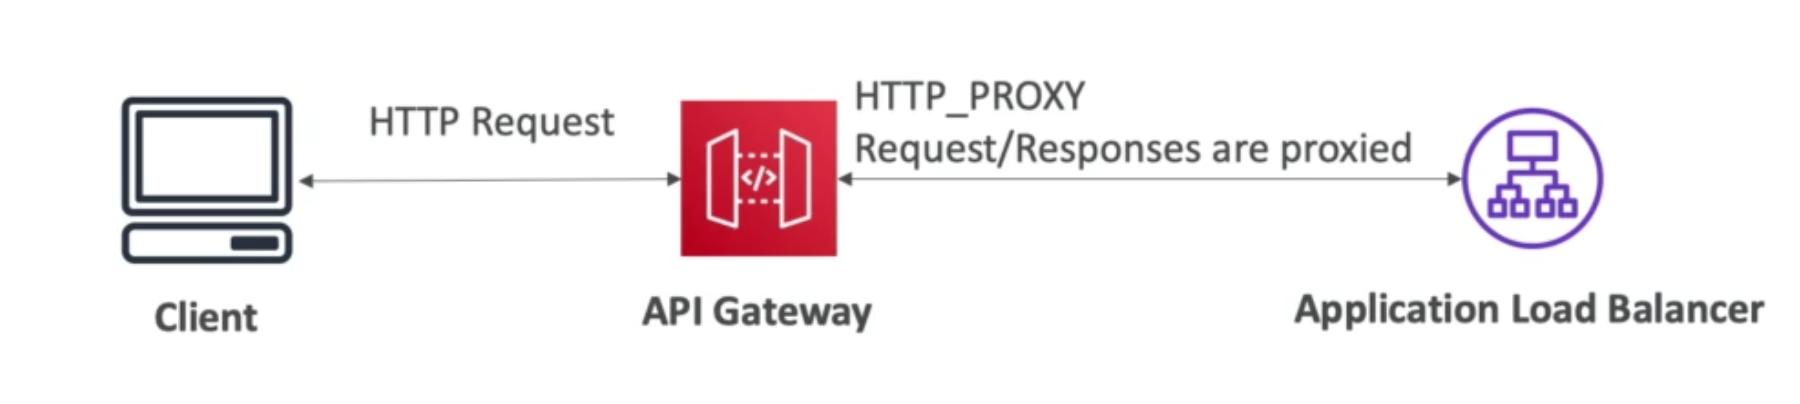
MOCK: This type of integration lets API Gateway return a response without sending the request further to the backend. This is useful for API testing because it can be used to test the integration set up without incurring charges for using the backend and to enable collaborative development of an API.
In collaborative development, a team can isolate their development effort by setting up simulations of API components owned by other teams by using the MOCK integrations. It is also used to return CORS-related headers to ensure that the API method permits CORS access. In fact, the API Gateway console integrates the OPTIONS method to support CORS with a mock integration.
Mapping Templates
- Are used to modify request / response in non proxy integration modes
- Can be used to rename / modify query string params, body content, add headers, and more..
- Uses Velocity Template Language (VTL) begin the scenes
- Can also be used to filter / clean results
Example (transform JSON to XML for legacy backend):
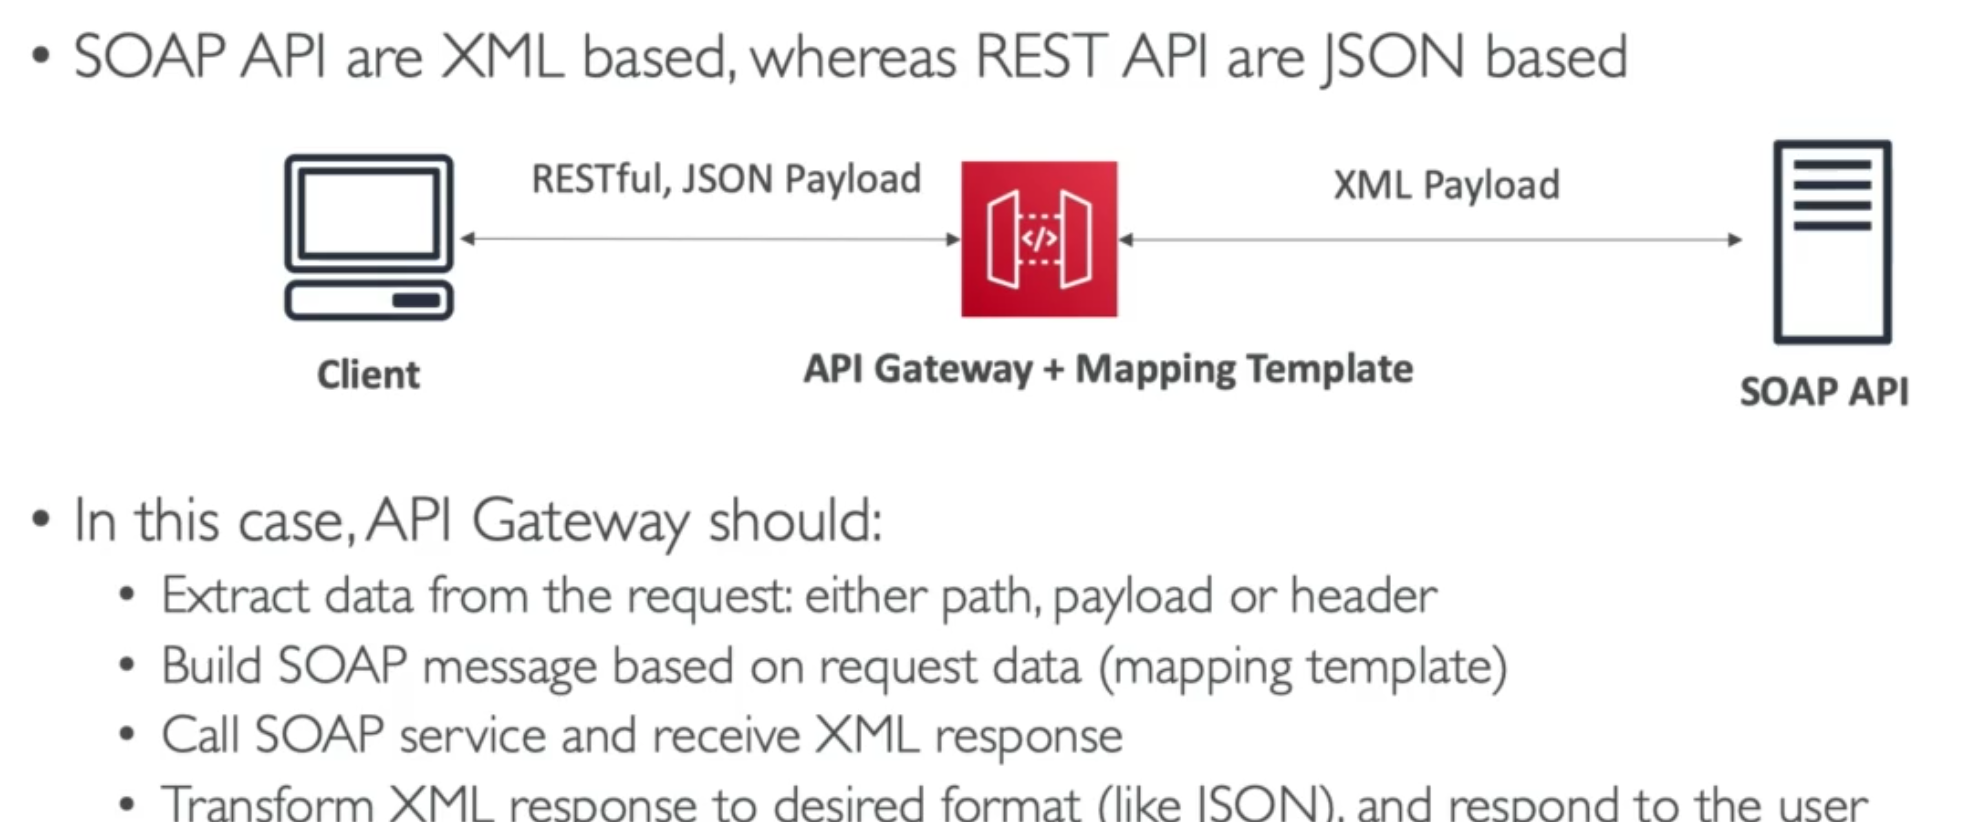
Example (rename request query string params):
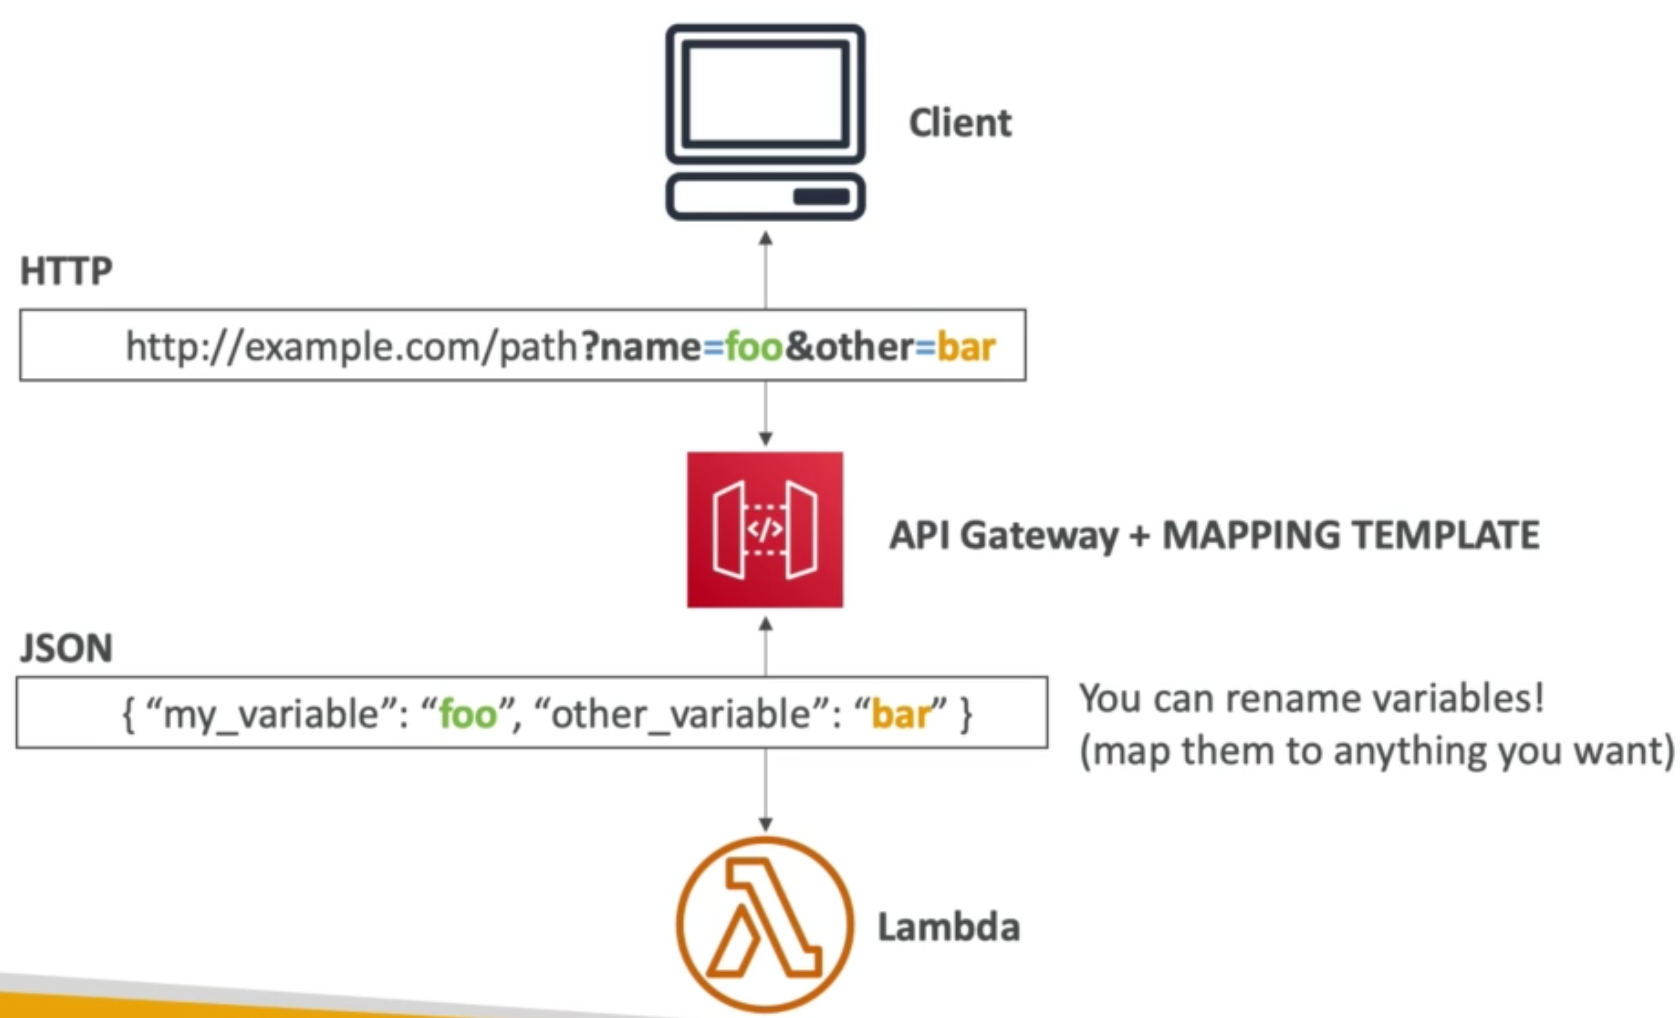
Caching API responses
- Default TTL is 300 seconds (min is 0 sec max is 3600 sec)
- Caches are defined per stage
- Possible to override cache settings per method
- Cache encryption is possible
- Cache capacity is between .5 GB to 237 GB
- Expensive
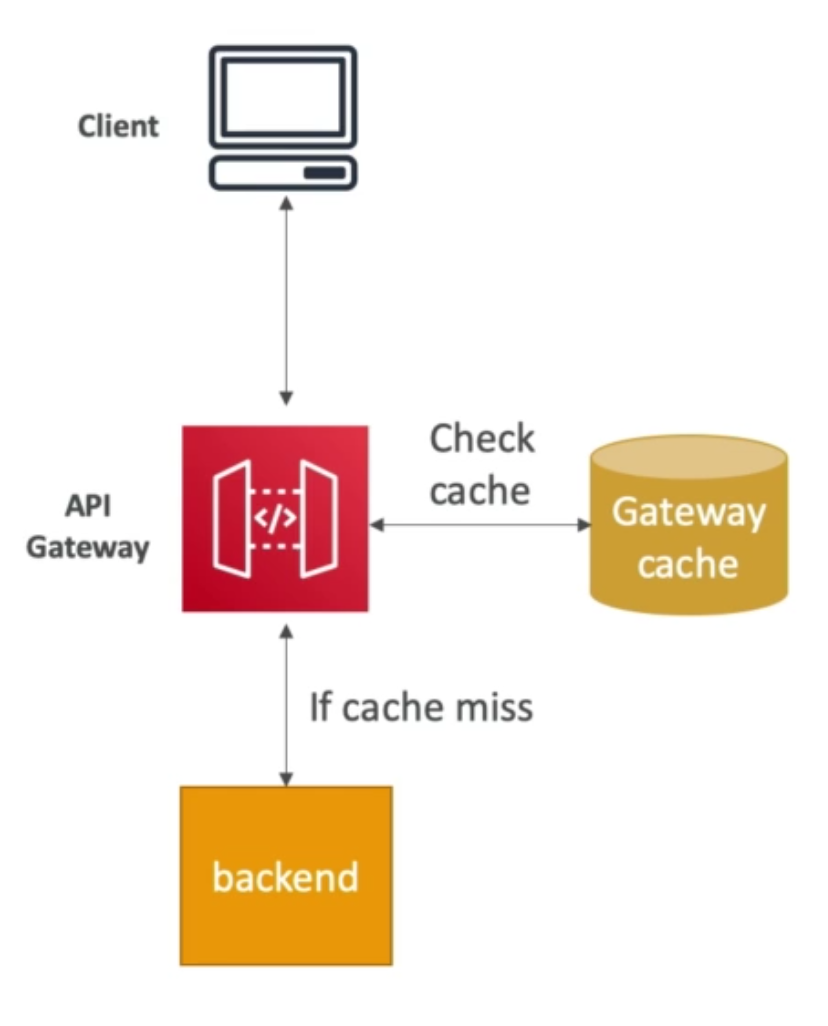
Cache Invalidation
- Clients can invalidate the cache with header
CacheControl: max-age=0(with proper IAM permissions) - If you don’t impose
InvalidateCachepolicy or choose require authorization check box in console any client can invalidate the API cache
API Gateway – Usage Plans & API Keys
- If you want to make an API available as an offering ($) to your customers
- Usage Plan:
- who can aces one or more deployed API stages and methods
- how much and how fast they can access
- uses API keys to identify clients and meter access
- ability to configure throttling limits and quota for individual clients
- API Keys:
- alphanumeric string values to distribute to your customers
- can use with usage plans to control access
- throttling limits are applied to the API keys
- quota limits is the overall number of maximum requests
To configure a usage plan:
- Create one or more APIs, configure the methods to require an API key and deploy the APIs to stages
- Generate or import the API keys to distribute to application developers (your customers) who will be using your API
- Create the usage plan with the desired throttles and quota limits
- Associate the API stages and API keys with the usage plan
Callers of the API must supply their assigned API key in the x-api-key header in the request to the API.
API Gateway – Logging & Tracing
- CloudWatch Logs:
- Enable CloudWatch logging at the Stage level (with Log Level)
- Can override settings on a per API basis (e.g., ERROR, DEBUG, INFO)
- Log contains information about request / response body
- X-Ray:
- Enable tracing to get extra information about requests in API Gateway
- X-Ray API Gateway + Lambda gives you the full picture
API Gateway – CloudWatch Metrics
- Metrics are by stage, possibility to enable detailed metrics
- CacheHitCount and CacheMissCount metrics: efficiency of the cache
- Count: the total number of API requests in a given period
- IntegrationLatency: the time between when API Gateway relays a request to the backend and when it receives a response from the backend
- Latency: the time between when API Gateway receives a request from a client and when it returns a response to the client. Thus, the latency includes the integration latency and other API Gateway overhead.
- 4XXError (client side) and 5XXError (server-side)
Gateway Throttling
- Account Limit
- API Gateway throttles requests at 10k requests per second across all APIs in current account
- Above limit can be increased
- In case of throttling => 429 Too Many Requests (retriable error)
- Can set limits per API Stage and Method to improve performance
- Or you can define Usage Plans to throttle per customer
Just like Lambda concurrency, one API that is overloaded, if not limited, will cause the other APIs in the same account to be throttled.
API Gateway – Errors

API Gateway - Cross-Origin Resource Sharing (CORS)
Cross-Origin Resource Sharing (CORS) is an HTTP-header based mechanism that allows a server to indicate any other origins (domain, scheme, or port) than its own from which a browser should permit loading of resources. CORS also relies on a mechanism by which browsers make a “preflight” request to the server hosting the cross-origin resource, in order to check that the server will permit the actual request. In that preflight, the browser sends headers that indicate the HTTP method and headers that will be used in the actual request (source).
- CORS must be enabled when you receive API calls from another domain
- The OPTIONS pre-flight request must contain the following headers:
- Access-Control-Allow-Methods
- Access-Control-Allow-Headers
- Access-Control-Allow-Origin
- CORS can be enabled through the console

API Gateway Authentication and Authorization
Authentication: the process of identifying users and validating who they claim to be Authorization: who has access to what
API Gateway Security – IAM Permissions
- Create an IAM policy authorization and attach to user / role
- Authentication = IAM
- Authorization = IAM Policy
- Good to provide access within AWS (EC2, Lambda, IAM users..)
- Leverages “Sig v4” capability where IAM credential are in headers
API Gateway Security – Resource Policies
- Resource policies (similar to Lambda Resource Policy)
- Allow for Cross Account Access (combined with IAM Security)
- Allow for a specific source IP address
- Allow for a VPC Endpoint

API Gateway Security – Cognito User Pools
- Cognito fully manages user lifecycle, token expires automatically
- API Gateway verifies identity automatically from AWS Cognito
- No custom implementation required
- Authentication = Cognito User Pools
- Authorization = API Gateway Methods

API Gateway Security – Lambda Authorizer (formerly Custom Authorizers)
- Token based authorizer (bearer token) – e.g., JWT (JSON Web Token) or OAuth
- A request parameter-based Lambda authorizer (headers, query string, stage var)
- Lambda must return an IAM policy for the user, result policy is cached
- Authentication = External
- Authorization = Lambda function
API Gateway Security – Summary
- IAM:
- Great for users / roles already within your AWS account (plus resource policy for cross account)
- Handle authentication + authorization
- Leverages Signature v4
- Custom Authorizer:
- Great for 3rd party tokens
- Very flexible in terms of what IAM policy is returned
- Handle authentication verification + authorization in the Lambda function
- Pay per Lambda invocation, results are cached
- Cognito User Pool:
- You manage your own user pool (can be backed by FB, Google logic, etc..)
- No need to write any custom code
API Gateway Concepts – Summary
API Gateway
API Gateway is an AWS service that supports the following:
- Creating, deploying, and managing a RESTful application programming interface (API) to expose backend HTTP endpoints, AWS Lambda functions, or other AWS services.
- Creating, deploying, and managing a WebSocket API to expose AWS Lambda functions or other AWS services.
- Invoking exposed API methods through the frontend HTTP and WebSocket endpoints.
API Gateway REST API
A collection of HTTP resources and methods that are integrated with backend HTTP endpoints, Lambda functions, or other AWS services. You can deploy this collection in one or more stages. Typically, API resources are organized in a resource tree according to the application logic. Each API resource can expose one or more API methods that have unique HTTP verbs supported by API Gateway.
API Gateway HTTP API
A collection of routes and methods that are integrated with backend HTTP endpoints or Lambda functions. You can deploy this collection in one or more stages. Each route can expose one or more API methods that have unique HTTP verbs supported by API Gateway.
API Gateway WebSocket API
A collection of WebSocket routes and route keys that are integrated with backend HTTP endpoints, Lambda functions, or other AWS services. You can deploy this collection in one or more stages. API methods are invoked through frontend WebSocket connections that you can associate with a registered custom domain name.
API deployment
A point-in-time snapshot of your API Gateway API. To be available for clients to use, the deployment must be associated with one or more API stages.
API endpoint
A hostname for an API in API Gateway that is deployed to a specific Region. The hostname is of the form {api-id}.execute-api.{region}.amazonaws.com. The following types of API endpoints are supported:
- Edge-optimized API endpoint
- Private API endpoint
- Regional API endpoint
API key
An alphanumeric string that API Gateway uses to identify an app developer who uses your REST or WebSocket API. API Gateway can generate API keys on your behalf, or you can import them from a CSV file. You can use API keys together with Lambda authorizers or usage plans to control access to your APIs.
API stage
A logical reference to a lifecycle state of your API (for example, ‘dev’, ‘prod’, ‘beta’, ‘v2’). API stages are identified by API ID and stage name.
App developer
An app creator who may or may not have an AWS account and interacts with the API that you, the API developer, have deployed. App developers are your customers. An app developer is typically identified by an API key.
Callback URL
When a new client is connected to through a WebSocket connection, you can call an integration in API Gateway to store the client’s callback URL. You can then use that callback URL to send messages to the client from the backend system.
Developer portal
An application that allows your customers to register, discover, and subscribe to your API products (API Gateway usage plans), manage their API keys, and view their usage metrics for your APIs.
Edge-optimized API endpoint
The default hostname of an API Gateway API that is deployed to the specified Region while using a CloudFront distribution to facilitate client access typically from across AWS Regions. API requests are routed to the nearest CloudFront Point of Presence (POP), which typically improves connection time for geographically diverse clients.
Integration request
The internal interface of a WebSocket API route or REST API method in API Gateway, in which you map the body of a route request or the parameters and body of a method request to the formats required by the backend.
Integration response
The internal interface of a WebSocket API route or REST API method in API Gateway, in which you map the status codes, headers, and payload that are received from the backend to the response format that is returned to a client app.
Mapping template
A script in Velocity Template Language (VTL) that transforms a request body from the frontend data format to the backend data format, or that transforms a response body from the backend data format to the frontend data format. Mapping templates can be specified in the integration request or in the integration response. They can reference data made available at runtime as context and stage variables.
The mapping can be as simple as an identity transform that passes the headers or body through the integration as-is from the client to the backend for a request. The same is true for a response, in which the payload is passed from the backend to the client.
Method request
The public interface of an API method in API Gateway that defines the parameters and body that an app developer must send in requests to access the backend through the API.
Method response
The public interface of a REST API that defines the status codes, headers, and body models that an app developer should expect in responses from the API.
Mock integration
In a mock integration, API responses are generated from API Gateway directly, without the need for an integration backend. As an API developer, you decide how API Gateway responds to a mock integration request. For this, you configure the method’s integration request and integration response to associate a response with a given status code.
Model
A data schema specifying the data structure of a request or response payload. A model is required for generating a strongly typed SDK of an API. It is also used to validate payloads. A model is convenient for generating a sample mapping template to initiate creation of a production mapping template. Although useful, a model is not required for creating a mapping template.
Private API
See Private API endpoint.
Private API endpoint
An API endpoint that is exposed through interface VPC endpoints and allows a client to securely access private API resources inside a VPC. Private APIs are isolated from the public internet, and they can only be accessed using VPC endpoints for API Gateway that have been granted access.
Private integration
An API Gateway integration type for a client to access resources inside a customer’s VPC through a private REST API endpoint without exposing the resources to the public internet.
Proxy integration
A simplified API Gateway integration configuration. You can set up a proxy integration as an HTTP proxy integration or a Lambda proxy integration.
For HTTP proxy integration, API Gateway passes the entire request and response between the frontend and an HTTP backend. For Lambda proxy integration, API Gateway sends the entire request as input to a backend Lambda function. API Gateway then transforms the Lambda function output to a frontend HTTP response.
In REST APIs, proxy integration is most commonly used with a proxy resource, which is represented by a greedy path variable (for example, {proxy+}) combined with a catch-all ANY method.
Regional API endpoint
The host name of an API that is deployed to the specified Region and intended to serve clients, such as EC2 instances, in the same AWS Region. API requests are targeted directly to the Region-specific API Gateway API without going through any CloudFront distribution. For in-Region requests, a Regional endpoint bypasses the unnecessary round trip to a CloudFront distribution.
In addition, you can apply latency-based routing on Regional endpoints to deploy an API to multiple Regions using the same Regional API endpoint configuration, set the same custom domain name for each deployed API, and configure latency-based DNS records in Route 53 to route client requests to the Region that has the lowest latency.
See API endpoints.
Route
A WebSocket route in API Gateway is used to direct incoming messages to a specific integration, such as an AWS Lambda function, based on the content of the message. When you define your WebSocket API, you specify a route key and an integration backend. The route key is an attribute in the message body. When the route key is matched in an incoming message, the integration backend is invoked.
A default route can also be set for non-matching route keys or to specify a proxy model that passes the message through as-is to backend components that perform the routing and process the request.
Route request
The public interface of a WebSocket API method in API Gateway that defines the body that an app developer must send in the requests to access the backend through the API.
Route response
The public interface of a WebSocket API that defines the status codes, headers, and body models that an app developer should expect from API Gateway.
Usage plan
A usage plan provides selected API clients with access to one or more deployed REST or WebSocket APIs. You can use a usage plan to configure throttling and quota limits, which are enforced on individual client API keys.
WebSocket connection
API Gateway maintains a persistent connection between clients and API Gateway itself. There is no persistent connection between API Gateway and backend integrations such as Lambda functions. Backend services are invoked as needed, based on the content of messages received from clients.
HTTP API vs REST API from exam perspective: HTTP API is a low cost alternative, only supports proxy integrations, there is no such thing as usage plan and API key.
AWS Serverless Application Model (SAM)
AWS SAM
- Framework for developing and deploying serverless applications
- All the configuration is YAML code
- Ultimately, the simple YAML based configuration is reduced to a complex CloudFormation template outlining our infrastructure
- Because the YAML configuration boils down to a CloudFormation template, it supports anything from CloudFormation. So: Outputs, Mappings, Parameters, Resources, etc…
- Only two commands to deploy to AWS
- SAM can use CodeDeploy to deploy Lambda functions
- SAM can help you to run Lambda, API Gateway, DynamoDB locally
AWS SAM – Recipe
- Transform Header indicates it’s a SAM template:
- Transform:
AWS::Serverless-2016-10-31
- Transform:
- Write Code:
AWS::Serverless::Function(Lambda)AWS::Serverless::Api(API Gateway)AWS::Serverless::SimpleTable(DynamoDB)
- Package & Deploy:
aws cloudformation package/sam packageaws cloudformation deploy/sam deploy
Cognito: Cognito User Pools, Cognito Identity Pools & Cognito Sync
- We want to give our users an identity so that they can interact with our application
- Cognito User Pools:
- Sign in functionality for app users
- Integrate with API Gateway & Application Load Balancer
- Cognito Identity Pools (Federated Identity):
- Provide AWS credentials to users so they can access AWS resources directly
- Integrate with Cognito User Pools as an identity provider
- Cognito Sync:
- Sync data from device to Cognito
- Is deprecated and replaced by AppSync
- Cognito vs IAM: when you hear “hundreds of users”, “mobile users”, “authenticate with SAML” think Cognito. IAM is for all of the users you trust in your AWS environment but for all other users that log in / register with your application use Cognito.
Cognito User Pools (CUP) – User Features
- Create a serverless database of users for your web & mobile apps
- Simple login: username (or email) & password
- Password reset is possible
- Email & Phone number verification capability
- MFA capability
- Federated Identities: users from Facebook, Google, SAML
- There is a feature to block users if their credentials are compromised elsewhere
- After login is successful we get back a JSON Web Token (JWT)
- CUP integrates with API Gateway and Application Load Balancer

CUP Lambda Triggers
CUP can invoke a Lambda function synchronously on these triggers:
